Drawing Challenge
If you want to draw a line from the CENTER of a circle to the middle of a vertical line, AutoCAD has a feature that makes this very easy. The feature is called Object Snaps (or Osnaps pronounced "Oh-Snaps").

Image from onikage108.deviantart.com ©2011-2015 katarnlunney
There are a few ways to enable OSNAPS. First you can type OS and press <RETURN>. You will see a dialog box:
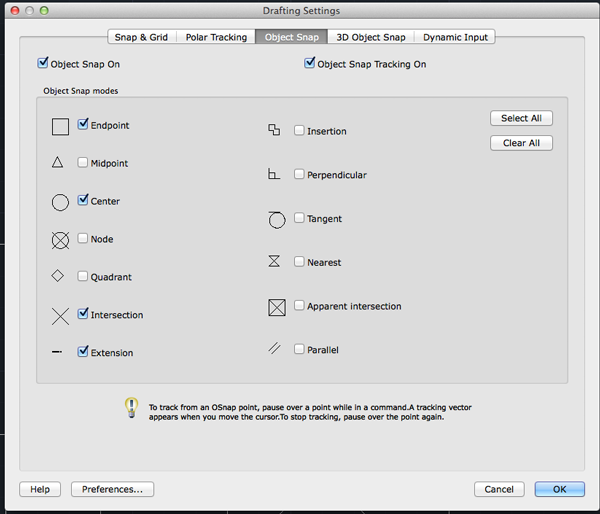
You may select whichever points you want to 'snap' on an object.
Another way is to enable OSNAPS is using the status bar. CTRL+click on the Object Snap icon and then select the OSNAP/OSNAPS you want to enable.
 .
.
OSNAPS are on when the icon is enabled:
 .
.
Another way is to press F3 for 2D OSNAPS and F4 for Object Snap Tracking . Object Snap Tracking works with OSNAP and POLAR to help align new points with existing locations in your drawing. You can also select the OSNAP using the command line.
Here is a list of your options. To enable the OSNAP, start with the command and then type your OSNAP option to invoke the needed OSNAP.
- Endpoint - snaps to either the beginning or the end of an object such as a line -END
- Type L and press <RETURN>.
- Type END and press <RETURN>.
- You will see the prompt of.
- Click the endpoint of the object.
- Midpoint—snaps to the exact middle of a line or an arc—MID
- Center—snaps to the center-point of a circle or arc—CEN
- Node—snaps to 'nodes'—NOD
- Quadrant—snaps to any of the four quadrants of a circle—QUA
- Intersection—snaps to the point where two object cross—INT
- Extension - Snaps to the phantom extension of an arc or line—EXT
- Insertion - snaps to the insertion point of an object (such as a block or text)—INS
- Perpendicular—will snap so that the result is perpendicular to line selected—PER
- Tangent—snaps to create a line tangent to a circle or arc—TAN
- Nearest—will find the closest point an object and snap to that point—NEA
- Parallel -Snaps parallel to a specified line—PAR
- M2P—This isn't technically an 'Object Snap' as you are not snapping to specific point on an object, but it allows you to select 2 points and it will calculate the midpoint between those 2 points. This is a very handy option to have.
OSNAP Drawing
- Open the drawing that you created in the first training.
- Make sure that your OSNAPS are disabled.
- You are going to add a circle. Type C and press <RETURN>.
At the prompt type 3.75,6 to set the center of the circle.
At the next prompt type d to specify that you want to enter the diameter (your other option is r for radius).
Type 1.5 for the length of the diameter. - You are going to use the command line to specify the OSNAPS. The first square will be referred to as sq1. The second will be called sq2. In order to follow the instructions assume that the left edge is segment 1, the top segment 2, the right segment 3 and the bottom segment 4.

- Call the command for LINE and press <RETURN>.
Type END and press <RETURN>,
When you see of in the prompt click on the top of segment 1 of sq2.
Type MID and and press <RETURN>.
When you see of in the prompt click on the middle of segment 3 of sq1.
You should have this:
- If you ended the line call the command for LINE and press <RETURN>.
Type MID press <RETURN>.
Click on the middle of segment 3 of sq1. (otherwise, just continue drawing)
Type CEN and press <RETURN>.
When you see of in the prompt click on the center of the circle.
You should have this:
-
Type QUA and press <RETURN>.
When you see of move your cursor to the right of the circle.
You should have this:
-
Type INT and press <RETURN>.
When you see of select segment 2 and 3 of sq2.
You should have this:
-
Type EXT and press <RETURN>.
When you see of drag your cursor over segment 1 of sq2 until you see a dotted green line.
Extend the line up so that you have something similar to this:
-
Type PER and press <RETURN>.
When you see to select the line to the right.
You should have something similar to this:
-
Type TAN and press <RETURN>.
When you see of select the circle.
You should have something similar to this:
- Type NEA and press <RETURN>.
When you see to select the center of the circle.
You should have something similar to this:
- Type M2P and press <RETURN>.
When you see first point of mid type END and press <RETURN>.
When you see of click on the left end point of segment 2 of sq1.
When you see of Second point of mid type END and press <RETURN>.
When you see of click on the right end point of segment 2 of sq1.
You should have something similar to this:
- Save your work.
Source:
Cross, Nigel. Engineering Design Methods. Chichester: Wiley, 1989.
Omura, George; Graham, Richard (Rick) (2010-11-09). Mastering AutoCAD for Mac (Kindle Location 18101). Wiley. Kindle Edition.
Shih, Randy H. AutoCAD 2014 Tutorial Second Level: 3D Modeling. Mission, KS: SDC Publications, 2013. Print.
Shumaker, Terence M., and David A. Madsen. AutoCad and Its Applications: Basics. Tinley Park, IL: Goodheart-Willcox, 2004. Print.
Watson, David. "Learn AutoCAD with Our Free Tutorials." AutoCAD Tutorials, Articles & Forums. N.p., n.d. Web. 05 Jan. 2015.