Setting up wifi
- Open terminal and ssh into your pi or connect your pi to a monitor and keyboard.
- Open the /etc/network/interfaces file
sudo nano /etc/network/interfaces
- Change the file to the following::
 auto lo

iface lo inet loopback
iface eth0 inet dhcp

allow-hotplug wlan0
iface wlan0 inet manual
wpa-roam /etc/wpa_supplicant/wpa_supplicant.conf

iface school inet static
address <school address>
gateway <school gateway>
netmask <school netmask>

iface home inet static
address <home address>
gateway <home gateway>
netmask <home netmask>
- CTRL+X,Y,RETURN
- Open the wpa_supplicant.conffile
sudo nano /etc/wpa_supplicant/wpa_supplicant.conf
- Add the following:
    ctrl_interface=DIR=/var/run/wpa_supplicant GROUP=netdev
update_config=1
network={
    ssid="SCHOOLS NETWORK NAME"
    psk="SCHOOLS PASSWORD"
    proto=WPA
    key_mgmt=WPA-PSK
    pairwise=TKIP
    auth_alg=OPEN
    id_str="school"
}

network={
    ssid="HOME NETWORK NAME"
    psk="HOME PASSWORD"
    proto=WPA
    key_mgmt=WPA-PSK
    pairwise=TKIP
    auth_alg=OPEN
    id_str="home"
}
- CTRL+X,Y+RETURN
- Avahi comes installed on the Raspberry Pi. But update before you do anything:
-
"Zeroconf is 'a set of techniques that automatically creates a usable Internet Protocol (IP) network without manual operator intervention or special configuration servers.'
Avahi is an implementation of zeroconf which 'ships with most Linux and *BSD distributions', but not the Pi's Debian distro. Zeroconf will be familiar to Apple users as Bonjour, and is pretty clever tech which means that things Just Work when sharing stuff across computers on a network. In this context, it means that once [you've] set it up on the Pi, [you'll] be able to address it as:
raspberrypi.local
regardless of what IP address it's been assigned on your local network. This is handy if its IP is likely to change regularly, and even means we'll continue to be able to address it if we're on a different network (say, shuffling between home & work networks)."
Install avahi with the following commands on the Pi:
sudo apt-get install avahi-daemon
- Type:
sudo insserv avahi-daemon
-
Create a config file for Avahi at /etc/avahi/services/multiple.service. I did this with the following command:
sudo nano /etc/avahi/services/multiple.service
-
The contents of this file should be something like the following, courtesy of aXon on the Rasperry Pi forums:
<?xml version="1.0" standalone='no'?>
<!DOCTYPE service-group SYSTEM "avahi-service.dtd">
<service-group>
        <name replace-wildcards="yes">%h</name>
        <service>
                <type>_device-info._tcp</type>
                <port>0</port>
                <txt-record>model=RackMac</txt-record>
        </service>
        <service>
                <type>_ssh._tcp</type>
                <port>22</port>
        </service>
</service-group>
- CTRL+X, Y, RETURN
- Restart Avahi to apply the new configuration
sudo /etc/init.d/avahi-daemon restart
-
The Pi should now be addressable from other machines as raspberrypi.local, for example:
ssh pi@raspberrypi.local
- Create a config file for Avahi
You need to open the config file
sudo nano /etc/avahi/avahi-daemon.conf
- Navigate to where you see [server]. Uncomment #host-name=foo and set the host-name to something that makes sense
- Press CTRL+X, Y and RETURN
- Shutdown
- Install Wireless module and restart.
- I'm using IP Scanner to find my pi. If all went well I should find li pi, an IP and a mac address.
- You should be able to now log in like this:
- If you try to log in and see:
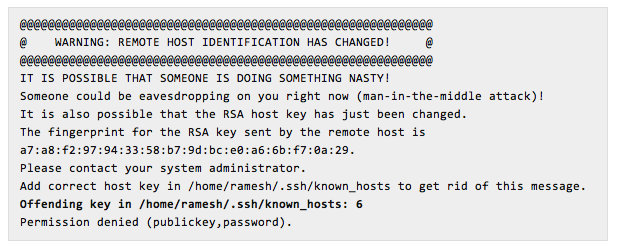 Do this:
# perl -pi -e 's/\Q$_// if ($. == 6);' ~/.ssh/known_hosts
Change the number to the line number shown in the message
Transfering Files
You can use SFTP to transfer content to the Pi.
Download
FileZilla onto your computer as your SFTP client.
- Open the application
- Click File > Site Manager
- In the General tab fill out the relevant connection details:
- Host:ip of your pi
- Protocol: select SFTP-SSH File Transfer Protocol
- Logon Type: set to normal
- User: specify the user (pi)
- Password: Specify the current password for the chosen account
- Click connect
- Navigate to /var/www
- Drag and drop any ontent into the target pi directory in FileZilla
- Click Disconnect on the toolbar to end the session
Setting up phpMyAdmin
phpMyAdmin is an open source PHP web application that provides you with a graphical front end interface
to MySQL. This is a browser-based tool, but there is still a bit of installation.
- In terminal type:
sudo apt-get install phpmyadmin
- In the configuring screen press Spacebar to place the selection asterisk next to apache2. Then press Tab and Enter
- When the next screen appears, select Yes to install the database.
- Type in the MySQL root user password and press Enter to continue. Then confirm the phpMyAdmin admin password
- Now you need to open the Apache 2 configuration file and link Apache to phpMyAdmin:
sudo nano /etc/apache2/apache2.conf
- In the conf file press CTRL+V repeatedly to scroll to the bottom of the file. At the bottom of the file add this line:
Include /etc/phpmyadmin/apache.conf
- Save changes and exit nano
- Restart apache by typing:
sudo /etc/init.d/apache2 restart
- To test , start LXDE, open Midori and navigate to http://localhost/phpmyadmin
- Log in with the username root and your MySQL admin password.
Joomla
Joomla is a content management system.
- From the LXDE open Midori and download the latest version of Joomla.
- Open Terminal and unpack the contents of Jooma to the apache content directory.
cd into the content directory and then type Replace Joomla.zip, with the downloaded Joomla name
sudo unzip joomla.zip -d /var
- Open the php configuration file:
sudo nano /etc/php5/apache2/php.ini
- In nano press CTRL+W to search for output_buffering
- Set the Development Value and Production Value to 0
- Press CRTL+O, Enter and then CTRL+X to save and exit
- Reboot the pi
- After reboot, open the LXDE and open another terminal seesion so that you can creare the Joomla configuration file and ensure that
it is writable:
cd /var/www
sudo touch configuration.php
sudo chmod 777 configuration.php
- Open Midori and navigate to the apache content page:
- If you see the default apache page instead of the Joomla page, then delete the old index page:
- If you cannot delete the installation page, in terminal:
cd /var/www
sudo rm -rf installation/
On the Internet
By putting your pi on the internet you can take advantage of services like Dropbox and Pandora, you can communicate with other users and you can use internet-dependent applications.
If you are going to do this, you must consider viruses and exposing private data.
Some precautions you can take involve configuring the pi with a static ip and using a DNS service.
Using No-ip
- Navigate to www.no-ip.com and create a free account
- Navigate to manage hosts and set up your ip.
- Create a subdirectory inside your home directory so that you have a place to store the No-IP client software
- Download No-IP's dynamic update client from www.no-ip.com
wget http://www.no-ip.com/client/linux/noip-duc-linux.tar.gz
- Unpack and navigate to the directory:
ar vzxf noip-duc-linux.tar.gz
ls no*
cd noip-2.1.9.1
- You now have uncompiled source files that you will need to compile
sudo make
sudo make install
- Enter your no-ip membership credentials
- Run the client:
sudo /usr/local/bin/noip2
- Log into your router and set up port forwarding to allow traffic on TCP port 80 (HTTP)
- Open a web browser on another computer and load your Joomla site. Follow this tutorial
to get the client to run automatically at startup.
A web Cam
Your Pi has a Camera Serial Interface 2 camera connector, which you can find between the Ethernet and HDMI port.
Never plug or unplug hardware from the pi while it is running, but you will need to enable the use of the camera before you can use it.
- While connected to your computer update the software
sudo apt-get update && sudo apt get upgrade
- Now you want to navigate to the raspi-config menu:
- Scroll down to camera and press ENTER
- Choose Enable suport for the Raspberry Pi and press ENTER
- Exit the config menu and reboot your pi
- Now shutdown your pi
- WARNING: The interface is very delicate
Make sure that your Pi is not powered
- Gently grasp the edges of the CSI-2 connector and carefully lift it off (it will remain attached, just lift it about a millimeter).
- Insert the camera board ribbon cable into the interface with the copper traces facing away from the Ethernet port
- When the cable is connected to the interface, gentlt press the retaining clip down to lock the cable in place.
- To tell your Pi to take a picture:
raspistill -o myImage.jpg -q 50 -t 10000
raspistill -v -w 1024 -h 768 -o myImage.jpg -q 50 -t 10000
-w is the width and -h is the height of the image.
- To see more raspistill commands type:
- To record a 5 second video:
raspivid -o fiveseconds.h264 -t 5000
-
raspivid -o smallvid.h264 -t 15000 -w 1024 -h 768
- To atually see your raw video you have to wrap the stream in an MPEG layer 4 container. To do this, download and install MP4BOX:
sudo apt-get install -y gpac
- Then:
MP4Box -fps 30 -add smallvid.h264 smallvid.mp4
- To view the movie:
For more video info see elinux.org/Rpi_Camera_Module#RaspiVid
Setting Up a Time-Lapse Webcam
- Install fswebcam
sudo apt-get install fswebcam
fswebcam -r 1024 x 768 -d /dev/video0 imagename.jpg
- Create a configuration file for fswebcam to save your defaults
cd ...
sudo nano .fswebcam.conf
- Add these lines and customize:
device /dev/video0
    input 0
    loop 15
    skip 20
    background
    resolution 320x240
    set brightness=60%
    set contrast=13%
    top-banner
    title "webcam"
    timestamp "%d-%m-%Y %H:%M;%S (%Z)"
    jpeg 95
    save /home/pi/webcam/viewcam.jpg
    palette MJPEG
-
To start the fswebcam using the config file
fswebcam -c ~/.fswebcam.conf
- To stop the process:
- To create a repeating operating system level job that snaps a picture every minute:
- Enter the following:
#!/bin/sh
filename=$(date +"%m-%d-%y||%H%M%S")
fswebcam -r 356x292 -d /dev/video0 $filename.jpg
    cp $filename.jpg /home/pi/webcam
- Make your shell script executable
sudo chmod +x camscript.sh
- Start the crontab editor for the pi user:
- When the file opens, move the curso r to the bottom. By entering ths line the pi will run the camscript.sh script every minute:
*/1 * * * * /home/pi/campscript.sh
