Introduction
What is Raspberry Pi?
According to Matt Richardson in Getting Started with the Raspberry Pi, "One of the great things about the Raspberry Pi is that there’s no single way to use it. Whether you just want to watch videos and surf the web, or you want to hack, learn, and make with the board, the Raspberry Pi is a flexible platform for fun, utility, and experimentation. "
Raspberry Pi was created as an educational tool. It comes preloaded with interpreters and compilers for many different programming languages. For the beginner, there’s Scratch, a graphical programming language from MIT. You can also use Python C, Ruby, Java, and Perl.
Raspberry Pi uses a Linux operating system called Raspbian.
Make sure you don't put your Raspberry Pi on a conductive surface. Flip over the board and look at the bottom; there are a lot of components there and a lot of solder joints that can be easily shorted.
Take 10 minutes to put the box together the plexiglass box. Build the box around the Raspberry Pi.
- Download the latest version from here:Adafruit
and decompress it. Note that it is 2.6 GB.
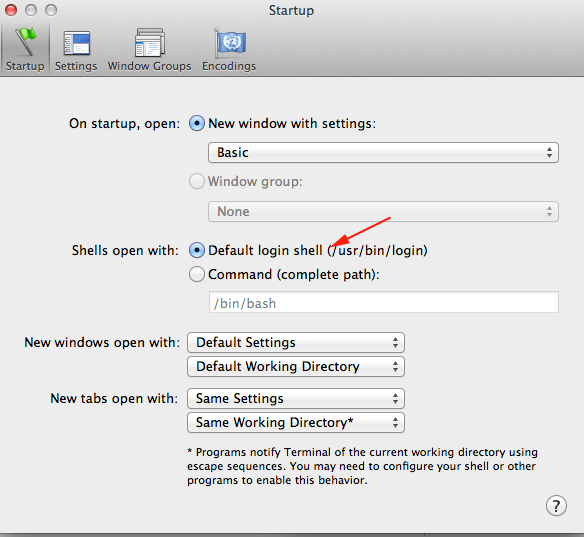
- Open Terminal. Make sure you have a tcsh shell. If not modify your preferences.
-
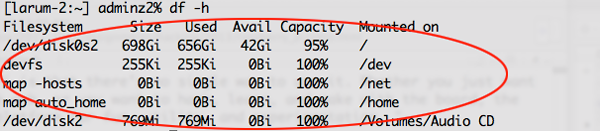
Without the card in your computer's SD card reader, type df -h. The df program shows your free space, but it also shows which disk volumes are mounted.
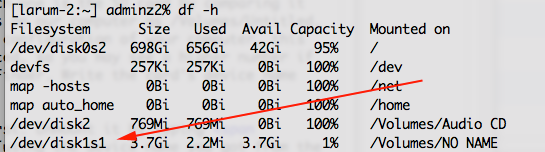
- Insert the SD card and run df -h again (You can press the Up arrow or type the command again).
-
Look at the list of mounted volumes and determine which one is the SD card by comparing it to the previous output. For example, an SD card mounts on our computer as /Volumes/Untitled, and the device name is /dev/disk1s1. Depending on the configuration of your computer, this name may vary. Names are assigned as devices are mounted, so you may see a higher number if you have other devices or disk images mounted in the Finder. Write the card's device name down.
/dev/disk1s1 3.7Gi 2.2Mi 3.7Gi 1% /Volumes/NO NAME
- To write to the card you'll have to unmount it first. Unmount it by typing sudo diskutil unmount /dev/disk1s1 (using the device name you got from the previous step instead of /dev/disk1s1). Note that you must use the command line or Disk Utility to unmount. If you just eject it from the Finder you'll have to take it out and reinsert it (and you'll still need to unmount it from the command line or Disk Utility). If the card fails to unmount, make sure to close any Finder windows that might be open on the card.

-
You'll need to figure out the raw device name of the card. Take your device name and replace disk with rdisk and leave off the s1 (which is the partition number). For example, the raw device name for the device /dev/disk1s1 is /dev/rdisk1.
It is really important that you get the raw device name correct! You can overwrite your hard drive and lose data if you start writing to your hard drive instead of the SD card. Use df again to double check before you continue. - Make sure that the downloaded image is unzipped and sitting in your home directory.
- You'll be using the Unix utility dd to copy the image bit by bit to the SD card. Below is the command. Replace the name of the disk image with the one you downloaded, and replace /dev/rdisk1 with the raw device name of the SD card.
You're essentially telling dd to run as root and copy the input file (if) to the output file (of).sudo dd bs=1m if=~/Occidentalis_v02.img of=/dev/rdisk1

- It will take several minutes to copy the whole disk image. When it's done it will show you some statistics; eject the SD card and you're ready to try it on the Pi.

Testing it out
Internet Sharing
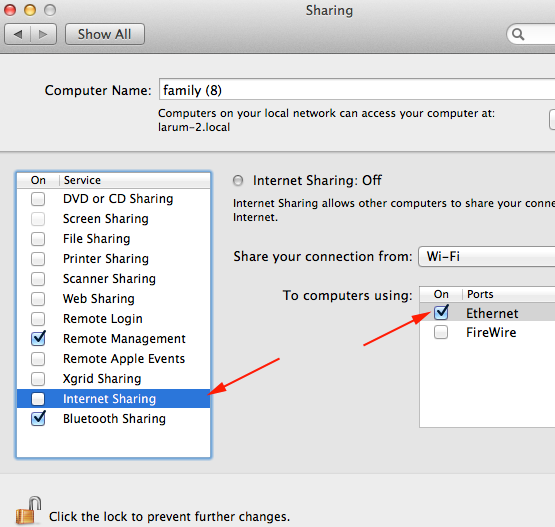
The first thing you need to do is configure your computer to share its internet connection with the Pi. On Mac OSX you can share your wifi connection with any computers that are hooked up to your ethernet port.- Open up the Sharing control panel in System Preferences.
- Click on the Internet Sharing option, which may be grayed out at this point.
- Choose Ethernet as the port you'll share your internet connection.
- Enable Internet Sharing.
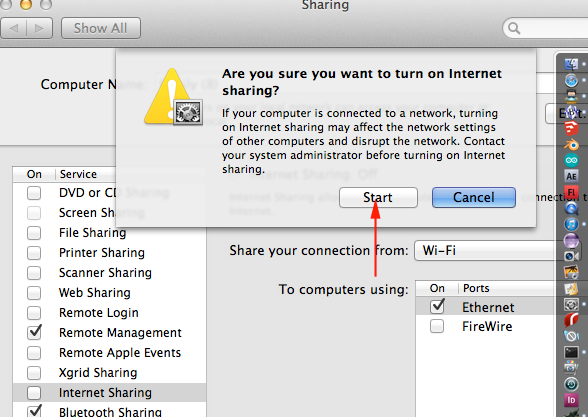
- Select Start
Connecting your Pi
- Plug your Pi into your laptop’s ethernet port.
- Plug the USB cable into your laptop, and then into the micro USB port on the Pi.
- Your Pi should boot up (notice the flashing LEDs). After a short while, assume that it has fully booted and grabbed an IP address from your laptop.
- In terminal find out what address it was assigned by using the cat command:
cat /private/var/db/dhcpd_leases
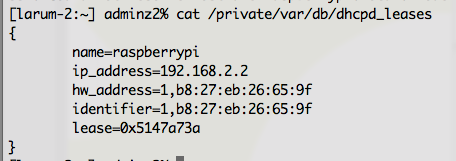
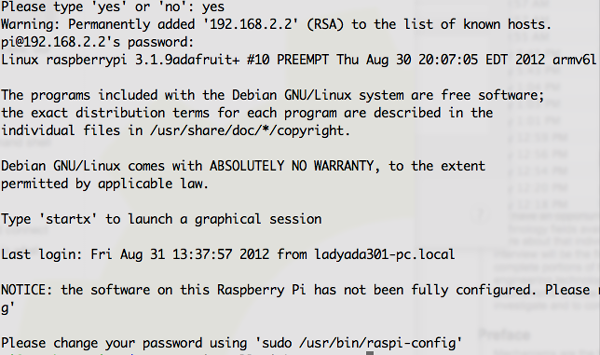
- Your address will probably be 192.168.2.2.

- Now you want to SSH in.That is, you need to connect to a command shell on the Pi:
Where x.x.x.x is the IP you found previously. It should connect and ask you for the default password, which is raspberry
ssh pi@x.x.x.x

- Now you need to configure the Pi. Type:
You can run raspi-config any time you like, if you find that there are some settings that you need to make or modify type on the command line:
sudo raspi-config
sudo raspi-config
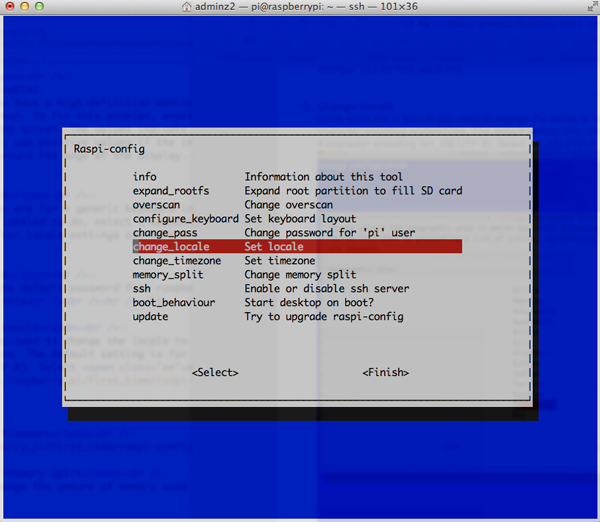
The raspi-config tool: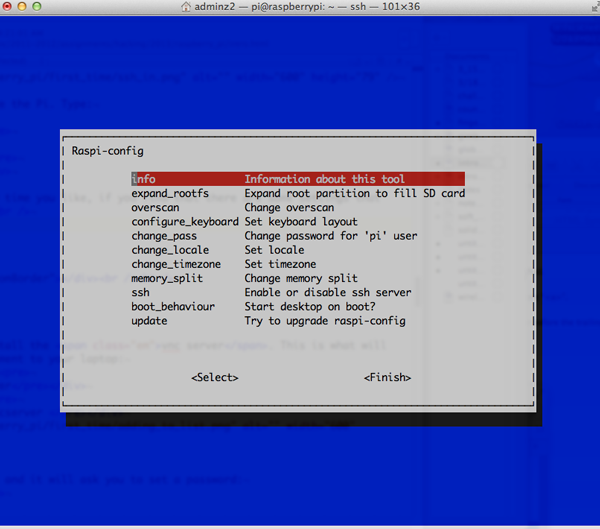
- Use the up and down arrow keys to move around the list, the space bar to select something, and tab to change fields or move the cursor to the buttons at the bottom of the window.
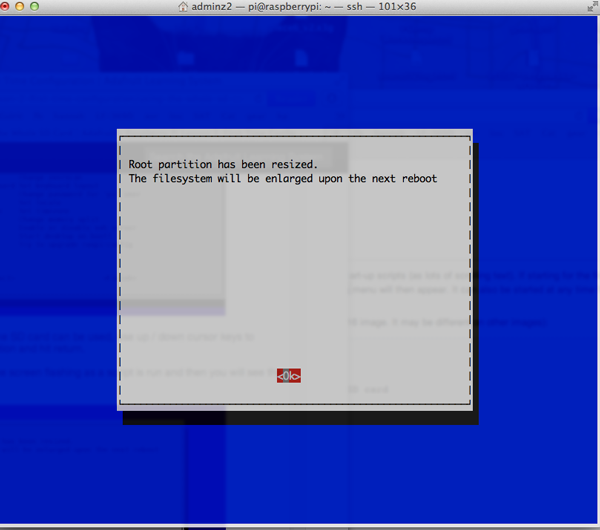
- Expand rootfs
You should always choose this option; this will enlarge the filesystem to let you use the whole SD card.
- Change Locale
Since you're not in the UK you need to change the locale to reflect your language and character encoding preferences.- Select Change Locale
-
The default setting is for UK English with a standard UTF-8 character encoding (en_GB.UTF-8). Use the arrow keys to find the default selection and press Space to deselect it:

- Use the arrow keys to find en_US.UTF-8 and select it by pressing Space
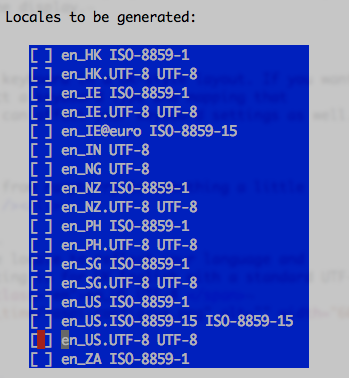
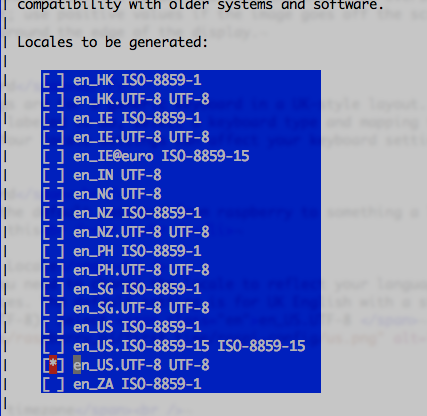
- Press Tab to accept changes:
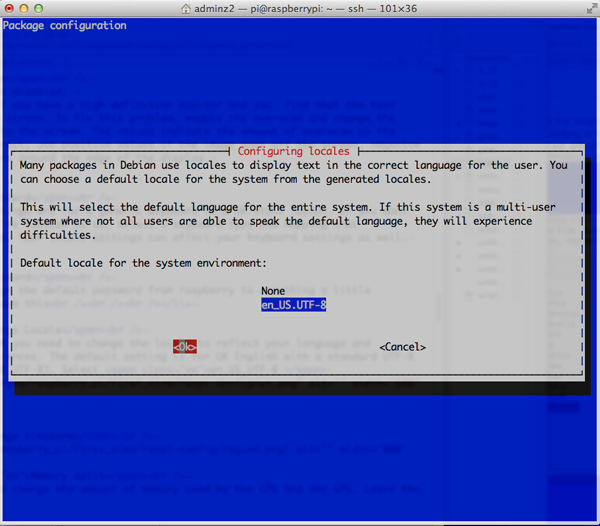
- Select Change Locale
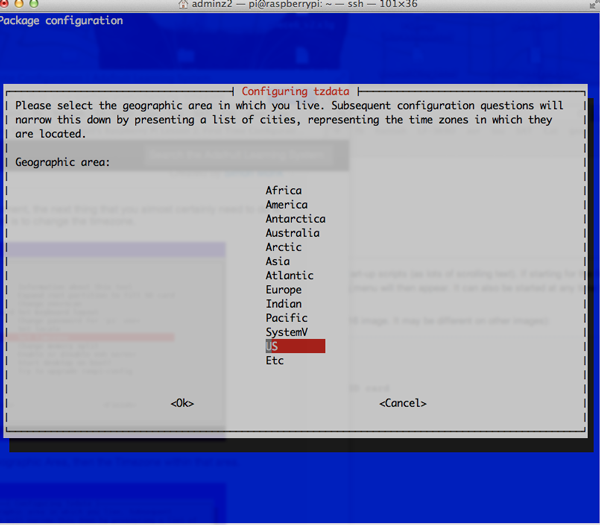
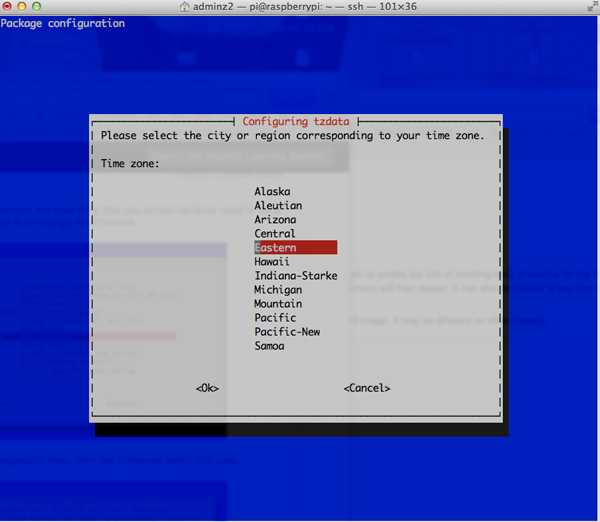
- Change timezone
- Keyboard
The default keyboard settings are for a generic keyboard in a UK-style layout. If you want the keys to do what they're labeled to do, select a keyboard type and mapping that corresponds to your setup. Your locale settings can affect your keyboard settings as well. - SSH
This option turns on the Secure Shell (ssh) server, which will allow you to login to the Raspberry Pi remotely over a network. Turn this on. -
Overscan
Leave the overscan option disabled. You'll use this option if you have a high definition monitor and you find that the text runs off the side of the screen. To fix this problem, enable the overscan and change the values to fit the image to the screen. The values indicate the amount of overscan so the display software can correct; use positive values if the image goes off the screen, negative if there are black borders around the edge of the display. - Password
It's a good idea to change the default password from raspberry to something a little stronger. But for now leave this - Memory split
This option allows you to change the amount of memory used by the CPU and the GPU. Leave the default split for now. - Overclock
You now have the option of running the processor at speeds higher than 700MHz with this option. For your first time booting, leave the default settings or try Medium or Modest. You may want to return to this later (Turbo mode can run at 1000MHz). - Desktop Behavior
This option lets you boot straight to the graphical desktop environment and is set to Yes by default. If you select No, you’ll get the command line when you boot up and you’ll have to login and start the graphical interface manually like this:When you’re in the graphical desktop, your command prompt will disappear. You can open a terminal program to get a command prompt while you’re in the graphical desktop. Click the desktop menu in the lower left, then choose Accessories?LXTerminal.raspberrypi login: pi Password: raspberry pi@raspberrypi ˜ $ startx
- Update
Finally, if you’re connected to the Internet you'll be able to update the conifg utility with this option. Don’t update the OS on your first time around. - When you're done, select Finish and you'll be dumped back to the command line.
Using VNC
- The next step is to install the vnc server. This is what will transmit the desktop environment to your laptop:
Type:
sudo apt-get install tightvncserver
- Run the VNC server once, and it will ask you to set a password:
Set and remember a password when it prompts you. I use raspberr because you can only use 8 characters
vncserver
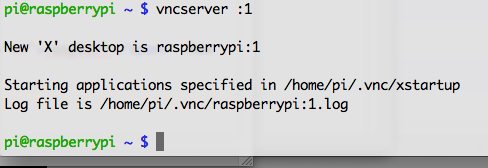
- Now run the VNC server for real:
The :1 is the display number. This is necessary because you could serve multiple virtual displays off of one computer.
vncserver :1 -geometry 640x480 -depth 24
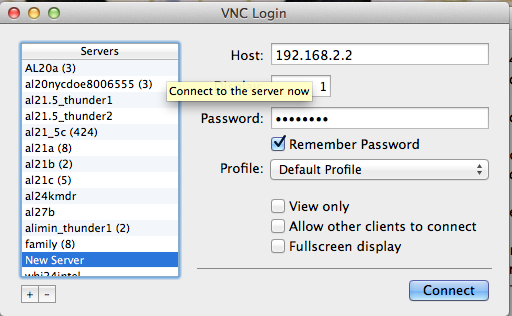
- Install the VNC client on your laptop and connect to the Pi's GUI. We are going to start with
Chicken of the VNC, which is a popular Mac client. Download and install it.
- Open Chicken of the VNC
- Configure the connection:
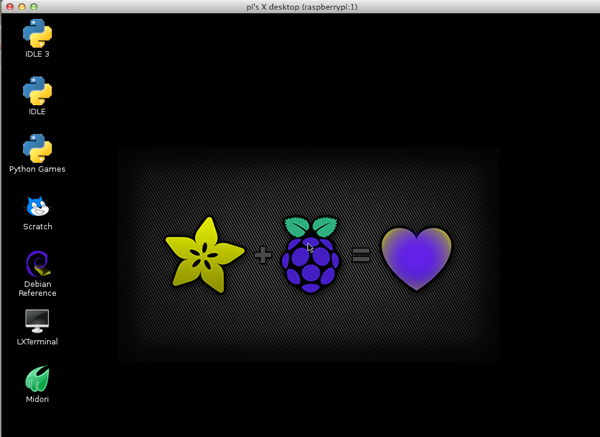
- When it connects you should see the desktop:
- When you want to use VCN again follow these steps:
- Open terminal
- SSH in
- Set up VCN:
- Start connection
- enjoy:
- Open terminal
- In the terminal after sshing into your Pi type:
the '.' at the start of the folder name indicates that this is a hidden folder, one that does not show up when you type 'ls'.
cd /home/pi
cd .config
- Type in the command below to create a new directory inside .config called 'autostart'.
mkdir autostart
-
Navigate, cd, into that new directory by typing:
cd autostart
-
Edit a new configuration file. So type the following command to open the
nano editor on the new file:
nano tightvnc.desktop
- Edit the contents of the file with the following text:
[Desktop Entry]
Type=Application
Name=TightVNC
Exec=vncserver :1
StartupNotify=false
- Type ctrl-X and then Y to save the changes to the file.
- If all goes well, The next time you reboot the VNC server will restart automatically.
Shutting Down
There's no power button on the Raspberry Pi. The right way to shutdown is through the Logout menu on the graphical desktop; select Shutdown to halt the system. You can also shut down from the command line by typing:pi@raspberrypi ˜ $ sudo shutdown -h now
