DESIGN PLANNING
Some Design Rules
- Are your walls thick enough to be printed
Wall thickness is the distance between the inner and surface and the outer surface.
As a default, Cura creates 1 outer shell and 2 inner shells to produce a minimum wall thickness 1mm with PLA. That means you should design your walls with 1mm thickness. - Does your model fit inside your printer's build volume?
The build volume of the printer defines the biggest possible bounding box for your model. - Are your engraved or embossed details large enough?
An example of a detail could be text on your model. You need to ensure that your details have enough thickness as Cura will ignore parts that are too small.
The height or depth for embossed or engraved texts should be in a range that reflects your layer height. - Have you thought about clearances
The distance between neighbouring two parts of a model.
Between two parts of a model there should at least be 1.0 mm of clearance otherwise these parts might be fused together while printing. - Have you used the proper tolerances for pressfit or moving parts?
To make sure two parts will fit, the inner diameter of one part must be bigger than the outer diameter of the other part. A difference in diameter of 0.8mm to 1mm will generaly allow for movement. For press fit parts, you can start with .2mm-.4mm and then test fit.
Remember: Parts which have the same inner diameter and the outer diameter will not fit! - Did you think about warping?
Warping describes the bending of a part due to temperature differences within the part.
Especially long and thin parts of your model can be affected by warping.
To avoid warping effects you can increase the wall thickness of the parts in question.
DESIGN SCOPE
The Design Scope outlines the general aims and goals of your project design and lists the major deliverables and milestones. It is dependent on your available resources and time.When working on larger projects, outlining the scope and sequence is important so that you cann deliver the project on time.
- What is your goal? Are you designing a new object? Are you redigning a product?
- Do you have a system established for saving files?
- Have you established naming conventions?
- Can you identify and describe the elements of design, including shape, form, color, space, and texture?
- Do you want any of these concepts to apply to your project: repetition, pattern, contrast, variety, rhythm, movement, balance, emphasis, dominance, proportion, alignment, proximity, unity, and harmony?
- Is your design practical or emotional?
- Does your design need to express a strong point of view or tell a meaningful story?
- Do you have the appropriate software?
- Do you need time to learn how to use the software or a new technique?
- How much time do you need to research?
- Do you know which material you will use?
- Do you have all the materials or do you need to order anything?
- Do you need to deliver sketches?
- Have you set aside time to iterate?
- What kind of files do you need to deliver?
- Do you need to deliver a Bill of Materials?
- How long will printing take?
- Will you need time to assemble your project?
- Can you identify common challenges involved with scheduling your project?
- Can you identify the main stages of the design process?
- Are you designing for people's needs, values, and social patterns? How are you accomplishing that?
SELECTING SOFTWARE
Gilles Pinault created an attempt at a flowcharting the selection of software. It is by no means the last word for which software to work with.When it comes to creating models for 3D printing, there is no shortage of free or commercially available software applications at your disposal. Your choice of software tool(s) will depend on a variety of factors:
- The kind of form you want to make (organic or geometric).
- Your ability level.
- Your interest in learning new tools and techniques.
- Your budget constraints.
DIGITAL MODELING
- Foundation
Create a solid foundation for the rest of your model to build upon. - Thickness
If your object is supposed to have a hole, then it must have an outside and an inside and a defined thickness. - Walls and details
Don't make detail too thin. - Geometry
It is good practice to not overlap/intersect your geometry. Instead try to connect (Boolean) them. - Overhangs
If your part requires an overhang angle greater than 45 degrees, can you add an arc or chamfer to assist in the part's printability? - Material
Decrease the size of parts as much as possible: Any unnecessary material used in a part is just wasted time.
SELECTING HARDWARE
SELECTING MATERIAL
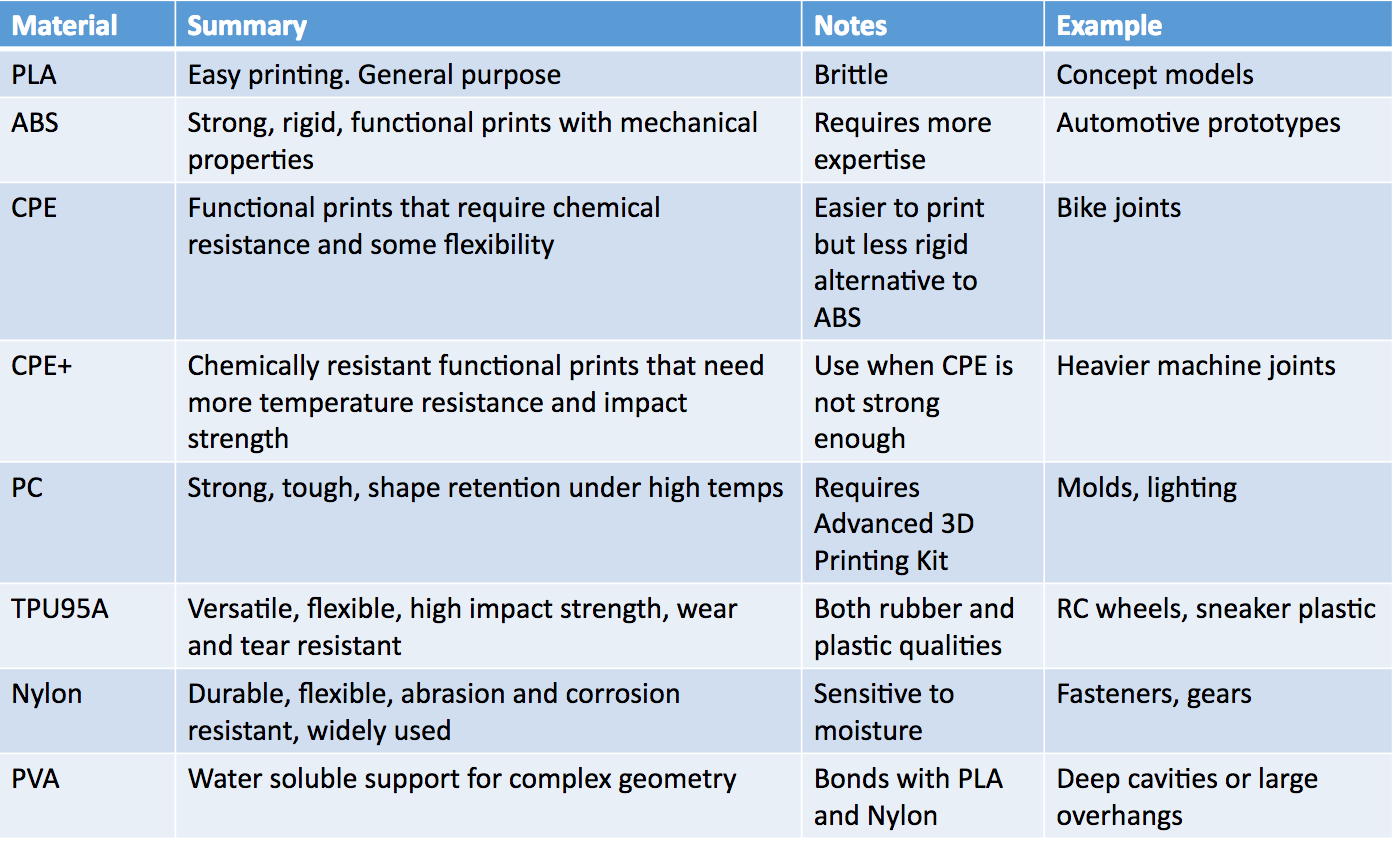
Not all filament is the equal. Always use quality filament, as quality filament is usually made in a cleaner environment, which means it's only going to contain components that will actually melt in your printer's hotend.
- PVA
PVA is hygroscopic and will readily absorb water from the atmosphere. When not using your PVA, keep it in a dry storage. PVA filament only needs warm tap water to dissolve in a few hours. Moving water speeds up the dissolving process and successful strategies have included fish tanks, sous vides and ultrasonic cleaners.
DESIGN EXPORT
When you export your design, make sure your:- Model is a single seamless mesh.
- Model is manifold (watertight).
- Model is exported in mm.
- Your smallest details are big enough to show up in the model when printed.
- Your mesh has 1 million polys or less.
- You have considered your overhangs and support strategy
MESH ANALYSIS AND REPAIR
In order to print your model, your mesh must be watertight and the normals must all be facing out. Keep in mind that you won't be able to see if your model is printable, but software exists to analyze and repair.PREVENTIVE MAINTENANCE
- Keep the XY rods lightly oiled.
- Keep the Z screw greased.
- Don't ever put the magnalube grease on the XY rods.
- Keep the printer clean.
- Keep your glass plate clean.
CALIBRATION
PART PLACEMENT
- Use z-axis to express highest resolution surfaces (more numerous points of adjustment along the z-axis)
- Use "long-threads" of the XY axes to strengthen features that would be much weaker if expressed on the Z.
- Position your part so there are no overhangs or provide actual or generated supports in the z-direction once printing begins.
SLICING
- When upgrading Cura, always delete your previous version first.
- When you upgrade Cura always update the firmware on your printer
- When to add Support
- A Y shape is safe to print without support because it's a gradual slope.
- An H, where the middle overhang connects to either side is called bridging. Any type of bridge should have supports to prevent drooping or a messy print.
- A T shape has overhangs that will need support to avoid drooping.
LOAD MATERIALS
- Make sure to place your filament on the spool holder so that the material can enter the feeder from the bottom.
- Straighten the end of the material a bit so it can easily enter the feeder.
- The material should only extend above the feeder about 1/2 inch before loading oit into the extruder.
- Make sure your nozzle is heated to the right temperature for your material.
- Your nozzle must be hot in order to load your filament.
Temperature and fan settings:
- PLA Print temp: 210�C notes: print with fans on
- ABS Print temp 250�C notes: print with fans off, heated bed at 110�C, don't print too fast
- Wood Print temp: 225�C notes: use little or no retraction as the material might break, speed around 50mm/s, you can vary the temperature to get color variations
- FlexPLA Print temp 230�C: notes: add some oil in the tube, print slow at around 10mm/s - 25mm/s, heated bed at 60�C
- BendLay Print temp 210-240�C notes: great for printing light emitting objects.
- LayBrick Print temp 175-210�C notes: higher temps gives a smoother finish
- Nylon (Taulman 618/645) Print temp 260-265�C notes: very strong and flexible great for jewelry or high durability prints
BED ADHESION
PLA
The first layer is the most important part of any print. There are a few things you need to do to get the first layer to stick well.- Level the bed.
- Adjust the distance between the nozzle and the bed so that the nozzle is close enough to make a nice squished first layer. If your nozzle is too far from a glass build plate or if it is too close to a glass build plate so that the extrusion of material is blocked your print will not stick.
- PLA will not stick well to Blue Tape on a heated bed.
- If you do use Blue Tape:
- Use even layer. Don't miss any spots or overlap the edges.
- Replace the tape after 5-10 prints or when parts stop sticking.
- The recommended bed temperature for PLA is 70C.
- Make sure you run the extruder before your print starts so you are consistantly extruding material when you start printing your model. This is where 'Skirt' can come in handy as it will make sure your nozzle is filled and there is sufficient pressure before starting to print your model.
- Make sure the extruder temperature is hot enough to properly soften the filament. If the plastic cools too quickly it will lift up from the bed. This can cause the nozzle to snag on the first layer when traveling around the bed and gum it up.
- Do not print too fast. Printing too fast can cause the plastic to cool too quickly and lift from the bed and cause a failed print.
- Keep your build plate clean.
Flexible Materials
- Print slowly.
In general, recommended speeds for flexible filament is between 30mm — 40mm/second for optimal print quality and timing. Printing slowly helps you avoid pressure build up in your extruder which can lead to messy prints. - Use a direct drive extruder.
To avoid filament jamming in the extruder, it is best to reduce the space between the cold end and the nozzle by using a direct-drive extruder. - Keep temperature hot&hellips;but not too hot.
Heating up your extruder temperature allows filament to flow more easily through your nozzle. The downside of this is it can cause oozing and stringy, uneven prints. Every printer and type of filament will require slight adjustments in temperature settings for the best print. - Adjust retraction settings.
Retraction can relieve the pressure from the hot end and keep filament from being pushed through the nozzle when the extruder isn't printing. If your extruder is clogged, you will want to lower your retraction. Some have had success with flexible filaments at retraction of zero. You want to find the minimum amount of retraction necessary to reduce the extra stringiness in your print. If you are experiencing extra material coming out of your nozzle, you will want to increase your retraction distance or speed. - Adjust hot bed temperature & use tape.