/ / INTRODUCTION
Parts
- ATTiny85
- LED
- 100µF electrolytic capacitor
- 10K Ω resistor
- 1K Ω resistor
- 3 servo motors
- Optional: headers
- Battery holder
- snaps
/ / Resources
Programming an ATtiny w/ Arduino

This tutorial shows you how to program an ATtiny45 or ATtiny85 microcontroller using the Arduino software and hardware. The ATtiny45 and ATtiny85 are small (8-leg), cheap ($2-3) microcontrollers that are convenient for running simple programs. They are almost identical, except that the ATtiny85 has twice the memory of the ATtiny45 and can therefore hold more complex programs. We like to use both of them with paper circuits and other craft electronics. To program them, we’ll use a port of the Arduino core libraries created by Alessandro Saporetti and slightly modified by HLT.
Materials and Tools
For this tutorial, you’ll need:
- Arduino Uno or Duemilanove (w/ an ATmega328, not an older board with an ATmega168)
- ATtiny45 or ATtiny85 (8-pin DIP package)
- a 10 uF capacitor (e.g. from Sparkfun or from Digi-Key)
- a breadboard
- jumper wires
For more information, see our list of materials and parts and our list of prototyping supplies.
Software
You'll need the Arduino software. If you haven’t yet, you can download it from the Arduino website. Installation instructions are available for Windows and for Mac OS X.
The ATtiny45 / ATtiny85 Microcontroller
Here’s the pinout of the ATtiny45 and ATtiny85:

Installing ATtiny45 / ATtiny85 support in Arduino
- Download: attiny45_85.zip
- Locate your Arduino sketchbook folder (you can find its location in the preferences dialog in the Arduino software)
- Create a new sub-folder called “hardware” in the sketchbook folder.
- Copy the attiny45_85 folder from the attiny45_85.zip to the hardware folder.
- Restart the Arduino development environment.
Turning the Arduino board into a programmer
We’re going to use the Arduino board to program the ATtiny45 or ATtiny85. First, we’ll need to turn the Arduino board into an “in-system programmer” (ISP). To this:
- Run the Arduino development environment.
- Open the ArduinoISP sketch from the examples menu.
- Select the board and serial port that correspond to your Arduino board.
- Upload the ArduinoISP sketch.
Connecting the Arduino board and the ATtiny
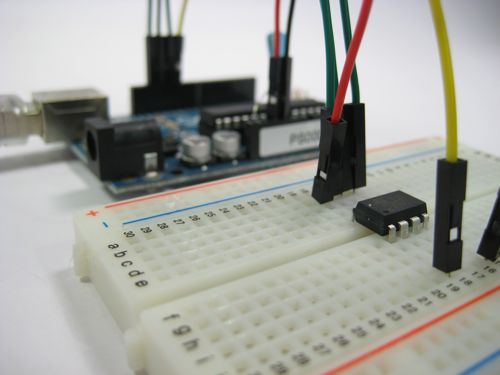
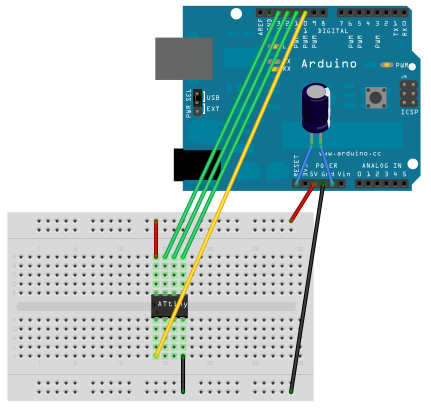
We’ll connect the Arduino board to the ATtiny as shown in the following diagram. Use the dot in the corner of the ATtiny to orient it properly. We’ll also connect a 10 uF capacitor between reset and ground on the Arduino board as shown in the diagram (the stripe on the capacitor that’s marked with a negative sign (-) should go to ground). (The capacitor is only needed if you’re using an Arduino Uno, not an Arduino Duemilanove.)

Pin connections:
- ATtiny Pin 2 to Arduino Pin 13 (SCK)
- ATtiny Pin 1 to Arduino Pin 12 (MISO)
- ATtiny Pin 0 to Arduino Pin 11 (MOSI)
Programming the ATtiny45 or ATtiny85
Next, we can use the Arduino as an ISP to upload a program to the ATtiny45/85:
- Open the Blink sketch from the examples menu.
- Change the pin numbers from 13 to 0.
- Select “ATtiny45 (w/ Arduino as ISP)” or “ATtiny85 (w/ Arduino as ISP)” from the Tools > Board menu (leave the serial port set to that of your Arduino board).
- Upload the sketch.
You’ll probably get the following message, but don’t worry, the upload should have worked anyway:
avrdude: please define PAGEL and BS2 signals in the configuration file for part ATtiny85
avrdude: please define PAGEL and BS2 signals in the configuration file for part ATtiny85
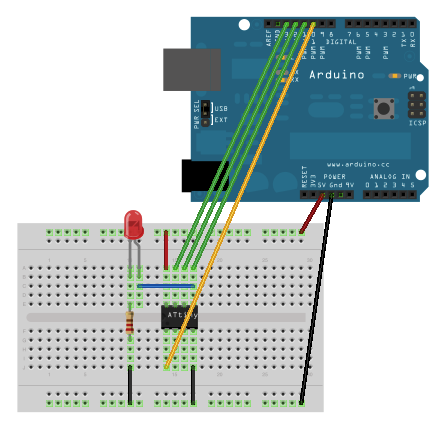
Now, connect an LED and see if it blinks.

Reference
The following Arduino commands should be supported:
//original code by Raphael Abrams
//Hey everybody, it's Mitchie Twitchie Time!
// set CPU clock speed and desired baud rate

#define F_CPU 8000000UL


#include <avr/io.h>


//#include <util/delay.h>
//#include <stdlib.h>

///////////////////////////////////////////////////////////////////////////////////////////////////////////

//constant defines

//these are constant values (they never change during execution) that come up in several places in the code.


//Changes made to the values here change the values in the whole program.


//Remember NOT to use a semicolon at the end of these lines!


//I like to use ALL CAPS for constants

//these are names we are giving to physical pin numbers


#define LEDPIN 	3


#define SERVO1 		0


#define SERVO2 		1


#define SERVO3 		2


//This is a way to keep from forgetting whether Twitchie is awake on high or low. It also makes it easy to switch for the whole program.

#define AWAKE  		1


#define ASLEEP 		0


////////////////////////////////////////////////////////////////////////////////////////////////////


//global variables


//These are variables that several different functions can use to communicate with oneanother.


//There are better ways to achiev this, but I find this easy to understand and simple to implement.


/////////////////////////////////////////////////////////////////////////////////////////////////////


//prototypes


//volatile void _delay_ms(unsigned int delay);

//volatile void _delay_us(unsigned int delay);

//void longdelay_ms( reps);


//void longdelay_us(unsigned long reps);


void delay_us(unsigned long reps);


//void delay_ms(unsigned int reps);


unsigned char limited_random(unsigned char a, unsigned char b);


void servo(char pin, unsigned char angle);


void burst(char quantity, char speed);


void rest(char length);


void purr(char duration, char speed, char reps);


void quiver(char duration, char speed, char intensity);


char status (void);


void led_blink(void);


static inline void led_off(void);

static inline void led_on(void);


//#define LEDON	PORTB |= (0x01<<3)


//#define LEDOFF	PORTB &= (0xfe<<3)


void led_off(void);

//main///////////////////////////////////////////////////////////////////////////////////////////////


int main(void) {


	DDRB = 0b011111;					//initialize the IO port pins

//I like to use binary because it's easy to see right away which way pins are set.

//settind a pin to zero makes it an input, setting to one makes it an output.


	PORTB=0;


	while(1){//Infinite loop. The code does whatever is in here until power is removed or the chip is reset.


		unsigned char loop=random(1,10);


		for(;loop>0;loop--){

			char x=random(3,20);

			char y=random(0,36);

			char z=random(0,180);

			char zz=random(0,180);

			for(;x>0;x--){

				servo(SERVO1,y);

				servo(SERVO2,z);

				servo(SERVO3,zz);

				delay_us(1000);

//				led_blink();

			}

		}

		led_on();

		delay_us(limited_random(1,30)*1000);

		led_off();

	}									//Look at the comments in the function definition for more explanation.


}


//Functions//////////////////////////////////////////////////////////////////////////////////////////////////////////////////////////////

/*


void burst(char quantity, char speed){

char pulseloop, pulsedelay;

char targetangle0, targetangle1;


	for ( ; quantity>0; quantity--){


		targetangle0 = limited_random(2,150);


		targetangle1 = limited_random(2,150);


		pulsedelay = limited_random(10,50);    //how long will we wait between pulses


//		if(status()==ASLEEP){return;}


        for (pulseloop=speed; pulseloop>0; pulseloop--){


			servo(SERVOA,targetangle0);


			servo(SERVOB,targetangle1);


			longdelay_us(pulsedelay*1000);


		}


	}


}


*/


/*


void purr(char duration, char speed, char reps){


char i;


char start0, start1;


char finish0, finish1;


	start0 = limited_random(25,120);


	start1 = limited_random(25,120);


	speed=255-speed;


	for(;reps>0;reps--){


		if (status()==ASLEEP) { return;}


   		finish0 = limited_random(25,120);


   		finish1 = limited_random(25,120);


		for ( i=duration; i>0; i--){


			if (start0>(finish0+speed)){start0=start0-speed;}


			else if (start0<(finish0-speed)){start0=start0+speed;}


			else {start0=finish0;}


			if (start1>(finish1+speed)){start1=start1-speed;}


			else if (start1<(finish1-speed)){start1=start1+speed;}


			else {start1=finish1;}


			if (start0 != finish0){servo(SERVOA,start0);}


			if (start1 != finish1){servo(SERVOB,start1);}


			longdelay_us(45000);


		}


	}


}


*/


/*

void rest(char length){


int restduration;


	restduration= limited_random(3,100)*length;


	for(;restduration>0;restduration--){


		longdelay_us(150000);


		if (status()==AWAKE){


			return;


		}


	}


}


*/


/*


void quiver(char duration,char speed, char intensity){


char i, ss ;


char rhold0, rhold1;


   	for ( ; duration>0; duration--){


		rhold0 = limited_random(25,120);


		rhold1 = limited_random(25,120);


		ss = limited_random(0,25);


		if (status()==ASLEEP) { return;}


 		for ( i=speed; i>0; i--){


 			servo(SERVOA,rhold0);


			servo(SERVOB,rhold1);


			longdelay_us(ss*1000);


			servo(SERVOA,rhold0+intensity);


			servo(SERVOB,rhold1+intensity);


			longdelay_us(ss*1000);


		}


	}


}


*/


//////////////////


//delay routines//


//////////////////


//This routine makes it possible to call longer delays than the normal _delay_ms() which, at 8MHz is limited to abut 26ms.


//This one takes a 16 bit argument, so you can call delays from 1ms to 65535ms. NOTE! It's not perfectly accurate because of


//the non-deterministic nature of the loops and the fact that the RC oscillator drifts with temperature.


//void longdelay_ms(int reps){


//	for(;reps>0;reps--){


//		_delay_ms(1);


//	}


//}


//This routine makes it possible to call longer delays than the normal _delay_us(). Goes from 1us to 65535us.


//The notes on the delay routine above also apply to this one.


//microeconds! one MILLIONTH of a second! Muah Ha Ha!


void delay_us(unsigned long reps){  //at 9.6mhz this is pretty close to 1uS per rep. Compiler has to be optimized to S.


volatile unsigned char x=0;

	for(;reps!=0;reps--){

x++;

	}


}


//void delay_ms(unsigned int reps){


//	for(;reps!=0;reps--){

//		delay_us(1000);

//	}

//}


/*

void longdelay_ms(unsigned long reps){


	for(;reps>0;reps--){


		_delay_ms(1);


	}


}


*/


/*

#define CYCLECOUNT_MS ((F_CPU/1000)/4)


volatile void _delay_ms(unsigned int delay){

volatile unsigned long cycletime=0;

	for(;delay>0;delay--){

		for(cycletime=0;cycletime<CYCLECOUNT_MS;){

			cycletime++;

		}

	}

}


#define CYCLECOUNT_US ((F_CPU/1000000)/4)


volatile void _delay_us(unsigned int delay){

volatile unsigned long cycletime=0;

	for(;delay>0;delay--){

		for(cycletime=0;cycletime<CYCLECOUNT_US;){

			cycletime++;

		}

	}

}


*/


void led_blink (void){


	led_on();

	delay_us(1000);


	led_off();

	delay_us(10000);


}


static inline void led_on(void){

	PORTB |= (0x01<<LEDPIN);


}


static inline void led_off(void){

	PORTB &= (0xfe<<LEDPIN);

}


///////////////////////////////


//Time to talk to the servos!//


///////////////////////////////


//Servos take a positive pulse, measure its length, and use the duration of the pulse


//to determine the angle they try to go to.


//Usually, it's about 1ms to 1.5ms for 0- 90 degrees. The actual pulse to angle


//relationship varies from brand to brand, and between models as well.


//Every pulse you send the servo makes it try to get to the destination, but for just a fraction of a second.


//To actually get to your desired angle you need to keep sending pulses over and over at about 60 Hz.


//This function sends one pulse.


//This routine is optimized for hitec standard servos.


//Give it a 0, the servo is going to go to 0 degrees.


//At 255, the servo will go to 180 degrees.


//127 givs an angle of 90 degrees.


void servo(char pin, unsigned char angle){


	PORTB |= (0x01<<pin);


	delay_us(10);


	for(;angle>0;angle--){


		delay_us(6);


	}


	PORTB &= (0xfe<<pin);


}


unsigned char limited_random(unsigned char a, unsigned char b){


unsigned int temp;


//	static unsigned long random_seed=1329; //interstella!

	if(b<a){temp=a;a=b;b=temp;}


	if(b==a){return a;}

//	random_seed = random_seed * 1103515245 +12345;

//  	return (unsigned char)(random_seed);


//	return( (unsigned char)random_seed % ((b-a)+1)) +a;

	return( rand() % ((b-a)+1)) +a;


//

//	return (unsigned char)rand()%100;

}
/ / Instructions
- Solder the parts to the board
- Design your twitchie