Using 3D Printing and Modeling to Create Text Labels
Source:
Ryan Francis Cain
PS 3 The Bedford Village School
Brooklyn, NY
17 July 2012
Second Grade
 Lesson Purpose: Students work with tinkercad.com to become familiar to adding text to a 3D model. This will also enhance their ability to modify the proportions of different elements
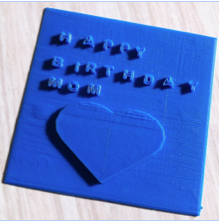
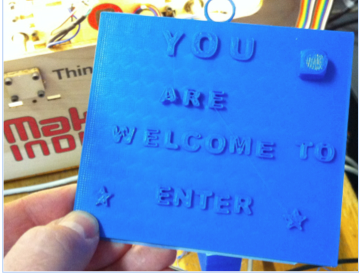
Lesson Behavioral Objectives: Students will create a sign, such as a label for their bedroom door. They will model the sign on tinkercad.com and print it on a TOM
Relationship to Previous Lesson: In previous lessons the children have created buildings or any other objects that they had an opportunity to print on the MakerBot.
Materials Needed: A class use of laptops with Google Chrome, a 3D printer, and access to the internet.
Sequence of Lesson:
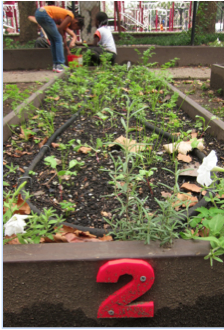
Motivation: Ask children, "why is it helpful to have labels on things?" Brainstorm on a dry erase board of the places that they think signs are important. Give an example such as the labels in our school garden. This allows our children to get assigned a specific raised bed planter to water or weed. Signs can protect us such as a stop sign or a warning label. When we see a skull and cross bones on a bottle of cleanser, we know that it is poison.
Steps for this Lesson:
Day 1-Give the explanation of the motivation above. Have children sketch out an idea for a sign in their notebooks. Show printed examples of making a background object to place the text on top of. This way the letters do not have to over lap in order to be one solid object. Demonstrate on a projector how to place and modify letters and numbers in tinkercad.com. Make sure to remind children to look at their designs from several different angles to make sure they letters are not floating in mid air.
Day 2 and on—Give the students at least a total of three 45 min sessions to work on their designs. Have students who finish help the students who are struggling with the activity. Try to have at least a few of the signs printed from day 1 for day 2. It is imperative that the students experience the thrill of rapid prototyping. I have found this is a great source of engagement in the activity.
 Assessment: Use the following rubric to score the student signs in within tinkercad.com and the finished pring; 1-Novice Getting started-No or little understanding, 2-Apprentice Almost-Student has some understanding, 3-Practitioner Got it!-Strong understanding-Meets the standard, 4-Expert Wow, awesome!-Exceptional understanding-Exceeds the standard.
Extensions: Have the students collaborate to create a group-sourced sign for the classroom door. What should be including on the sign so that people know what to expect when opening the door. At our school the children will be creating a sign for the school garden and more labels for the raised bed planters.
Download lesson
Ryan Francis Cain
PS 3 The Bedford Village School
Brooklyn, NY
17 July 2012
Second Grade
Lesson Purpose: Students work with tinkercad.com to become familiar to adding text to a 3D model. This will also enhance their ability to modify the proportions of different elements
Lesson Behavioral Objectives: Students will create a sign, such as a label for their bedroom door. They will model the sign on tinkercad.com and print it on a TOM
Relationship to Previous Lesson: In previous lessons the children have created buildings or any other objects that they had an opportunity to print on the MakerBot.
Materials Needed: A class use of laptops with Google Chrome, a 3D printer, and access to the internet.
Sequence of Lesson:
Motivation: Ask children, "why is it helpful to have labels on things?" Brainstorm on a dry erase board of the places that they think signs are important. Give an example such as the labels in our school garden. This allows our children to get assigned a specific raised bed planter to water or weed. Signs can protect us such as a stop sign or a warning label. When we see a skull and cross bones on a bottle of cleanser, we know that it is poison.
Steps for this Lesson:
Day 1-Give the explanation of the motivation above. Have children sketch out an idea for a sign in their notebooks. Show printed examples of making a background object to place the text on top of. This way the letters do not have to over lap in order to be one solid object. Demonstrate on a projector how to place and modify letters and numbers in tinkercad.com. Make sure to remind children to look at their designs from several different angles to make sure they letters are not floating in mid air.
Day 2 and on—Give the students at least a total of three 45 min sessions to work on their designs. Have students who finish help the students who are struggling with the activity. Try to have at least a few of the signs printed from day 1 for day 2. It is imperative that the students experience the thrill of rapid prototyping. I have found this is a great source of engagement in the activity.
Assessment: Use the following rubric to score the student signs in within tinkercad.com and the finished pring; 1-Novice Getting started-No or little understanding, 2-Apprentice Almost-Student has some understanding, 3-Practitioner Got it!-Strong understanding-Meets the standard, 4-Expert Wow, awesome!-Exceptional understanding-Exceeds the standard.
Extensions: Have the students collaborate to create a group-sourced sign for the classroom door. What should be including on the sign so that people know what to expect when opening the door. At our school the children will be creating a sign for the school garden and more labels for the raised bed planters.
Download lesson
