Getting Started
Overview
The MakerBot 3D printer is an inexpensive machine that can be either put together or purchased preassembled and allows anyone to participate in personal fabrication and rapid prototyping. Using a digital design, it prints objects by melting layers of plastic, one on top of the other, to form three-dimensional objects.
The Process
Once you have a STL file, the 3D model needs to be sliced into layers in order to be printed. The software that slices a model is called SkeinForge, and it is incorporated into ReplicatorG, which translates the 3D information into GCode, the common name for the widely used computer numerical control (CNC) programming language). The GCode tells the MakerBot how to print the object.The Choices
There is no shortage of free or commercially available software at your disposal. Your choice of software tool(s) for use with your students will depend on a variety of factors:The content/theme of your class or program
Ability level of students
Student interest
Budget constraints
We'll be covering the free and/or open source options that are available:
- 3DTin
- Tinkercad
- SketchUp
- OpenSCAD
- Blender
- Wings3D
- 123DCatch
- MeshMixer
However, if your budget permits you may wish to consider commercial options (read: expensive) such as Rhino 3-D and SolidWorks.
Here are the basic steps involved in printing:
- Start with an STL file
- Open Makerware
- Open the .stl file in Makerware
- Generate the GCode file
- Either use an SD card or connect your computer to the MakerBot
- Print!
.stl Files
.stl or STereoLithography files describe the surface geometry of a 3D object and are used to build physical 3D Cad Models. .stl files are created using a mesh made of triangles that represents the physical part of your object. The .stl file is a complete listing of the xyz coordinates of the vertices and normals,the vectors perpendicular to a surface that determine the orientation for the triangles, that describe the 3D object.
A good .stl file size is between .5MB for a simple file to 10MB for a large complicated one. Generally, if your part is outside of these parameters, you'll need to resize it. A good .stl file must also conform to two rules.
- Adjacent triangles must have two vertices in common
- The orientation of the triangles (what side of the triangle is in and what side is out) as specified by the vertices and normals must agree
A .stl file can be termed bad because of translation issues. In many CAD systems, the number of triangles that represent the model can be defined by the user. If you are using too many triangles, the .stl file size can become unmanageable. If you're using too few triangles to describe your object, your curved areas will not be properly defined and your cylinders might look like hexagons.
What can you print with?
Large scale printers, including those made by Stratasys can use different types of additive manufacturing materials, including clear, rubberlike and biocompatible photopolymers, and tough high-performance thermoplastics.Here are examples of different printing processes:
- Composites and Ceramics
- powder bed and inkjet head printers
This process uses inkjet-type heads to deposit tiny droplets of liquid binder on top of a thin layer of powder. The final object is a stack of powder layers finely glued together. This type of printing can use ceramic powder to create food-safe objects.
- powder bed and inkjet head printers
- Plastics
- Stereolithography (SLA)
In this process liquid plastic resin is selectively hardened by exposure to high intensity light. - Selective Laser Sintering
This process uses high powered lasers to melt and fuse particles of very fine plastic powder - Photopolymer Jetting
This process uses moveable heads, like an inkjet printer, to deposit droplets of resin onto a build platform through a number of very small jets.
- Stereolithography (SLA)
- Metals
- Direct Metal laser sintering (DMLS)
This process uses lasers to directly fuse certain metal powders, such as titanium, in a way similar to SLS printing. - Direct Metal Printing
This process uses a multi-step method to create powder-based metallic models, mainly from stainless steel. First the object is printed on a bed of fine stainless steel powder using the inkjet-binder process. A carefully controlled heat treatment then burns out the plastic binder and fuses the steel particles together. Lastly, the porous sintered model is infused with liquid bronze, which fills the empty spaces. - Indirect Printing Methods
This process uses casting methods to create metal parts.
- Direct Metal laser sintering (DMLS)
Here are examples of different filaments:
taulman3D makes a Nylon Co-Polymer as well as t-glass, a high strength material.Taulman Nylon 618 is stronger than PLA. Not only can it take some abuse, but it is also flexible. It is more difficult to print with nylon than PLA. Nylon will absorb moisture from the air and reacts poorly in humid environments. If you see bubbling and steam or are getting stringy prints, this is the result of absorbing moisture from the air. To print with this material, adjust the temperature to 245° and change the speed to 45mm/s, the interlayer to 35 mm/s and the perimeter to 25 mm/s.
To help the nylon stick to the tape, rub a glue stick over the surface of the tape.
Warning: nylon may emit trace amounts of cyanide at high temperatures. Make sure you are printing in a well ventilated space.
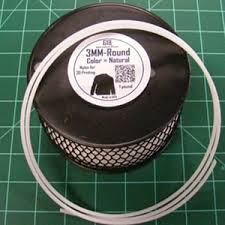
3ntr also makes a 3mm polyamide 6 filament (nylon). Similar to Taulman Nylon 618, this filament only comes in 3mm.

LAYWOOD-D3 This filament from Germany is a mixture of 40% recycled wood with a binding polymer. This wood/polymer composite allows the filament to be printed just like thermoplastic filaments – such as ABS and PLA – but gives your creation a wooden-like appearance.
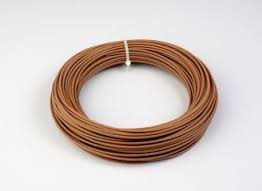
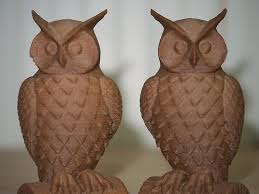
Print between 175°C and 250°C. After printing, your object will look and smell like wood and it can also be handled like wood. After printing you can cut, grind and paint your creations similar as you can do with wooden objects. This filament sticks well to tape
Depending on the temperature at which LAYWOO-D3 filament is printed, it will take on a different shade of brown. This means that by intentionally varying the printing temperature, you can simulate a tree’s growth ring effect. At 180°C your LAYWOO-D3 prints will have a light colour and at 245°C your print will become darker.
This filament comes unspooled, but you can print your own spool with
Here is a python script to simulate banding:
LAYBRICK This filament prints like sandstone. It contains natural mineralic fillers (super-fine milled chalk) and harmless co-polyesters. Printing between 165°C to 190°C will produce a smooth surface. Printing at higher temperatures around 210°C will produce a rougher surface.This filament must be printed in the replicator 2 because it needs the fan. Leave the finished print on the bed for several minutes to allow the material to set.

Flex Eco PLA This material is a rubber-like 3D printer filament which allows you to print flexible objects, such as rubber machine parts, soft toys, flip-flops, and other rubbery items.
This filament has a much lesser carbon footprint than typical co-polyester 3D printer filaments. Printing with a 5% infill produces a flexible model, while a 100% infill produces a model with a vulcanized rubber-like quality. You can use this filament to create molds, drive belts, toys, etc.
Print at 230°c and slow down the printing to 20mm/s. You will need to create a custom profile in MakerWare in order to use this filament.
Orbi-Tech, a filament-maker in Germany makes BendLay, a 3D fibre that is tough, bendable and resilient. BendLay's transparency is similar to that of Plexiglass. It can be extruded between 215° - 240°C, with 240°C recommended for best layer adhesion during fast printing. It's thermal stability is like PLA (65° - 70°C).
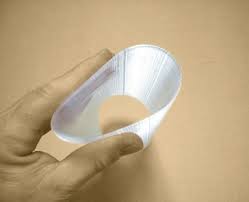
A modified Butadiene, BendLay is not a material found in nature, but it is safe for household and food products. Its water absorption rate is 30% that of ABS (this matters, because evaporation contributes to warping/curling). Bending will not cause the clear color to change due to stress. It is high-impact resistant and sticks well to both ABS and PLA, for multi-material print jobs. Acetone will turn it crumbly.
Applications range from straps and belts to anything requiring flexibility, thin walls, or light emission. It is relatively easily bent, depending on wall thickness, and highly resilient.
Shapeways prints with a flexible, rubbery plastic material called Elasto Plastic. It features high impact resistance, flexibility and compression. The material is made of laser sintering powder and has a rough, grainy finish. It is quite strong when printed with thick features (greater than 5mm). Though not strictly water-tight, it can hold liquids, but it does not like high temperatures or fire.
Shapeways also can print with:
- Alumide, a brittle Nylon Plastic that's filled with Aluminum dust.
- Detail Plastic, an acrylic based polymer that can print fine details. Smooth and slightly shiny.
- Frosted Detail Plastic, a UV-cured acrylic plastic that prints fine details and walls. Smooth and translucent.
- Stainless Steel — surface is slightly pitted & rough.
- Sterling Silver (92.5% silver).
- Gold Plated Brass, highly polished material
- Full Color Sandstone, gypsum printable with color textures on the model surface. Feels like matte clay.
- Ceramics Food-safe glazed ceramics. Available in glossy and satin finishes, and a variety of colors.
3DTin
3DTin is a free, simple to use, 3D Modeler that runs in your browser's window. It works best with WebGL support, but unlike Tinkercad, another web-based 3D modeler, it can also use HTML5 Canvas.
You can use 3DTin to
- Design models by placing cubes and other primitives on top of each other.
- Save your artwork in the cloud. (You'll need a gmail, facebook or twitter account)
- Smooth a model
- Export models in standard 3D file formats (OBJ, STL) and use them for 3D printing or import in other CAD tools.
- Run some preliminary checks to prepare your model for 3D printing (Manifold violations).
The 3DTin Interface

3DTin Controls

Enabling WebGL
Mac
To run webgl on the Mac with Firefox you'll have to do the following:- Type about:config in the Firefox 4 URL bar
- Type webgl in the search box
- Set webgl.force-enabled = true
- Type about:flags in the Chrome URL bar
- Click to enable WebGl
Windows
on Windows XP, WebGL and acceleration is blacklisted.To enable it, in command line:
chrome.exe --enable-webgl
- Close any open Chrome windows
- Find the Chrome shortcut you use (normally on the desktop or in the start menu) and right click on it.
- Select 'Properties'
- Add the '--ignore-gpu-blacklist' flag without the quotes at the end of the 'Target' box
- type "about:flags" on address bar of google chrome
- under "Override software rendering list" click "enable"
- scroll down and "relaunch google chrome"
Linux
In command line:./chrome --enable-webgl
google-chrome --ignore-gpu-blacklist
3DTin Intro
Tinkercad

tinkercad.com
Tinkercad is a web-based 3D modeler that requires WebGL support, so you'll have to use at least Chrome 10 or Firefox 4.
Tinkercad is simple to learn and use and you will be building models quickly. You will also be able to share them with
To get Tinkercad to run on Mac with Firefox you'll have to do the following:
- Type about:config in the Firefox 4 URL bar
- Type webgl in the search box
- webgl.force-enabled = true
- Go to https://tinkercad.com and refresh the page
There are a number of keyboard and mouse shortcuts in Tinkercad that allow you to work smarter and faster.
Enabling WebGL
Mac
To run webgl on the Mac with Firefox you'll have to do the following:- Type about:config in the Firefox 4 URL bar
- Type webgl in the search box
- Set webgl.force-enabled = true
- Type about:flags in the Chrome URL bar
- Click to enable WebGl
Windows
on Windows XP, WebGL and acceleration is blacklisted.To enable it, in command line:
chrome.exe --enable-webgl
- Close any open Chrome windows
- Find the Chrome shortcut you use (normally on the desktop or in the start menu) and right click on it.
- Select 'Properties'
- Add the '--ignore-gpu-blacklist' flag without the quotes at the end of the 'Target' box
- type "about:flags" on address bar of google chrome
- under "Override software rendering list" click "enable"
- scroll down and "relaunch google chrome"
Linux
In command line:./chrome --enable-webgl
google-chrome --ignore-gpu-blacklist
Tinkercad Intro
OpenSCAD
OpenSCAD is software for creating solid 3D CAD objects. It is free software and available for Linux/UNIX, MS Windows and Mac OS X.
OpenSCAD focuses on the CAD aspects of 3D modeling and is good for creating 3D models of machine parts or any part where you want to specify parameters.
OpenSCAD is not an interactive modeller. Instead it reads in statements that describes the object and it renders the 3D model from that code. This gives you full control over the modelling process and enables you to easily change any step in the process or make designs that are defined by configurable parameters.
OpenSCAD provides two main modelling techniques:
- Constructive Solid Geometry
- Extrusion of 2D outlines
Numbers in OpenSCAD are in millimeters. So circle(5); or circle(r=5); draws a circle with a radius of 5mm.
OpenSCAD Intro
Netfabb
So you have your model and your .stl file, but how do you know if it is a good file?
Netfabb provides two free ways to fix your files:
- Netfabb's Cloud Services
- Netfabb's Studio Basic
Netfabb's cloud service will repair your file for you by removing duplicates and ensuring that your mesh is manifold and oriented.
- Open a browser window and navigate to http://cloud.netfabb.com
- Upload your file
- Go to 3D view and Download the fixed file
Netfabb's Studio Basic (Netfabb) allows you to repair your models on your desktop. You'll need to register online in order to obtain the key to run the software.
SketchUp
SketchUp is a free 3D modeler.
Your SketchUp file must be one continuous, solid object. The printer must be able to clearly distinguish between the inside and outside of the object it is printing. There cannot be holes or gaps in the model, because the 3D printer will not be able to tell what is inside the object and what is outside-the exterior of the building must be sealed. There are tools that can help identify an close holes and gaps, but the majority of these areas should be found and closed within the original CAD model for best results. In order to print your sketchup models, you'll have to convert your files to stls.
- SketchUp Basics
- Spheres
- Groups
- Making solid models
- Superellipsoid
- Spinning
- Cubes
- What to do when you can't make the model solid
- Polygons
- Autofolding
- Aligning
- Subtracting Objects From Each Other
- Making Holes
- Scaling
- Tubes
- Bezier Curves
- The Curviloft Plugin
- More Follow Me
- Components
SketchUp 3D text
SketchUp and Math
Meshlab
You'll use Meshlab to fix scanned 3D images MeshLab is an open source, portable, and extensible system for the processing and editing of unstructured 3D triangular meshes. The system is aimed to help the processing of the typical not-so-small unstructured models arising in 3D scanning, providing a set of tools for editing, cleaning, healing, inspecting, rendering and converting this kind of meshes. The system is heavily based on the VCG library developed at the Visual Computing Lab of ISTI - CNR, for all the core mesh processing tasks and it is available for Windows, MacOSX, and Linux. . The MeshLab system started in late 2005 as a part of the FGT course of the Computer Science department of University of Pisa and most of the code (~15k lines) of the first versions was written by a handful of willing students. The following years FGT students have continued to work to this project implementing more and more features. The proud MeshLab developers are listed here.
(from http://meshlab.sourceforge.net/)
Download MeshLab
Blender and Wings 3D
Blender and Wings 3D are two free subdivision modelers available for downloading.
Blender Intro
Blender Modeling
Wings3d Intro
Mathematica
Wolfram's Mathematica allows you to create 3D forms through mathematical equations.
Mathematica Introduction
Processing
Processing is an open source programming language and environment for people who want to create images, animations, and interactions. Initially developed to serve as a software sketchbook and to teach fundamentals of computer programming within a visual context, Processing also has evolved into a tool for generating finished professional work. Today, there are tens of thousands of students, artists, designers, researchers, and hobbyists who use Processing for learning, prototyping, and production.
Processing Introduction
CookieCutter-Editor
CookieCutter-Editor extrudes a 2D design into a custom made and printable cookie cutter.
Using CookieCutter
Extruding 2D to 3D
There are a few ways to do this:
Software: OOML
The Object Oriented Mechanics Library (OOML) developed by Juan Gonzalez-Gomez (Obijuan), Alberto Valero-Gomez, and Mario Almagro. It is set of tools that allow designers to create mechanical parts using the C++ language and generate OpenSCAD code. .
OOML basics
Printing
So how much material does a print take?After you print your object, weigh it. Here's a formula to work out your costs:
(____grams)*(cost_of_spool)/1000= $cost_of_print
Printing with a Replicator
MakerWarePrinting with a Thing-o-matic
ReplicatorGThingiverse
Thingiverse is a universe of things.It is also a place to share your digital designs with the world, as well as a community of people who create and share designs freely, so that all can benefit from them.
To save your own digital designs, you need to Join Thingiverse. All the information that is required is a username, email, password and human status.

Once you've joined, you can choose to fill out your profile or not.

Here are some things you can do:

Here's where you go to Upload a Thing

Check out Thingisearch This website that was created to bring to the Digital Community of Thingiverse a real search engine!
Vocabulary
Binary Space Partition (BSP)
Constructive Solid Geometry (CSG)
Shapes that are made up of primitive shapes such as cubes, spheres, cones, cylinders, etc. These primitive shapes can be combined with boolean operations such as union and intersection. A solid object, which was modeled using CSG, can be represented internally by a binary tree (CSG tree). The leaves of the tree are the standard primitives and all interior nodes represent boolean operations. A transform can be assigned with every link between nodes.Parametric Design
The expression of abstract relationships between elements that remains unchanged, even when parts of the design are changed.123D Catch
Autodesk's 123D Catch allows you to take ordinary photos and turn them into extraordinary things.123D Catch and Meshmixer
All about Meshmixer
Classroom Tips
Additional Tools/Materials
- Extra SD cards.
- Needle files and sandpaper for finishing prints.
- Acetone or nail polish remover to clean platform (ABS printing).
- Rag for the acetone (ABS printing).
- 3mm Hex key to unscrew the fan if the extruder gets clogged.
- X-acto knife to cut off excess platic and to help remove model from platform.
- Squeegee to lay down the kapton tape on the build platform without air bubbles.
- Putty Knife to remove prints from bed.
- Kapton Tape to cover the build platform (ABS printing).
- Blue Painters Tape (PLA printing).
- Material to cover windows so that you can deal with drafts (ABS printing).
- Natural hair paintbrush cut short to remove dust from extruder.
- Tweezers to remove the small piece of filament when the the extruder gets clogged.
- Crazy glue.

Clogged Extruder
- Try unloading and loading first. You may need to to go "the wrong way" because the filament may be stripped.
- Unscrew the fan keeping the heat sink attached. If you see some filament in the hole below the drive gear, use a sharp, strong pair of tweezers to remove the filament.
- Turn drive gear around and use Natural hair Paintbrush cut short to clean
Leveling
Run through the the leveling script 4 times.Curling
As printed plastic parts cool the different areas of the object can cool at different rates. Depending upon the parts being printed, this effect can lead to warping and curling. Although PLA has a much lower shrinkage factor than ABS, both can warp and curl.- The platform may not be level which will prevent even adhesion
- There might be an adhesion issue. Print with a raft. Rafts are basically a large flat lattice work of printed material underneath the lower-most layer of your printed object. They’ll also help reduce warping and curling by allowing your printed object to adhere better to your flat build surface.
- The platform may not be clean. Clean your build surface. ABS and PLA stick better to a clean build surface. Keep it clean of dust, pieces of old prints, and any other debris.
- You might be printing too fast. Print slower. Printing slower allows finer detail, better adhesion to the build surface and lower layers, and gives the printed part more time to cool evenly.
- There may be drafts in the environment which causes the plate to heat up too much. Eliminate drafts or enclose your robot.
- Reduce infill. When printing a model you can chose to print it hollow, completely solid, or some percentage between zero and 100. The plastic inside a model exerts a force on the entire printed object as it cools. It stands to reason that the more plastic you have, the more those pieces of plastic will pull against themselves and the build surface as they cool. By reducing infill there will a reduced amount of internal tension as the object cools. Reducing these internal forces by printing with a lower infill ratio can help reduce curling and warping as well.
- The base of the model may not be level.Open the model in an application that will allow you to evenly slice off the bottom.
- There may be issues with the geometry. Rotating the model on the build platform might help.
Terrible Noise
There is a terrible noise. The extruder seems to be hitting the servo motor in the far right hand corner. The gantry may have become misaligned. See this tutorial for how to fix it.OmNomNom Creator &OpenSCAD
OmNomNom is a lightweight easy to use software tool to change 2D Images into 3D objects. It was designed by Thingiverse member Jetty.You can use OmNomNom to create 3D Cookie Cutters, Medallions, Logos, Surface Maps, Mazes, QR Codes, Stamps, or for anything where you need to get a 2D image into a 3D project.
It is simple to use, just drag and drop any common image format (gif, jpg, png, tiff etc.) into OmNomNom.
Choose the output format you want, and it will launch OpenSCAD containing a template of your 3D object.
If you don't use OpenSCAD, just create the .stl and print.
Compatibility: Mac OS X 10.7 or later (Lion or later)
Requirement: OpenSCAD 2011.12 or later
Download, open and drag OmNomNom.dmg into Applications. Then launch and create.
Watch the video
Papers
- Stress Relief: Improving Structural Strength of 3D Printable Objects by Ondrej Stava, Juraj Vanek, Bedrich Benes, Nathan Carr, Radom?r Mech, Purdue University, Adobe Systems Incorporated
- Thesis Feasibility Study For Teaching Geometry and Other Topics Using Three-Dimensional Printers
by Elizabeth Ann Slavkovsky
- Digital Fabrication and ‘Making’: The Democratization of Invention by Paulo Blikstein
- Low-cost 3D Printing for Science, Education and Sustainable Development from The International Centre for Theoretical Physics
