Introduction
The Arduino microcontroller is used for rapid prototyping. It can receive data from sensors to collect information in its surroundings and it can be used to control other electronic components like lights, motors and more.How it works
A program is written in the Arduino Integrated Development Environment (IDE), a special program that runs on your computer to allow you to write programs for the Arduino board in a simple language based on the language Wiring. When you press the button that uploads the program to your board, the code you have written is translated into the C language, and is passed on to the avr-gcc compiler, a piece of open-source software that makes the ultimate translation into the language understood by the microcontroller. This last step is important—it's where the Arduino IDE makes your life simpler by hiding away as much as possible the complexities of programming a microcontroller.The Interface
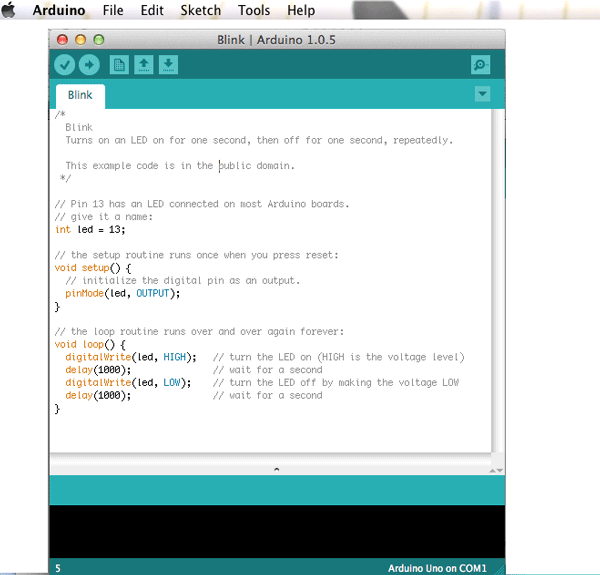
Click Verify to check your code

Help
Hilight a word then click on Help>Reference to see an explanation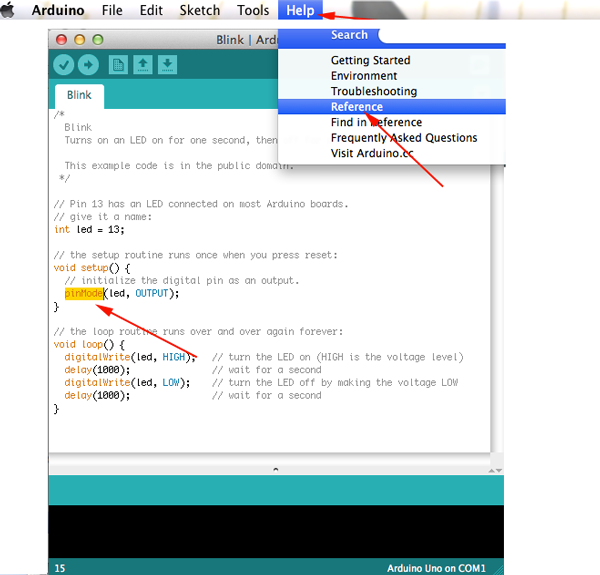
Common functions
-
pinMode()—set a pin as input or output
- digitalWrite()—set a digital pin high/low
- digitalRead()—read a digital pin's state
- analogRead()—read an analog pin
- analogWrite()—write an "analog" value
- delay()—wait an amount of time
- millis()—get the current time
For more information see the Arduino Programming Notebook
The Basic Sketch Structure
- Declare your variables at top of your sketch
- Initialize values
- setup()— run once at beginning, set pins
- Running
- loop()— run repeatedly, after setup()
Digital In/Digital Out
ButtonsLEDs
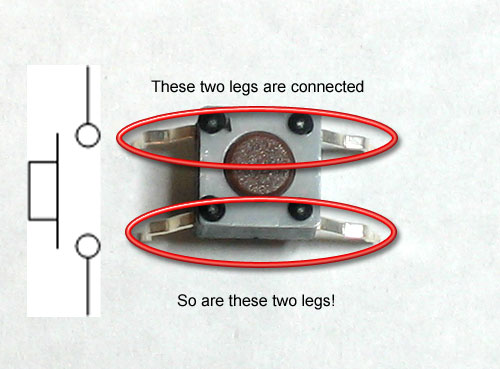
These mechanical devices can plug directly into a breadboard and have 4 legs, which may make you think that there are 4 wires that are
switched on and off, but in fact, two on each side are actually connected together inside.
So really, this switch is just a 2-wire switch.
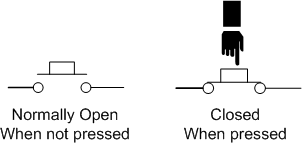
Normally, the two wires are disconnected (normally open) but when you press the little button on top, they become mechanically connected.
To get the buttons to sit better in your protoshield, you may want to straighten out the legs (just squish them with a pair of pliers) so that they look like the button on the left.
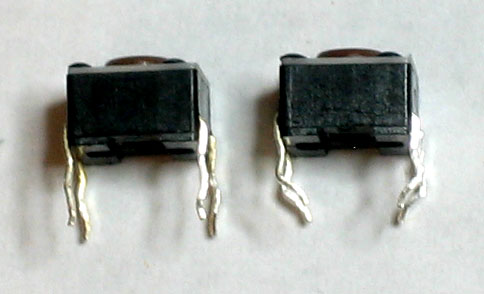
Images from Lady Ada
Normally, the two wires are disconnected (normally open) but when you press the little button on top, they become mechanically connected.
To get the buttons to sit better in your protoshield, you may want to straighten out the legs (just squish them with a pair of pliers) so that they look like the button on the left.
Images from Lady Ada
Adding the Microcontroller
Now connect the led and the switch to the chip based on the schematic below: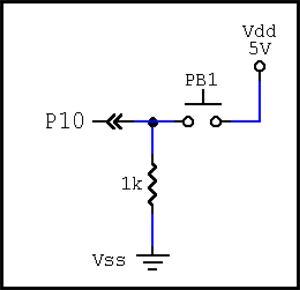
| The Arduino chip has uncommitted inputs.
That is, when an I/O pin is not connected and acting as an input,
it cannot be assured to be either HIGH or LOW.
Pull-up and pull-down resistors are needed to commit the
input to the non-active (open) state for switches. Think of buttons as screen doors that are influenced by the wind. You need to do something to keep the door either opened or closed. |
- When the button IS NOT pressed (open), P10 will sense Vss (0V, LOW, 0) because it is pulled-down to Vss.
- When PB1 IS pressed (closed), P10 will sense Vdd (5V, HIGH, 1) making it Active-High.
/* using a push button*/
int led=8;
int btn=10;
void setup(){
    pinMode(led,OUTPUT);
    pinMode(btn,INPUT);
}
 void loop(){
 if (digitalRead(btn)==0){
        digitalWrite(led,LOW);
     } else if  (digitalRead(btn)==1){
        digitalWrite(led,HIGH);
     }
 }
This code can be rewritten:
/* using a push button*/
int led=8;
int btn=10;
void setup(){
    pinMode(led,OUTPUT);
    pinMode(btn,INPUT);
}
 void loop(){
 if (!digitalRead(btn)){
        digitalWrite(led,LOW);
     } else if  (digitalRead(btn)){
        digitalWrite(led,HIGH);
     }
 }
/* using a push button*/
int led=8;
int btn=10;
void setup(){
    pinMode(led,OUTPUT);
    pinMode(btn,INPUT);
}
 void loop(){
     digitalWrite(led,digitalRead(btn);
 }
LEDs
LEDs are cool because they're tiny and long lasting (up to 10 years). Unlike incandescent bulbs, LEDs don't get hot or consume a lot of power.
LEDs come in many colors, brightnesses, sizes and shapes.
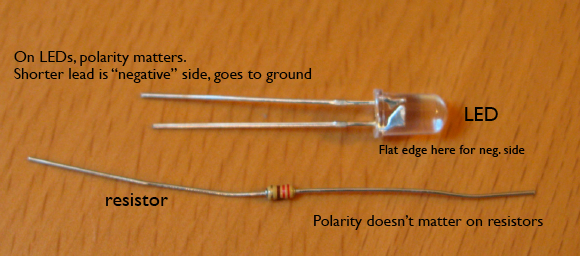
LEDs are polarized. The positive side (the side connected with the + side of the battery) is the longer leg and is referred to as the anode. The shorter leg, the negative side, is called the cathode. You won't hurt the LED if you accidentally plug it in backwards. It just won't work.
The color of an LED is determined by the semiconductor material and not by the package (plastic body). Different colored LEDs require different amounts of voltage to light up. Red, green, and yellow LEDs typically require 2.2V-2.4V. Super-bright white and blue LEDs can require up to 3.4V.
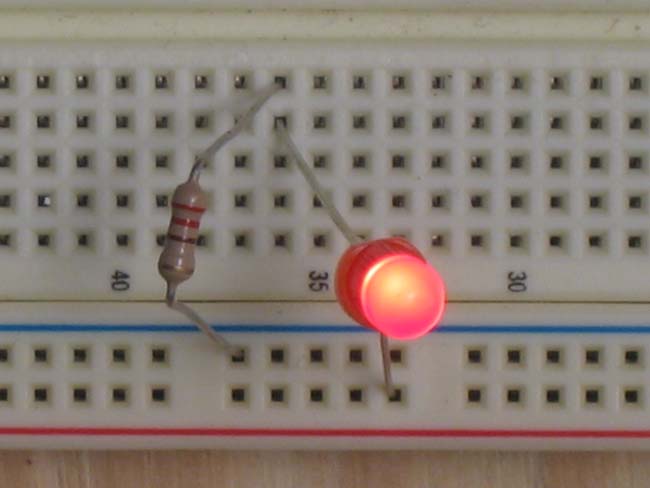
Most LEDs require 20mAh of current flowing from the battery, but most batteries supply more than 20mAh, so you need to use a resistor to limit the flow of current to each LED so they don't burn out.
VF Forward Voltage is also referred to as Voltage Drop. It is the minimum amount of voltage needed to light up an LED.
lV Luminous Intensity is the amount of light emitted from an LED in a particular direction. It is measured in millicandela (mcd). You can consider this property as brightess. The greater the millicandelas the brighter the LED.
IF Forward Current is the amount of current the LED uses.
Viewing Angle is the spatial distribution or spread of light. It is expressed in degrees that measure the width of the light beam. LEDs with a small viewing angle produce a more focused beam, and LEDs with larger viewing angles produce a softer more dispersed beam.
| Type | Color | IF | VF Typ | VF Max | Luminous Intensity | Viewing Angle | Wavelength |
|---|---|---|---|---|---|---|---|
| Standard | Red | 30mA | 1.7V | 2.1V | 5mcd@10mA | 60° | 660nm |
| Standard | Yellow | 30mA | 2.1V | 2.5V | 32mcd@20mA | 60° | 565nm |
| Super bright | Red | 30mA | 1.85V | 2.5V | 500mcd@20mA | 60° | 660nm |
UV LED's emit a light that you don't see, but that can damage your eyes. Be careful!
To use a resistor calculator you need the following information:
- Supply voltage, the voltage from your power source
- LED voltage Drop
- LED Forward Current
- Number of LEDs you want to connect
- Type of Connection— whether the LEDs are connected in series or in parallel
There are 3 ways to connect LEDs together:
- In parallel—each positive lead is connected to the positive lead of the next LED, and each negative lead is conected to the negative lead of the following LED.
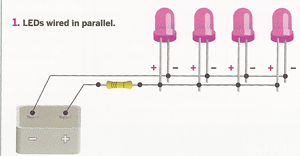
Image from Fashioning Technology - In series—each positive lead of an LED is connected to the negative lead of the next LED.
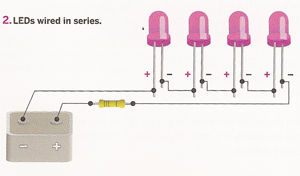
Image from Fashioning Technology - Separate LED chains—chains of LEDs wired together in parallel can be combined all together in series
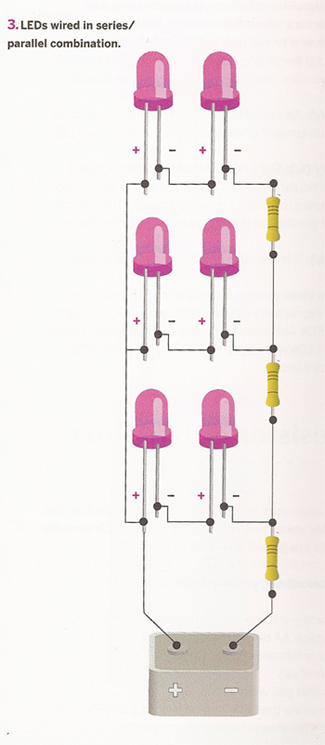
Image from Fashioning Technology
The decision to wire LEDs in series or in parallel depends mainly on the following factors:
- your power source
- the number of LEDs you wish to illuminate
- whether you are using different colored LEDs together
Electricity takes the path of least resistance If you have two different colored LEDs, one red with a forward voltage of 2.2V and the other green with a forward voltage of 2.4V, the current will flow through and light only the red LED. The green LED will be circumvented. It is possible to mix colored LEDs with the same specifications in a parallel circuit, but often some of the LEDs end up appearing dimmer than the others.
When LEDs are connected in parallel, the voltage across each LED remains the same, and the current is divided between them.
A circuit with a 3V battery and a resistor will light up 2 red LEDs with forward voltages of 2.2V when wired in parallel. Each LED will receive its 2V and the current will be dispersed between the two LEDs—therefore, you'll drain your battery more quickly than if you had wired them in series.
When resistors are connected so that the same voltage is applied across each resistor, the resistors are said to be connected in parallel. The single equivalent resistance R of three parallel resistors can be determined from:
1/Rtotal=1/R1+1/R2+1/R3
A connection of two resistors in parallel is called a current divider
1/Rtotal=1/R1+1/R2+1/R3
A connection of two resistors in parallel is called a current divider
In series— When LEDs are connected in series, the voltage is divided equally across each LED, and the current remains the same. If you had a series circuit with a 3V battery, a resistor and 2 red LEDs with forward voltages of 2.2V, neither would light up as each would receive only 1.5V.
When resistors are connected in a circuit so that the same current flows through each resistor, the resistors are said to be connected in series. It is possible to determine the resistance of a single resistor that has the same resistance as a number of resistors in series. This single equivalent resistance is just the sum of the individual resistances. For three resistors in series, the equivalent resistance R is given by:
Rtotal = R1 + R2 + R3
A series connection of two resistors is called a voltage divider
Rtotal = R1 + R2 + R3
A series connection of two resistors is called a voltage divider
Connecting different colored LEDs
The power supply must be equal to or more than the sum of the voltage requirements for each LED and its resistor. If you want to mix colors and wire your LEDs in parallel, then you need to add the right resistor to each LED (not one for the entire circuit). This levels the amount of power required to illuminate each LED.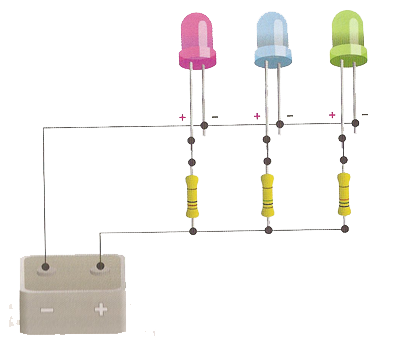
Image from Fashioning Technology
If your project requires the use of multiple LEDS and a small power supply, parallel wiring is the way to go.
Other Types of LEDs
Flashing LED
These LEDs contain an integrated circuit. They do not require resistors.IR LED
These LEDs emit Infrared light that is invisible to the human eyeThese are found in remote control devices
Piranha or High-Flux LED
These LEDs are square and have four leads: two are positive and two are negative. To distinguish the cathodes from the anodes you must refer to the LEDs' datasheet or create a simple circuit with alligator clips, a battery and a resistor.Blinking an LED without delay
 /* Blinking LED without using delay*/

// LED should be the pin connected to an LED
int led = ___;


// set value to the state of the LED before the program runs
int ledVal = 0;

// store last time LED was updated
unsigned long previousMillis = 0;

// interval at which to blink (milliseconds)
unsigned long interval = _____;

void setup(){
    // sets the digital pin as output
    pinMode(led,OUTPUT);

}

void loop(){
   if (millis() - previousMillis > interval) {

          // remember the last time you blinked the LED
          //by setting previousMillis to millis()
          previousMillis=millis();

          // if the LED is off turn it on and vice-versa.
          ledVal=!ledVal;
  }

    digitalWrite(led, ledVal);
}
 /* Blinking LED without using delay*/

// LED should be the pin connected to an LED
int led = ___;

int btn=____;
int btnVal;
int btnState;
boolean doYourThing=false;

// set value to the state of the LED before the program runs
int ledVal = 0;

// store last time LED was updated
unsigned long previousMillis = 0;

// interval at which to blink (milliseconds)
unsigned long interval = _____;

void setup(){
    // sets the digital pin as output
    pinMode(led,OUTPUT);
    // sets the digital pin as input
    pinMode(btn,INPUT);
    btnState=digitalRead(btn);
}

void loop(){
   btnVal=digitalRead(btn);

   if(btnVal!=btnState){
       if(btnVal){
           doYourThing=!doYourThing;
       }
   }

   if(doYourThing){
      // check to see if the difference between the current time
      //and last time you blinked the LED is greater than
      // the interval at which you want to blink the LED.
      if (millis() - previousMillis > interval) {

          // remember the last time you blinked the LED
          //by setting previousMillis to millis()
          previousMillis=millis();

          // if the LED is off turn it on and vice-versa.
          ledVal=!ledVal;
      }
  }else{
      ledVal=0;

  }

    digitalWrite(led, ledVal);
    btnState=btnVal;
}
Digital In/Analog Out
Microcontrollers cannot produce varrying voltages. They produce a high (5V) and a low (0V). But you can "fake" analog output by using pulsewidth modulation. Just like animation creates the illusion of movement, pulsewidth modulation, manipulates the intervals bewtween on (the pulsewidth) and off in such a way that it fools the eye and appears to be between on and off.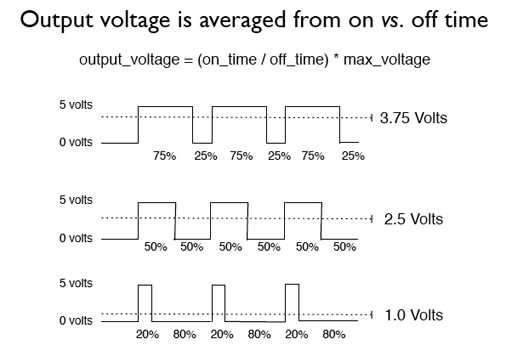 Image from sweb.cityu.edu.hk
Where can I find me some PWM?
- Dimmers
- Speed control
- Noise making
Exercise I—Analog Out
The easiest way to see PWM in action is to attach an LED to one of the PWM pins. Be aware that you may be able to see the flashing rather than a dimming effect.Put the led on pin 9. This is a PWM pin.
int led = 9;    // PWM pin that the LED is on.
void setup() {
   //set the pin to be an
  _________________
}

void loop() {
    for(int i=0;i<255;i++){
        analogWrite(led,i);
        delay(10);
    }
    delay(100);
    for(int i=255;i>0;i--){
        analogWrite(led,i);
        delay(10);
    }
    delay(100);
}
Low Pass Filter Circuit
This circuit uses a combination of a capacitor and a resistor to average out the pulses so that the time when the LED is off between pulses is not so pronounced. The capacitor stores up a charge during a pulse and releases in between pulses.
The circuit doesn't smooth all the pulses. It allows pulses below a certain threshold to pass through without smoothing them, and smoothes out those above the threshold frequency into an even pseudo-analog voltage. The range of frequencies filtered out is determined by the ratio of the resistor's value to that of the capacitor.
Add analog Input
 int led = 9;    // PWM pin that the LED is on.
int potVal;
int pot=A0;

void setup() {
  pinMode(led,OUTPUT);
}

void loop() {

  potVal=analogRead(pot);
  potVal=map(potVal, 0, 1023, 0, 255);
  analogWrite(led,potVal);
  delay(10);

}
Analog In/Digital Out
LDR stands for Light Dependent Resistor and is also known as a photoresistor. An LDR is made of a high resistance semiconductor. The LDR is similar to a normal resistor with the exception that normal resistor have fixed values and the LDR:s resistance is dependent on light in its vicinity. It is very hard to use an LDR to determine an exact amount of light in a given setting but they are good enough to use for determining light in a broader sense — if its dark or light.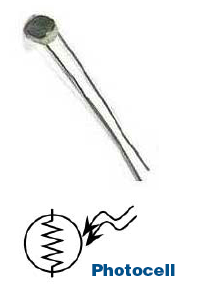
//Voltage Dividers
Image from ITP
The circuit above works for any variable resistor. It's a voltage divider.
In the image above, there are two voltage dividers, one on analog in 0 and one on analog in 1. The fixed resistor in each circuit should have the same order of magnitude as the variable resistor's range. For example, if you're using a flex sensor with a range of 50 - 100 kilohms, you might use a 47Kohm or a 100Kohm fixed resistor. If you're using a force sensing resistor that goes from inifinity ohms to 10 ohms, but most of its range is between 10Kohms and 10 ohms, you might use a 10Kohm fixed resistor.
Connect one lead of the LDR to GND. The other lead should connect to an analog pin and 5V through a resistor.
/* declare an led pin */

/* create a  variable to store the LDR value */

/* create a variable to hold a  threshold value  */

void setup(){
 /* set up communication and speed */
 Serial.begin(9600);

 /* declare led as OUTPUT */

}
void loop(){
	/*read the value, print to Serial monitor, test if it is less than your threshold.
	If it is, light the led. If it isn't, turn off the led
	*/

}
//Piezoelectric Sensors
Images from Bionic Arduino
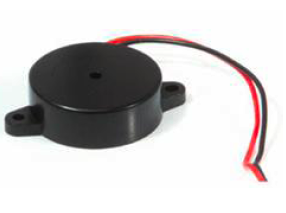
diagram:
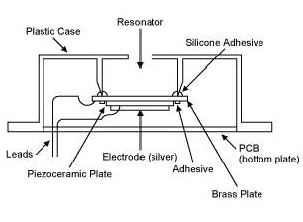
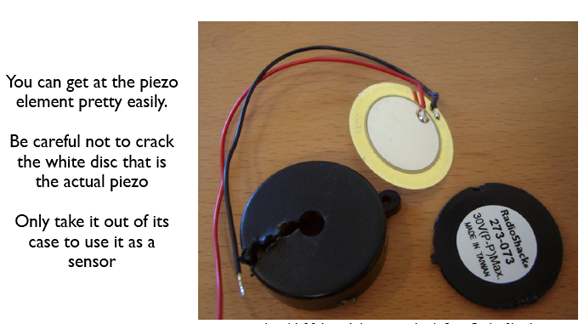
Inside the Piezo Buzzer
How it works
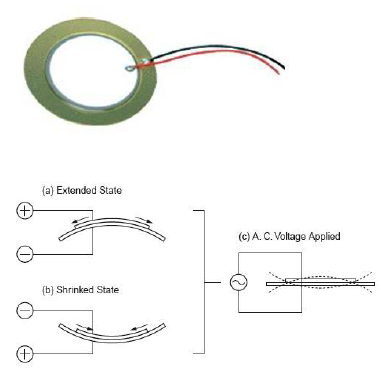
A certain amount of current is sent through the sensor, and that current is fed through the sensor. When the sensor is bent, the resistance of the sensor increases, and the amount of current returned from the sensor is reduced.Piezos have polarity. Commercial devices usually have a red and a black wire indicating how to plug it to the board. Connect the black one to ground and the red one to the input. You also have to connect a resistor in the range of the Megaohms in parallel to the Piezo element;
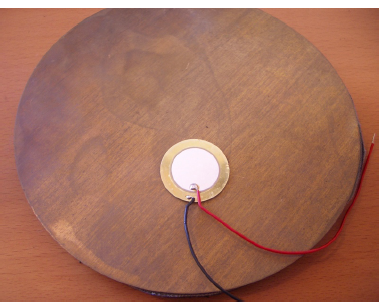
Sometimes it is possible to acquire Piezo elements without a plastic housing. These devices look like a metallic disc and are easier to use as input sensors.
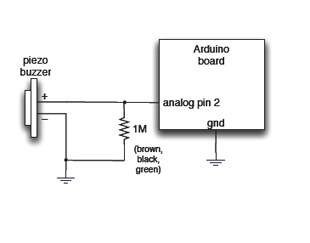 To read a piezo you can
just hook it into an
analog input, but you need to drain off
any voltage with a
resistor, or it just builds
up.
To read a piezo you can
just hook it into an
analog input, but you need to drain off
any voltage with a
resistor, or it just builds
up.
When the Piezo element is used to detect sound, it is a knock sensor. Knock sensors read a voltage value and transform it into a value encoded digitally. When using an Arduino, you transform the voltage into a value in the range 0..1024. 0 represents 0 volts, while 1024 represents 5 volts at the input of one of the six analog pins.
The code example will capture the knock and if it is stronger than a certain threshold, it will send the string "Knock!" back to the computer over the serial port.
// these constants won't change:
const int ledPin = 13;      // led connected to digital pin 13
const int knockSensor = A0; // the piezo is connected to analog pin 0
const int threshold = 150;  // threshold value to decide when the detected sound is a knock or not


// these variables will change:
int sensorReading = 0;      // variable to store the value read from the sensor pin
int ledState = LOW;         // variable used to store the last LED status, to toggle the light

void setup() {
  pinMode(ledPin, OUTPUT); // declare the ledPin as as OUTPUT
  Serial.begin(9600);       // use the serial port
}

void loop() {
  ledState=0;
  // read the sensor and store it in the variable sensorReading:
  sensorReading = analogRead(knockSensor);
  Serial.println(sensorReading);
  // if the sensor reading is greater than the threshold:
  if (sensorReading >= threshold) {
    // toggle the status of the ledPin:
    ledState = 1;
    // send the string "Knock!" back to the computer, followed by newline
    Serial.println("Knock!");
  }
  digitalWrite(ledPin, ledState);
  delay(100);  // delay to avoid overloading the serial port buffer
}
/ /Motor Pulse
Wire up a Piezo and a motor
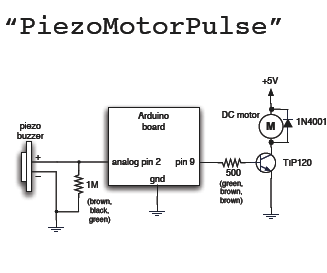
int ledPin = 13;
int knockSensor = 0;
byte val = 0;
int statePin = LOW;
int motor=___;
int THRESHOLD = 100;
int t;

void setup() {
 pinMode(ledPin, OUTPUT);
 beginSerial(9600);
}

void loop() {
  val = analogRead(knockSensor);
  if (val >= THRESHOLD) {
  //reverse the state of the pins
    ___________________
    //turn the led on
    ___________________

    t=0;
    while(analogRead(knockSensor)>THRESHOLD){
        t++;
    }
    if (t!=0){
     Serial.print("Knock!");
     Serial.print(t);
     analogWrite(motor,100);
     delay(1000);
     analogWrite(motor,0);
  }
 }

}
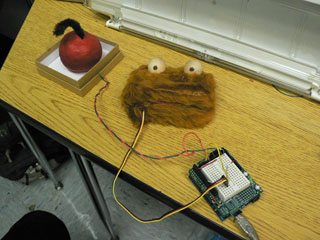
/ /Getting Creative
 You can mount the element on anything
(under rugs, floor mat, door, your body, etc.)
You can mount the element on anything
(under rugs, floor mat, door, your body, etc.)This one is glued to a larger brass disc for a drum trigger.
Analog In/Analog Out
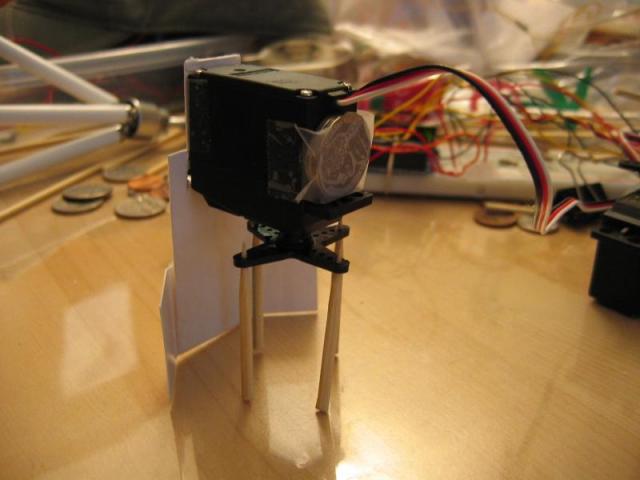
Making motions with servo motors
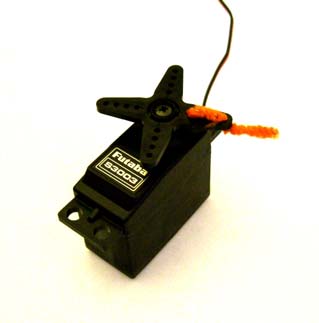
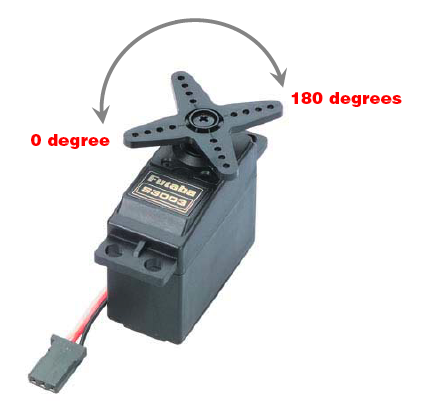 A Servo is a small device that has an output shaft. This shaft can be positioned to specific angular positions by sending the servo a coded signal. As long as the coded signal exists on the input line, the servo will maintain the angular position of the shaft. As the coded signal changes, the angular position of the shaft changes. In practice, servos are used in radio controlled airplanes to position control surfaces like the elevators and rudders. They are also used in radio controlled cars, puppets, and of course, robots.
What's inside:
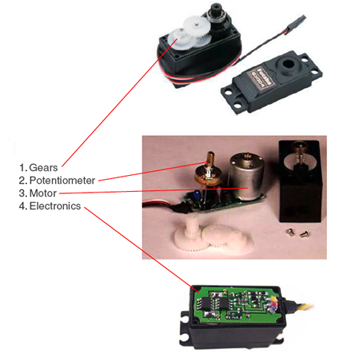
The servo motor has some control circuits and a potentiometer (a variable resistor) that is connected to the output shaft. This pot allows the control circuitry to monitor the current angle of the servo motor. If the shaft is at the correct angle, then the motor shuts off. If the circuit finds that the angle is not correct, it will turn the motor the correct direction until the angle is correct. The output shaft of the servo is capable of traveling somewhere around 180 degrees. Usually, its somewhere in the 210 degree range, but it varies by manufacturer. A normal servo is used to control an angular motion of between 0 and 180 degrees. A normal servo is mechanically not capable of turning any farther due to a mechanical stop built on to the main output gear.
The amount of power applied to the motor is proportional to the distance it needs to travel. So, if the shaft needs to turn a large distance, the motor will run at full speed. If it needs to turn only a small amount, the motor will run at a slower speed. This is called proportional control.
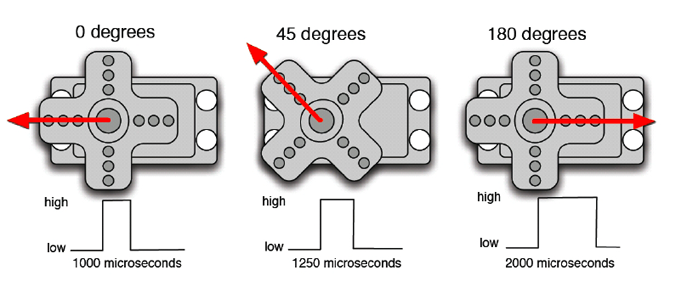
Angles of Rotation:
What servos are good for
- Roboticists, movie effects people, and puppeteers use them extensively
- Any time you need controlled, repeatable motion
- Can turn rotation into linear movement with clever mechanical levers
Where you find them
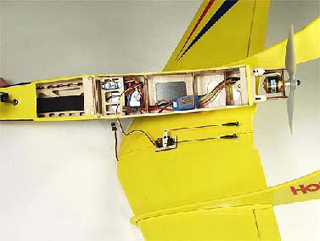
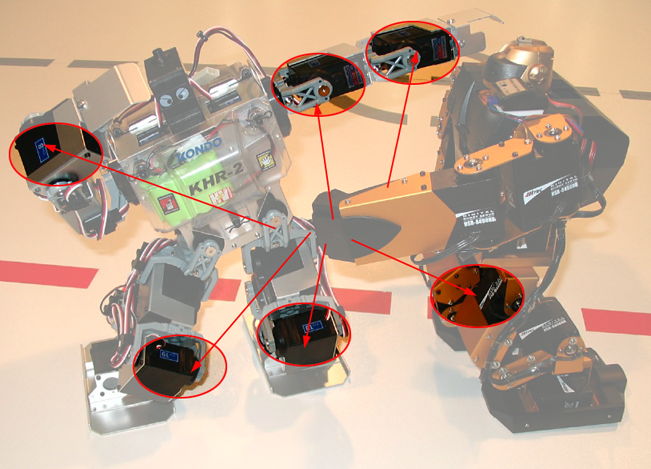
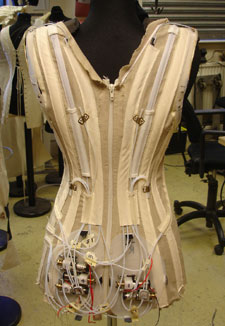
The underpinnings of one of the five transforming dresses featured in Hussein Chalayan's latest runway show. Wires within the tubes connect to motors at the bottom of the dress. The motors reel in wires attached to the outer layer of the garment, altering its shape.
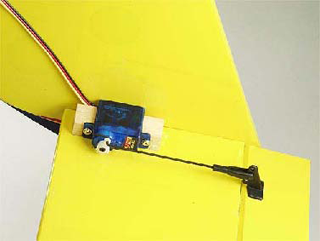
When using the servo, it is helpful to mark the servo horn. This allows you to follow the rotation:
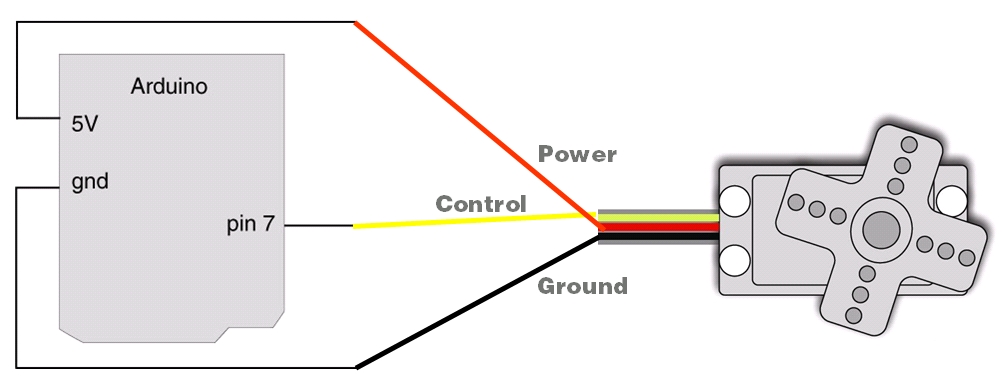
Connect the servo to the Microcontroller like this:
The computer can't really output analog values, but it can fake it. It fakes it using Pulse Width Modulation or PWM.
This program moves a servo across its full range:
But doesn't Arduino have PWM?
 Yes Arduino has built-in PWM on pins 3, 5,6, 9,10,11, and you can use
analogWrite(pin,value)
to write an analog value (PWM wave) to a pin. You can light a LED at varying brightnesses or drive a motor at various speeds.
After a call to analogWrite(), the pin will generate a steady wave until the next call to analogWrite (or a call to digitalRead or digitalWrite on the same pin). But it operates at a high, fixed frequency and isn't usable for servos. The PWM speed used for analogWrite() is set to 490Hz currently. It's
not something changeable without understanding more about how AVRs work.
So when programming AVRs in C outside of Arduino, PWM speed can be set to just about any value.
Yes Arduino has built-in PWM on pins 3, 5,6, 9,10,11, and you can use
analogWrite(pin,value)
to write an analog value (PWM wave) to a pin. You can light a LED at varying brightnesses or drive a motor at various speeds.
After a call to analogWrite(), the pin will generate a steady wave until the next call to analogWrite (or a call to digitalRead or digitalWrite on the same pin). But it operates at a high, fixed frequency and isn't usable for servos. The PWM speed used for analogWrite() is set to 490Hz currently. It's
not something changeable without understanding more about how AVRs work.
So when programming AVRs in C outside of Arduino, PWM speed can be set to just about any value. Here's the good news, the Servo library takes care of this for you:
Exercise
Wire up the servo and a potentimeter: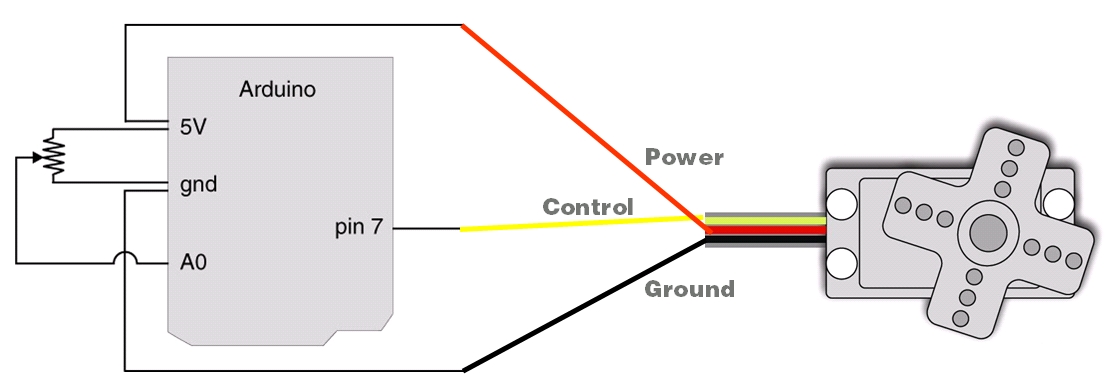
You are going to drive the servo with a potentiomer.
#include <Servo.h>
Servo myServo;
int pos=0;
int analogSensor=0;

void setup(){
  myServo.attach(9);
  myServo.write(0);
  Serial.begin(9600);

}
void loop() {
  pos=analogRead(analogSensor);
  Serial.println(pos);
  pos=map(pos,0,1023,0,180);
    myServo.write(pos);              // tell servo to go to position in variable 'pos'
    delay(15);                       // waits 15ms for the servo to reach the position

}
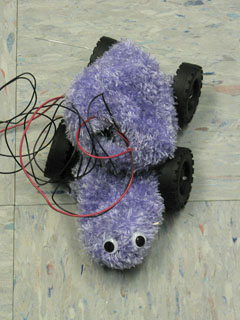
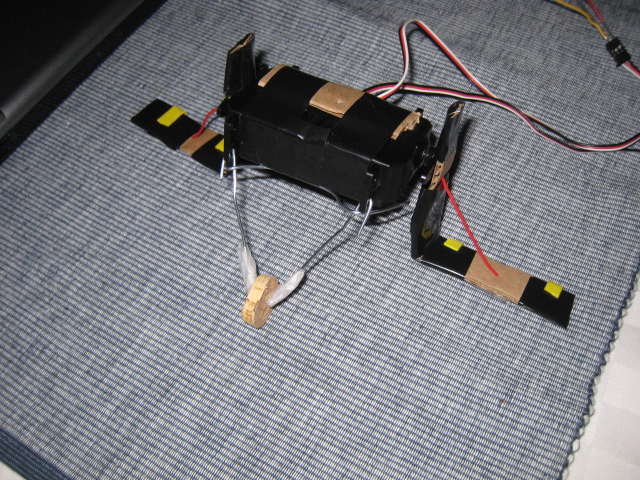
Servo Critters
From my class:
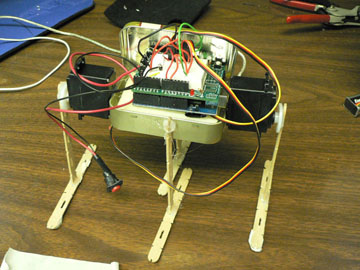


Others:
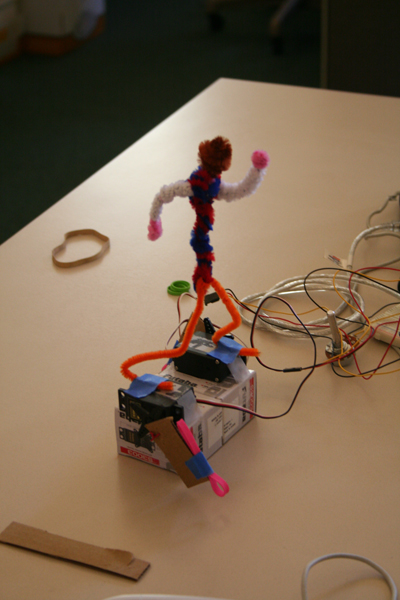

//twitchie v0.5
//Raphael Abrams

#define servoPinA 3     // Control pin for servo motor
#define servoPinB 9     // Control pin for servo motor
#define servoPinC 10     // Control pin for servo motor
#define Led 10          // activity light
#define minangle 550    // Minimum servo position
#define maxangle 2400   // Maximum servo position
#define trigger 0       // the analog pin that the sensor's on
#define AWAKEN 200
#define SLEEPY 50


char SEEDS[256] __attribute__((progmem)) = {
  208,75,137,110,218,247,165,23,248,216,204,59,118,35,193,29,83,158,93,57,224,194,3,207,205,149,203,22,129,171,10,
  142,251,99,249,244,144,16,17,238,37,197,111,151,4,192,104,7,95,150,67,101,69,15,132,186,87,156,206,27,166,20,182,
  163,92,198,119,213,180,61,152,39,185,19,58,45,33,64,24,160,40,222,172,131,227,221,105,108,177,183,73,43,157,12,199,
  113,9,245,126,130,106,120,210,215,31,167,246,76,139,195,239,50,229,169,55,122,212,30,112,6,85,141,82,236,21,32,89,
  219,173,188,127,74,214,187,190,176,62,123,189,121,184,148,225,34,1,196,28,49,46,79,77,54,117,240,175,242,140,231,
  13,128,25,97,146,228,179,116,70,53,178,18,254,78,109,155,241,233,81,255,159,202,102,2,174,14,147,234,60,8,84,52,98,
  100,230,145,211,125,11,181,164,26,90,134,161,36,71,223,143,232,136,63,68,51,96,243,66,65,235,47,154,237,252,72,209,
  114,138,115,86,250,5,94,133,42,44,88,226,103,253,124,168,91,48,217,56,80,135,220,107,191,201,162,153,38,170,41,200,0};


/////////////////////////////////////////////////////////////////
void setup() {
  pinMode(servoPinA, OUTPUT);  // Set servo pin as an output pin
  pinMode(servoPinB, OUTPUT);  // Set servo pin as an output pin
  pinMode(servoPinC, OUTPUT);  // Set servo pin as an output pin

  pinMode(Led, OUTPUT);  // Set servo pin as an output pin
  Serial.begin(9600);
}
/////////////////////////////////////////////////////////////////
void loop() {
  ledflash(3,200);
  Serial.println("I... am... ALIIIIVE!!!!!");
  purr(3,20,4);
  while(1){
    analogWrite(Led,random(1,200));
    randomSeed(millis());
    if(analogRead(trigger)>AWAKEN){
      Serial.println("WAKEY!!!");

      burst(random(10,150),random(2,20),1);
      delay(200);
      burst(random(10,150),random(2,32),0);
      delay(random(200,2500));
      quiver(1, random(3,10),random(3,10),random(30,140));
      //    purr(random(1,10),20,random(2,15));
    }
    if(analogRead(trigger)<SLEEPY){
      Serial.println("TIRED");
      quiver(0, random(3,10),random(3,10),random(30,140));
      timedsleep(random(10,50));
    }
    if(analogRead(trigger)<SLEEPY){
      Serial.println("TIRED");
      quiver(0, random(3,10),random(3,10),random(30,140));
      timedsleep(random(10,50));
      purr(3,20,4);
    }
  }
}
//  burst(100,10,1);//perfect!
//  burst(10,10,0);
//  purr(3,20,4);
//  quiver(5,5,100);
////////////////////////////////////////////////
////////////////////////////////////////////////


void ledflash(int number, int duration) {
  for(int i=number;i>0;i--){
    delay(duration/2);
    digitalWrite(Led, HIGH);   // sets the LED on
    delay(duration/2);                  // waits for a second
    digitalWrite(Led, LOW);    // sets the LED off
  }
}

//////////////////////////////////////////////////////////////
void servo(char pin, int angle){
  // protect the servos from pulses that move them too far
  if(angle>maxangle){
    angle=maxangle;
  }
  if(angle<minangle){
    angle=minangle;
  }

  // now figure out which one should move, and move it toward the angle specified
  // this will only move the servo by one pulse,
  // so you will need to call this a few times to get it all the way there
  if(pin=='A' || pin=='a'){
    digitalWrite(servoPinA, HIGH);
  }
  if(pin=='B' || pin=='b'){
    digitalWrite(servoPinB, HIGH);
  }
  if(pin=='C' || pin=='c'){
    digitalWrite(servoPinC, HIGH);
  }


  delayMicroseconds(angle);       // Length of the pulse sets the motor position

  if(pin=='A' || pin=='a'){
    digitalWrite(servoPinA, LOW);
  }
  if(pin=='B' || pin=='b'){
    digitalWrite(servoPinB, LOW);
  }
  if(pin=='C' || pin=='c'){
    digitalWrite(servoPinC, LOW);
  }

}


void burst(char quantity, char slowness, char type){
  int c, holdcount ;
  int rhold0, rhold1, rhold2, rhold3, rhold4, rhold5, rhold6, rhold7;
  if (type==0){
    for ( int i=quantity; i>0; i--){
      if (analogRead(trigger) < SLEEPY ) {
        return;
      }
      Serial.print("whee! ");
      rhold0 = random(minangle,maxangle);
      rhold1 = random(minangle,maxangle);
      rhold2 = random(minangle,maxangle);

      holdcount = random(1,10);
      for ( c=slowness; c>0; c--){
        servo('a',rhold0);
        servo('b',rhold1);
        servo('c',rhold2);

        delay(holdcount);
      }
    }
  }
  if (type==1){
    for ( ; quantity>0; quantity--){
      if (analogRead(trigger) < SLEEPY ) {
        return;
      }
      Serial.print("wh00t! ");
      rhold0 = random(minangle,maxangle);
      rhold1 = random(minangle,maxangle);
      rhold2 = random(minangle,maxangle);

      holdcount = random(1,10);
      for ( c=holdcount; c>0; c--){
        servo('a',rhold0);
        delay(slowness);
      }
      holdcount = random(1,10);
      for ( c=holdcount; c>0; c--){
        servo('b',rhold1);
        delay(slowness);
      }
      holdcount = random(1,10);
      for ( c=holdcount; c>0; c--){
        servo('c',rhold2);
        delay(slowness);
      }

    }
  }
}

///////////////////////////////////////////////////////////////////////////////
void purr(int duration, int offset, int reps){
  int c,i,ii;
  int start0, start1, start2;
  int finish0, finish1, finish2;

  start0 = random(minangle,maxangle);
  start1 = random(minangle,maxangle);
  start2 = random(minangle,maxangle);

  Serial.print("pu");
  for(i=reps;i>0;i--){
    Serial.print("r");
    if (analogRead(trigger) < SLEEPY ) {
      return;
    }
    finish0 = random(minangle,maxangle);
    finish1 = random(minangle,maxangle);
    finish2 = random(minangle,maxangle);

    for ( ii=duration; ii>0; ii--){

      if (start0>(finish0+offset)){
        start0=start0-offset;
      }
      else if (start0<(finish0-offset)){
        start0=start0+offset;
      }
      else {
        start0=finish0;
      }

      if (start1>(finish1+offset)){
        start1=start1-offset;
      }
      else if (start1<(finish1-offset)){
        start1=start1+offset;
      }
      else {
        start1=finish1;
      }

      if (start2>(finish2+offset)){
        start2=start2-offset;
      }
      else if (start2<(finish2-offset)){
        start2=start2+offset;
      }
      else {
        start2=finish2;
      }


      if (start0 != finish0){
        servo('a',start0);
      }
      if (start1 != finish1){
        servo('b',start1);
      }
      if (start2 != finish2){
        servo('c',start2);
      }


      delay(25);
    }
  }
}

////////////////////////////////////////////////////////////////////////////
void quiver(char quittable, char duration,char slowness, char intensity){
  int c, holdtime ;
  int rhold0, rhold1, rhold2, rhold3;
  Serial.print("qu");
  for ( ; duration>0; duration--){
    rhold0 = random(minangle,maxangle);
    rhold1 = random(minangle,maxangle);
    rhold2 = random(minangle,maxangle);

    holdtime = random(2,25);
    if ((quittable)&&(analogRead(trigger) < SLEEPY)) {
      return;
    }
    Serial.print("i");
    for ( c=slowness; c>0; c--){
      servo('a',rhold0);
      servo('b',rhold1);
      servo('c',rhold2);


      delay(holdtime);
      servo('a',rhold0+intensity);
      servo('b',rhold1+intensity);
      servo('c',rhold2+intensity);

      delay(holdtime);
    }
  }
  Serial.println("ver");
}

/////////////////////////////////////////////////////////////////////////
void timedsleep(int duration){
  int c;
  Serial.print("I'm sleepy! I'm going to sleep for ");
  Serial.print(duration, DEC);
  Serial.print(" Z's... getting... ");
  Serial.print("sle");
  for ( ; duration >0; duration --){
    for (c=4;c>0;c--){
      delay(150);
      Serial.print("e");
      if (analogRead(trigger) > AWAKEN ) {
        Serial.print("  Oh! you woke me!");
        return;
      }
    }
  }
  Serial.println("py ");
}
Serial Communication-Arduino to Processing
In Arduino, you read a sensor and send data as a byte:
int val;
int sensor=A0;
void  setup(){
     Serial.begin(9600);
}
void loop(){
    val=analogRead(sensor);
    val=map(val,0,1023,0,255);
    Serial.write(val);
    delay(50);
}
import processing.serial.*;

Serial myPort;

void setup(){
    String portName = Serial.list()[0];
    myPort = new Serial(this, portName, 9600);

}

void draw(){
   while(myPort.available()>0){
       int inByte=myPort.read();
       println(inByte);
   }

}
You are going to control a shape on the screen with a variable resistor attached to your Arduino.
- Wire up a potentiometer or other variable resistor
- Start with the Arduino code above. You'll need to add statements to initialize your sensor and your sensor's value as well as set up Serial Communication in your setup() method.
- Upload your program to your board, then close Arduino
- Open Processing and create a new document
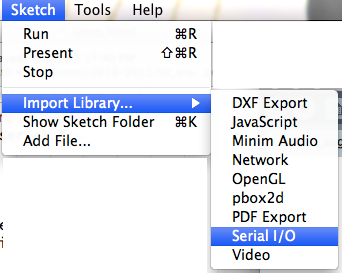
- You need to import the processing.serial* library. Your first line should do that.
- You need to create an instance of the Serial object:
Serial myPort;
- Create instance variables to hold your xPosition and yPosition. These variables should be of type float
- Create a setup() method.
- Inside the setup() method you want to get a list of serial ports:
println(Serial.list());
- If you run the sketch now, you should see something like this:

- If your Arduino is plugged in, it is probably attached to the tty.usbserial port. On my computer this was the first port or the port described as [0]
- Back in your setup() method, you can comment out the println() statement. Add a statement that will initialize the Serial port and assign it to your port instance:
myPort = new Serial(this, Serial.list()[your_port_number], 9600); - Set the size for your sketch by using this syntax:
size(width,height);
- Set the fill color by using this syntax. the values range from 0-255:
fill(red, green, blue);
- Set the y position of the object to 50% of the stage height or half the height.
- Create the draw() method
- Set the background color by using this syntax. The value ranges are between 0-255:
background(red, green, blue);
- Create a shape (like an ellipse) that you will control with your variable resistor. Set the position to your xPosition and your yPosition. Give your shape a width and height
- Outside of the draw() method create a new method called serialEvent(). This method returns void and takes Serial myPort as a parameter. Inside the method set the xPosition valiable to myPort.read().
- map the value of xPosition so that instead of being between 0-255 it ranges between half the width of the shape to the width of the sketch less half the width of the shape.
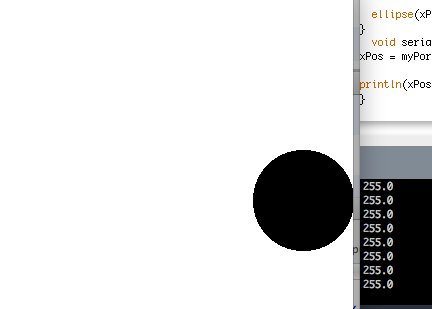
- Use println() to see the value of xPosition
- Run the sketch
- Run the sketch
Multiple Values
Call and Response
A way to keep multiple bytes of serial data in order is to send one set of values at a time. If you use this method, the receiving program has to request new data every time it finishes reading what it's got.- Start with this code:
int firstSensor = 0; // first analog sensor int secondSensor = 0; // second analog sensor int inByte = 0; // incoming serial byte void setup(){ // start serial port at 9600 bps: Serial.begin(9600); establishContact(); // send a byte to establish contact until receiver responds } void loop(){ // if we get a valid byte, read analog ins: if (Serial.available() > 0) { // get incoming byte: inByte = Serial.read(); // read first analog input, divide by 4 to make the range 0-255: firstSensor = analogRead(A0); firstSensor=map(firstSensor, 0,1023, 0, 255); // delay 10ms to let the ADC recover: delay(10); // read second analog input, divide by 4 to make the range 0-255: secondSensor = analogRead(A1); secondSensor=map(secondSensor, 0,1023, 0, 255); // read switch, map it to 0 or 255L Serial.write(firstSensor); Serial.write(secondSensor); } } - Add a new method at the end of the sketch called establishContact(). This method sends out a message on startup until it gets a byte of data from Processing. Later you'll modify the Processing sketch to look for this message and send a response:
void establishContact() { while (Serial.available() <= 0) { Serial.println('A'); // send a starting message delay(300); } } -
To call this new method, add a line at the end of the setup() method:
establishContact();
- Type any character in the output box and click Send. You'll get a string of sensor values at the end of your A's
- Type another character and click Send. The loop will always wait for an incoming byte before sending a new set of sensor values.
- Upload the previous code, close Arduino, open Processing, copy and paste:
/** * Serial Call-Response * by Tom Igoe. * * Sends a byte out the serial port, and reads 3 bytes in. * Sets foregound color, xpos, and ypos of a circle onstage * using the values returned from the serial port. * Thanks to Daniel Shiffman and Greg Shakar for the improvements. * * Note: This sketch assumes that the device on the other end of the serial * port is going to send a single byte of value 65 (ASCII A) on startup. * The sketch waits for that byte, then sends an ASCII A whenever * it wants more data. */ import processing.serial.*; // Fill color Serial myPort; // The serial port int[] serialInArray = new int[2]; // Where we'll put what we receive int serialCount = 0; // A count of how many bytes we receive float xpos, ypos; // Starting position of the ball boolean firstContact = false; // Whether we've heard from the microcontroller void setup() { size(400, 400); // Stage size noStroke(); // No border on the next thing drawn // Set the starting position of the ball (middle of the stage) xpos = width/2; ypos = height/2; // Print a list of the serial ports, for debugging purposes: printArray(Serial.list()); // I know that the first port in the serial list on my mac // is always my FTDI adaptor, so I open Serial.list()[0]. // On Windows machines, this generally opens COM1. // Open whatever port is the one you're using. String portName = Serial.list()[5]; myPort = new Serial(this, portName, 9600); } void draw() { background(255); fill(255,0,0); // Draw the shape ellipse(xpos, ypos, 20, 20); } void serialEvent(Serial myPort) { // read a byte from the serial port: int inByte = myPort.read(); // if this is the first byte received, and it's an A, // clear the serial buffer and note that you've // had first contact from the microcontroller. // Otherwise, add the incoming byte to the array: if (firstContact == false) { if (inByte == 'A') { myPort.clear(); // clear the serial port buffer firstContact = true; // you've had first contact from the microcontroller myPort.write('A'); // ask for more } } else { // Add the latest byte from the serial port to array: serialInArray[serialCount] = inByte; serialCount++; // If we have 2 bytes: if (serialCount > 1 ) { xpos = map(serialInArray[0],0,255, 0, width); ypos = map(serialInArray[1],0,255, 0, height); // print the values (for debugging purposes only): println(xpos + "\t" + ypos ); // Send a capital A to request new sensor readings: myPort.write('A'); // Reset serialCount: serialCount = 0; } } } - Run the program
