Setting up wifi
- Open terminal and ssh into your pi or connect your pi to a monitor and keyboard.
- Open the /etc/network/interfaces file
sudo nano /etc/network/interfaces - Change the file to the following::
 auto lo

iface lo inet loopback
iface eth0 inet dhcp

allow-hotplug wlan0
iface wlan0 inet manual
wpa-roam /etc/wpa_supplicant/wpa_supplicant.conf

iface school inet static
address <school address>
gateway <school gateway>
netmask <school netmask>

iface home inet static
address <home address>
gateway <home gateway>
netmask <home netmask>
- CTRL+X,Y,RETURN
- Open the wpa_supplicant.conffile
sudo nano /etc/wpa_supplicant/wpa_supplicant.conf - Add the following:
ctrl_interface=DIR=/var/run/wpa_supplicant GROUP=netdev update_config=1 network={ ssid="SCHOOLS NETWORK NAME" psk="SCHOOLS PASSWORD" proto=WPA key_mgmt=WPA-PSK pairwise=TKIP auth_alg=OPEN id_str="school" } network={ ssid="HOME NETWORK NAME" psk="HOME PASSWORD" proto=WPA key_mgmt=WPA-PSK pairwise=TKIP auth_alg=OPEN id_str="home" } - CTRL+X,Y+RETURN
- Avahi comes installed on the Raspberry Pi. But update before you do anything:
sudo apt-get update
-
"Zeroconf is 'a set of techniques that automatically creates a usable Internet Protocol (IP) network without manual operator intervention or special configuration servers.'
Avahi is an implementation of zeroconf which 'ships with most Linux and *BSD distributions', but not the Pi's Debian distro. Zeroconf will be familiar to Apple users as Bonjour, and is pretty clever tech which means that things Just Work when sharing stuff across computers on a network. In this context, it means that once [you've] set it up on the Pi, [you'll] be able to address it as:
raspberrypi.local
regardless of what IP address it's been assigned on your local network. This is handy if its IP is likely to change regularly, and even means we'll continue to be able to address it if we're on a different network (say, shuffling between home & work networks)."
Install avahi with the following commands on the Pi:sudo apt-get install avahi-daemon
- Type:
sudo insserv avahi-daemon
-
Create a config file for Avahi at /etc/avahi/services/multiple.service. I did this with the following command:
sudo nano /etc/avahi/services/multiple.service
-
The contents of this file should be something like the following, courtesy of aXon on the Rasperry Pi forums:
<?xml version="1.0" standalone='no'?> <!DOCTYPE service-group SYSTEM "avahi-service.dtd"> <service-group> <name replace-wildcards="yes">%h</name> <service> <type>_device-info._tcp</type> <port>0</port> <txt-record>model=RackMac</txt-record> </service> <service> <type>_ssh._tcp</type> <port>22</port> </service> </service-group> - CTRL+X, Y, RETURN
- Restart Avahi to apply the new configuration
sudo /etc/init.d/avahi-daemon restart
-
The Pi should now be addressable from other machines as raspberrypi.local, for example:
ssh pi@raspberrypi.local - Create a config file for Avahi
You need to open the config file
sudo nano /etc/avahi/avahi-daemon.conf - Navigate to where you see [server]. Uncomment #host-name=foo and set the host-name to something that makes sense
host-name=liz-pi - Press CTRL+X, Y and RETURN
- Shutdown
- Install Wireless module and restart.
- I'm using IP Scanner to find my pi. If all went well I should find li pi, an IP and a mac address.
- You should be able to now log in like this:
ssh pi@liz-pi.local - If you try to log in and see:
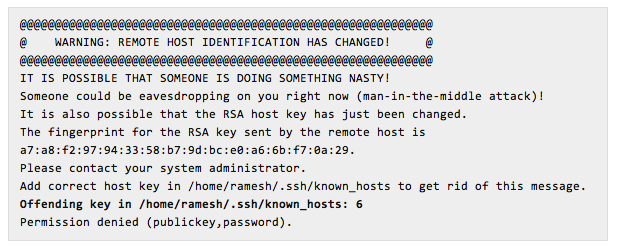 Do this:
# perl -pi -e 's/\Q$_// if ($. == 6);' ~/.ssh/known_hosts
Change the number to the line number shown in the message
Transfering Files
You can use SFTP to transfer content to the Pi.Download FileZilla onto your computer as your SFTP client.
- Open the application
- Click File > Site Manager
- In the General tab fill out the relevant connection details:
- Host:ip of your pi
- Protocol: select SFTP-SSH File Transfer Protocol
- Logon Type: set to normal
- User: specify the user (pi)
- Password: Specify the current password for the chosen account
- Click connect
- Navigate to /var/www
- Drag and drop any ontent into the target pi directory in FileZilla
- Click Disconnect on the toolbar to end the session
raspivid -o smallvid.h264 -t 15000 -w 1024 -h 768
sudo apt-get install -y gpac
MP4Box -fps 30 -add smallvid.h264 smallvid.mp4
omxplayer smallvid.mp4
Setting Up a Time-Lapse Webcam
- Install fswebcam
sudo apt-get install fswebcam
- The r switch specifies the dimensions the d switch the output directory
fswebcam -r 1024 x 768 -d /dev/video0 imagename.jpg
- Create a configuration file for fswebcam to save your defaults
cd ...
sudo nano .fswebcam.conf
- Add these lines and customize:
Save file
device /dev/video0 input 0 loop 15 skip 20 background resolution 320x240 set brightness=60% set contrast=13% top-banner title "webcam" timestamp "%d-%m-%Y %H:%M;%S (%Z)" jpeg 95 save /home/pi/webcam/viewcam.jpg palette MJPEG -
To start the fswebcam using the config file
fswebcam -c ~/.fswebcam.conf
- To stop the process:
pkill fswebcam
- To create a repeating operating system level job that snaps a picture every minute:
sudo nano camscript.sh
- Enter the following:
Save
#!/bin/sh filename=$(date +"%m-%d-%y||%H%M%S") fswebcam -r 356x292 -d /dev/video0 $filename.jpg cp $filename.jpg /home/pi/webcam - Make your shell script executable
sudo chmod +x camscript.sh
- Start the crontab editor for the pi user:
crontab -e
- When the file opens, move the curso r to the bottom. By entering ths line the pi will run the camscript.sh script every minute:
*/1 * * * * /home/pi/campscript.sh
