Circuit Bending
Introduction
In addition to turning sounds on and off, you can also use the CMOS Hex Inverter (4049) chip to make things louder. A preamp will boost a low-level signal. A preamp has five basic components:- The CMOS Hex Inverter (4049)
- The input resistor (10kΩ)
- Feedback resistor (larger than input resistor)
- Input capacitor (.1µF)
- Output capacitor (10µF)
Parts
Preamp
- 2 1/8" stereo miniplug connector—Cable wholesale
- 9V battery connector—Jameco
- 9V battery
- Wire—Electronix Express
- 100K-1MΩ potentiometer
- 1MΩ potentiometer
- CD4049 CMOS Hex Inverter
- 3 0.1µF capacitors
- 2 10-100pF capacitors
- 100KΩ potentiometer
Fuzzy Dice
- Preamp circuit
- CD4049 Quad Nand Gate
- 2 LDRs
- 2 0.1µF capacitors
- 100KΩ potentiometer
Divider
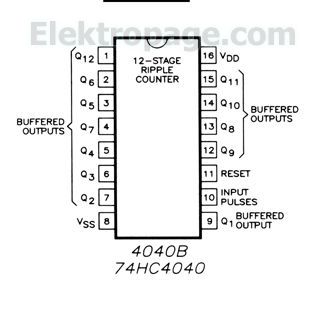
- CD4040 Binary Counter Divider
- 74C14 Hex Schmitt Trigger
- 100K-1MΩpotentiometer
- 1 0.1µF capacitor
- mini amp
- 1/8" jack
- handful of 10K capacitors
Envelope
- CD4046 Phase Locked Loop
- CD4017 Divide-By-Ten Counter
- resistors
- capacitors
Instructions
Preamp
4049 Schematic

- Connect power to power and ground to ground

- Place chip in breadboard and connect pin 8 to GND and pin 1 to power

- Connect a 10K Ω resistor to pin 2:

- Connect a 0.1µF cap:

- Connect pins 2 and 3 through a 100KΩ -1MΩ resistor:

- Connect pin 3 to the longer lead of an electrolytic 10 µF capacitor:

- Connect the red lead of the output going to your mini amp to the gnd lead of the 10 µF capacitor:

- Connect the power lead of the input to the 0.1µF capacitor and the gnd lead to gnd:

- Test the circuit. Have the input be your phone.
Fuzzy Dicer

Envelope Follower
The envelope follower circuit allows you to translate the loudness of a signal into brightness of an LED. The main control for this circuit is the 1MΩ potentiometer in the first gain stage.

Dividers

Build the following with 74C14 and the CD4040 chips
Tie multiple dividers to the output through 10K resistors:

The Design Process
Research how people play with audio distortors. Follow the steps of the design process, then design the housing that reflects your research.Basic steps of the Design Process
The Design Process requires- Describe the general situation or problem you are trying to solve. Instead of asking what do you want to design? ask why do you want to design that? and what problem and or need will your design ultimately be solving?
- Identify your target audience, the group that will benefit from your project. Is the target population an individual, a group, a specific community, or a larger, identifiable population? Is the target population from a specific location (country, region, town), demographic (age or gender), or other identifying characteristics (health condition or employment)? Think about how is your target population connected?
-
Research existing solutions to audio distorters. What aspects of their designs appeal to you, why?
- Observe how people approach devices with knobs and how they hold objects. Will your bended circuit rest on a table, be held in a hand or fixed to a surface?
-
Identify the requirements and constraints. A requirement is a need or a necessity; it's what a particular product or service should do. A constraint is a restriction on the degree of freedom you have in providing a solution to a need or problem.
Make lists.
- Determine if the compromises are necessary.
- Find images that speak to the style of your design
- Make sketches of 3 different approaches. See Examples
- Choose one to prototype
