Whirligigs
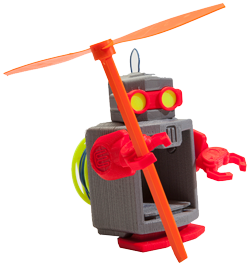
This project was derived from a project by Thingiverse member 23Meteor
A propeller's action creates a force in the upward direction, but the weight of the mechanism attached to the blades creates a force in the downward direction. In addition to up and down, the air rushing past the mechanism causes a resistance and also acts to pull it down.
There are two forces dragging the mechanism down and one force moving it up. If the one force moving the mechanism up is larger than the two forces acting down combined, the mechanism will lift up into the air. But, what happens if the size of the two forces acting down are almost the same as the one force going up?
In science and engineering, arrows are often used to depict the magnitude (size) and direction of different forces (vectors).
Can you answer this question? There are two forces dragging the mechanism down and one force moving it up. If the one force moving the mechanism up is larger than the two forces acting down combined, the mechanism will lift up into the air. But, what happens if the size of the two forces acting down are almost the same as the one force going up?
In science and engineering, arrows are often used to depict the magnitude (size) and direction of different forces (vectors).
Does size affect the ability to fly?
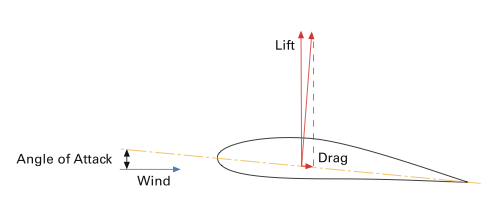
An airfoil is the shape of a wing or blade (of a propeller, rotor or turbine) as seen in cross-section. The airfoil shape of wind turbine blades creates lift while minimizing turbulence.
The lift on an airfoil is primarily the result of its angle of attack and shape. When oriented at a certain angle, an airfoil deflects the oncoming air, resulting in a force on the airfoil in the direction opposite to the deflection. This force is known as aerodynamic force and can be resolved into two components: Lift and drag.
Here are some resources to help you understand the complexity:
- http://www.grc.nasa.gov/WWW/k-12/airplane/foil3.html
- http://www.ae.illinois.edu/m-selig/ads/coord_database.html
- http://www.ppart.de/aerodynamics/profiles/NACA4.html
- WindWiseEducation.org
Instructions
- Download the
Stl file
- Print with 0 extra shells and 15-20% infill.
- Glue top and bottom halves of prop hub together and insert the blades with the less curved side as the leading edge. (A small clamp, even a clothespin, is very handy for keeping it all together).
- The stick should snap in without glue.
- Launch it by spinning it counter-clockwise, as quickly as possible, between your open palms. (Left hand remains stationary, right hand pushes away in the direction you want it to fly).
- Keep track of who can get it through a hoola-hoop or get it to fly the highest or farthest!
Extensions
How does the blade affect the ability to go higher?What variables can you change to affect the flight?
Here's the original skp file
Here's what you need to think about:
Drag
Drag is air resistance, the force that is working against the blades, causing them to slow down.You want to design your blades so that they have as little drag as possible.
Drag increases with the area facing the wind. Changing the angle of the blades will change the area facing the apparent wind (the real wind combined with the wind created with the blades movement or headwind). Changing the angle of the blades changes the area facing the wind. A blade pitch angle between 10-20° has less drag than greater angles.
Drag also increases with wind speed, so the faster the blades move through the air, the more drag force it experiences. The tips of the blade move faster than the base which is why the shape changes along the length of the blade.
-
Lift
Lift is the force that opposes drag. Your goal is to generate as much lift while minimizing the drag.
The amount of lift a blade can generate is determined by- shape
- speed of air passing around blade
- the angle of the blade relative to the apparent wind
-
Shape
Shape is how you can take advantage of the Bernoulli Effect:
Faster moving air has lower pressure. Wind turbines are cambered so that the air molecules moving around the blade travel faster on the downwind side than on the upwind side. This shape is like a teardrop. The downwind side is curved, while the upwind side is almost flat. Air moves faster on the curved, downwind side of the blade so there is less pressure on this side of the blade. The difference in pressure on the other side of the blade causes the blade to be lifted toward the curve of the airfoil.
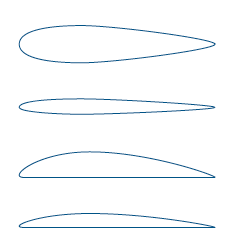
The profile of a blade changes down its length. It should get flatter and narrower toward the tip in order to optimize the lift and minimize the drag.
Speed
The faster the blade moves, the more drag it experiences. As the blades move faster, lift also increases. The faster that the air passes over the blade, the more lift can be generated.
Angle
The angle affects the amount of lift generated. The angle of the blade relative to the plane of rotation is the pitch angle.The angle of the blade relative to the apparent wind is called the angle of attack. Generally an angle of attack of 10-15° creates the least drag.
Torque
Torque is the force that turns or rotates something. Torque is equal to the force multiplied by distance, so the longer the blade, the more torque can be generated. But increasing the torque increases the drag.
So when you design, you need to think about:
- shape
- size
- number of blades
- angle of blades
- airfoil shape
- pitch
Helpful links for Blade Design:
- http://www.scoraigwind.com/wpNotes/bladeDesign.pdf
- http://www.otherpower.com/blades.html
- http://www.windstuffnow.com/main/blade_design_help.htm
Wind Turbines
Converting kinetic energy into electrical energy. Kinetic energy of wind turns the blades which drives a generator that converts the kinetic energy to electromagnetic energy.The current is used to do work, while voltage (the resulting force after overcoming resistance) is the energy required to drive the flow of the current.
A Turbine
The basic concept is simple. A framework or support column holds up a large wheel or turbine blades that looks like a fan or airplane propeller. The angled blades catch passing winds and deflect some of the wind's energy, which pushes the blades around, turning a central shaft. The shaft can be connected via gears or belts to machinery on the ground or in a nearby structure. Alternatively, the shaft can be connected directly to a generator that produces electricity, which is then transmitted.Blades
Blades of a windmill spin because of two principles:- Newton's Third Law—For every action there is an equal and opposite reaction. So when the wind hits the blade, the blade is pushed. If the blade is at a certain angle, the wind is deflected at an opposite angle, which pushes the blades
away from the deflected wind. You can see this in action with the flat blade. If you push the blade it will will move in the direction away from your finger.
- The Bernoulli Effect—Faster moving air has lower pressure.
Wind turbines are cambered so that the air molecules moving around the blade travel faster on the downwind side than on the upwind side. This shape is like a teardrop. The downwind side is curved, while the upwind side is almost flat.
Air moves faster on the curved, downwind side of the blade so there is less pressure on this side of the blade. The difference in pressure on the other side of the blade causes the blade to be lifted toward the curve of the airfoil.
Experiment:
- Take two pieces of paper
- Fold them in half
- Unfold them and place them together so that the folds you made line up but the creases should be on the outside
- Blow between the papers
- Did it match your expectations
The speed of the air is higher between the two pieces of paper than outside the papers. Higher velocity leads to a lower pressure between the sheets.
How blades capture wind power
Wind turbine blades work by generating lift with their shape. The more curved side generates low air pressures while high pressure air pushes on the other side of the airfoil. The net result is a lift force perpendicular to the direction of flow of the air.
Lift and Drag Vectors from WE Handbook- 2- Aerodynamics and Loads
The lift force increases as the blade is turned to present itself at a greater angle to the wind. This is called the angle of attack. At large angles of attack the blade stalls and the lift decreases again. When it comes to generating the maximum lift, there is an optimum angle of attack.
Another force also exists. This is called drag. This force is parallel to the wind flow, and also increases with angle of attack. If the airfoil shape is good, the lift force is much bigger than the drag. But at very high angles of attack, the drag will increase dramatically. When the angle is slightly less than the maximum lift angle, the blade will reach its maximum lift/drag ratio. The best operating point will be between these two angles.
The blade's own movement through the air means that the wind is blowing from a different angle. This is called apparent wind. The apparent wind is stronger than the true wind but its angle is less favorable: it rotates the angles of the lift and drag to reduce the effect of lift force pulling the blade round and increases the effect of drag slowing it down. So, to maintain a good angle of attack, your blade must be turned further from the true wind angle.
The closer to the tip of the blade you get, the faster the blade is moving through the air and the greater the apparent wind angle is. Therefore the blade needs to be turned further at the tips than at the root. Your blade must be built with a twist along its length. Typically the twist is around 10-20° from root to tip.
In general the best lift/drag characteristics are obtained by a blade that is fairly thin.
Length: The blade length determines how much wind power can be captured.
Aerodynamic Section: The blades have an aerodynamic profile in their cross section to create lift and rotate the turbine.
Planform Shape: The planform shape gets narrower towards the tip of the blade to maintain a constant slowing effect across the swept area. This ensures that none of the air leaves the turbine too slowly (causing turbulence), yet none is allowed to pass through too fast (which would represent wasted energy).
Airfoil Thickness: The thickness increases towards the root to take the structural loads, in particular the bending moments. If loads weren't important then the section thickness/chord ratio would be about 10-15% along the whole length.
Blade Twist: To maintain optimum angle of attack of the blade section to the wind, it must be twisted along its length.
Blade Number and Rotational Speed: Typically three blades.
Pitch Control: Because the wind power varies so greatly (with the cube of wind speed), the turbine must be able to generate power in light winds and withstand the loads in much stronger winds. Therefore, above the optimum wind speed, the blades are typically pitched either into the wind (feathering) or away from the wind (active stall) to reduce the generated power and regulate the loads.
Assignment
Create a mechanism that will spin in the wind. Attach the mechanism to a low RPM motor. Attach the leads of the motor to an LED. As the blades spin, the LED should light up.Vocabulary
Amperage —A measure of the flow rate of electrical current that is available.
Amps - Watts/Volts. Blade Pitch —Angle of the blades with respect to the plane of rotation. (Blades perpendicular to the oncoming wind would be 0 degrees. Blades parallel to the wind would be 90 degrees).
Drag —In a wind turbine also called wind resistance. Friction of the blades against air molecules as they rotate. Drag works against the rotation of the blades causing them to slow down.
Forces - Forces are the pushes and pulls in different directions. The direction and the strength of the force will be dependent on the strength and direction of all of the forces created by the forces added together. Scientists and engineers refer to this as the "sum of all the forces."
Lift —A force experienced by the blades that is perpendicular to the oncoming flow of air. Lift is a force working to speed up the rotation of the blades.
Multimeter —An electronic instrument that can measure voltage, current, and resistance. Power —The rate at which energy changes form from one form to another, or the rate at which work is done
Voltage —The electrical pressure that drives electric current. Voltage is a convenient way of measuring the ability to do electrical work. Volts = Watts/Amps
Vectors — In science, engineering, and mathematics, forces are a special type of quantity called a vector. Vectors have a magnitude (strength or size) and direction. When you add forces you are really adding both the magnitude (strength) of the force and its direction. Which way will a force move? You need to add both the magnitudes and directions of all the forces together.
Wattage —A unit of measure for power, or how fast energy is used. One watt of power is equal to one ampere (a measure of electric current) moving at one volt (a measure of electrical force). One watt is equivalent to one joule of electrical energy per second. Watts = Volts x Amps.
Project 3
This project was inspired by wings.avkids.comWorking in groups, build a toy helicopter just like the Wright Brothers did!
Materials
- 2 Makerbotted Propeller blades
- 2 Makerbotted fins and strut
- Makerbotted base and cork replacement
- 17" Long Rubber Band
- 1-Inch Diameter Domed Washer
- 2 Heavy Duty Paper Clips
- Super glue
- Needle Nose Pliers
- Wire Cutters
- Here is a template for the propeller:
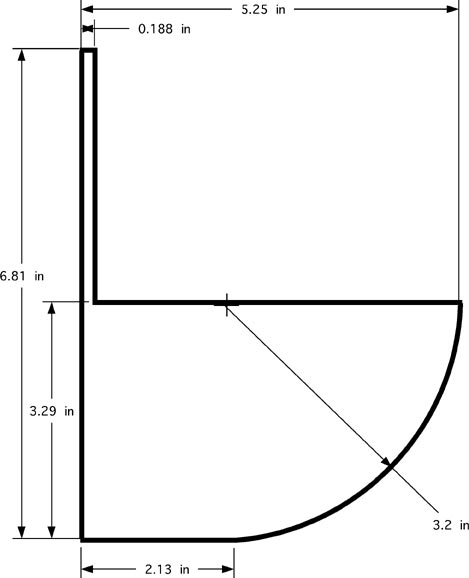
- Recreate this:
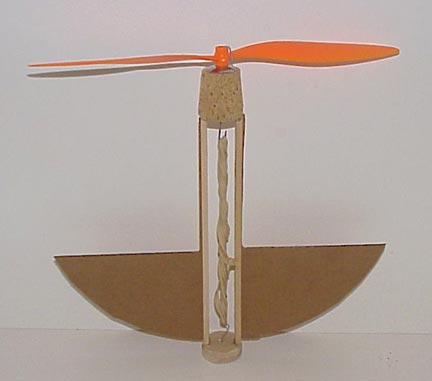
Open this stl in OpenSCAD and make a hole through the top for the wire.
Make a cone with a small hole in the center. and two other holes for the struts
Make the struts attached to fins.
Make a base with hole. - Bend the bottom of one of the paper clips into a hook shape as shown. Insert it through the bottom cork of the helicopter assembly. Bend the upper portion also into a hook shape.
Make a base with hole. - Bend the other paper clip in a tight hook so that it slides through the propeller hub (hole). Pass the paper clip through the domed washer with the dome (convex) side against the propeller. Now pass it through the upper cork end and bend the end of the wire into a hook.
Make a base with hole. - Attach the rubber band stretching between the upper and lower clips.
Make a base with hole. - You are ready to launch your helicopter! Holding the bottom base, wind the rubber band into a spiral. Hold the helicopter in one hand by the base, away from you but pointing up. Release the propeller and allow it to build up speed for a second, then let go of the base. The helicopter should rise 10 to 15 feet before the rubber band unwinds.
Make a base with hole.
Blender
Using Blender
The Loft tool is turned off as the default in Blender 2.62 and may not exist in your Blender 2.63 version.- To use it in version 2.62 or before open User Preferences>Add-Ons>Mesh>LoopTools
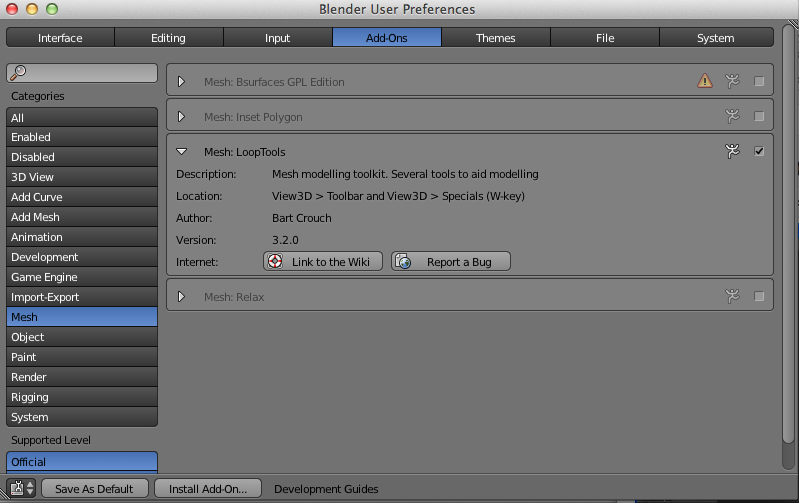
- If you don't have the LoopTools option go to this page, download the python script (put it in a convenient place). Click on install AddOn
Install the Add-On
- Enable it

-
Click as Save As Default
To use it in version 2.63 you may need to download and install the bsurfaces addon from here. If you don't find it in User Preferences>Addons>Mesh then download it.
- Open User Preferences>Addons>Mesh
- Click Install Addon... and navigate to your download
- Enable it
- Disable Smooth Stroke in preferences in Editing preferences
- Click as Save As Default
Using LoopTools
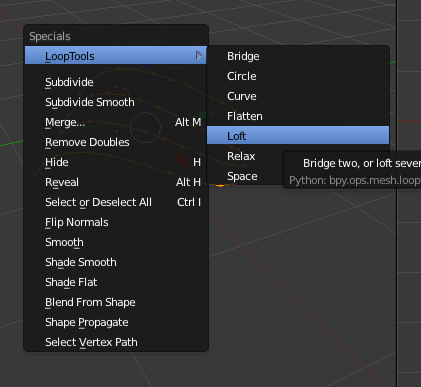
To use the Loft tool you must be in Edit mode. Select the vertices and press W, then Loop Tools and Loft.You need to make sure that your shape in Manifold (water-tight).
Select SHIFT+CTRL+ALT M if anything is selected go to Object mode and apply a Solidify Modifier
Return to Edit mode and reselect SHIFT+CTRL+ALT M. Still a problem? Try recalculating normals and try again.
Using BSurfaces
bsurfaces is an AddOn that allows you to create meshes from curves and the grease pencil.- Add in a mesh in Object mode
- Go to Edit mode
- Delete the vertices (X)
- Press N to open the right panel. Add in a grease pencil layer (but don't hold D and drag because this will be perpendicular to the view).
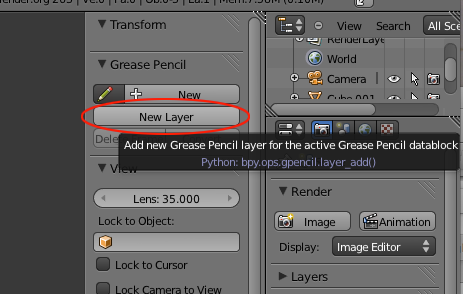
- Set Drawing Setting to Surface
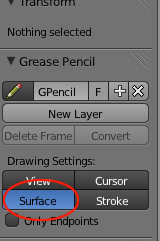
- Now hold down D and LMB drag/ D and RMB erases
Strokes (or curves splines) must be drawn in the order you want the surface to be built. The direction of the stroke determines how the surface is built. The first point of each stroke will be connected to the first point of the next, and each last point to the last point of the next. - Drag a few lines to describe start middle and end
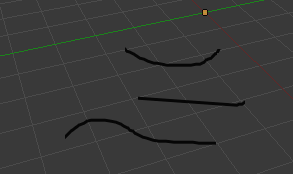
- Add surfaces from the BSurfaces Panel in the tool shelf
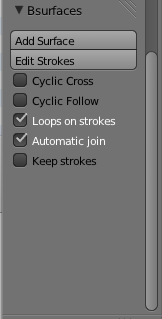
-
After the surface is built, the number of face-loops crossing the strokes and face-loops following the strokes can be edited. Other Bsurfaces options can also be tweaked in real-time in this panel.

- OPTION/ALT RMB click on the last loop to select it and add more lines. Connect them by adding surfaces
How to use Loft in Blender
- Add a bezier curve and adjust the curve in Edit mode
- Back in Object mode, make a duplicate (SHIFT+D) or add another curve.
Edit the curve in Edit mode
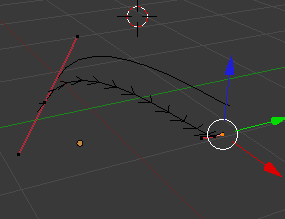
- Dupe or Add and edit a few times
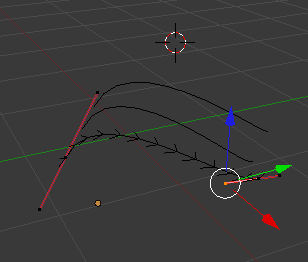
- In Object mode convert each curve to a mesh
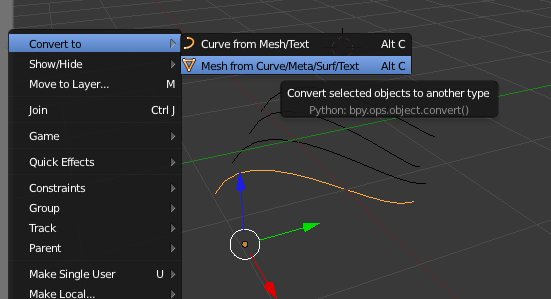
- Select the separate meshes and join them (CTRL+J)

- In Edit mode select all the vertices (A), press
W and select Loop tools and Loft
- In Object Mode add a Solidify modifier
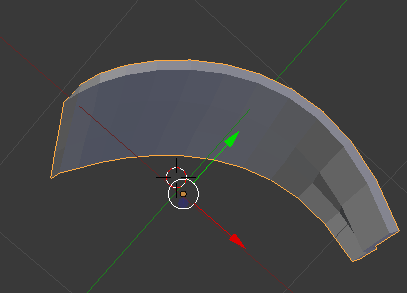
- In Edit mode check for Non-manifold SHIFT+CTRL+ALT M.
- If something is selected try Recalculating Normals
- Retry SHIFT+CTRL+ALT M
