Sketching
Drawing's real power lies in its immediacy and speed; its capacity to materialize thoughts and ideas quickly so that they can be expanded upon or shared before they disappear. The designer uses lines and marks to shepherd ideas into existence while they are still only partially formed in his or her mind.
This process— a cumulative rather than linear one— allows the designer to go back to a sketch and add to, or subtract from, it or simply revisit ideas on paper and continue the thinking process begun earlier. Such sketch ideation is not simply a matter of documentation or observation; instead it is a highly creative and dynamic act where the power and poetry of line can capture character and begin defining form or clarifying connections thereby enhancing communication. Sketching can be used to show cause and effect, time-based interactions, or form factors.
Henry, Kevin (2012-08-27). Drawing for Product Designers (Portfolio Skills) (Kindle Locations 109-115). Laurence King. Kindle Edition.
Sketching allows you to visualize and convey ideas quickly and effectively
Sketching can also allow you to create complex designs that are structually sound and visually clear.
Quick sketches do not have to be realistic. Their objective is to get the ideas down. Later on you can refine your sketches and ideas.
Before you ever model in software, you need to start with sketches. Software applications require user input, which if you want to make something structually sound and of the right size and proportions, you need an understanding of form.
 Henry, Kevin (2012-08-27). Drawing for Product Designers (Portfolio Skills) (Kindle Locations 109-115). Laurence King. Kindle Edition.
Sketching and drawing rely on conventions: common rules and procedures established by a community of users to facilitate quick exchange. The three most common drawing types are:
- Orthographic (top, front and side views)
- Isometric
- Perspective
Sketching is not only as a quick way to realize an idea, but it can also inform about how the object might be built in the computer. This relationship speeds up the design workflow.
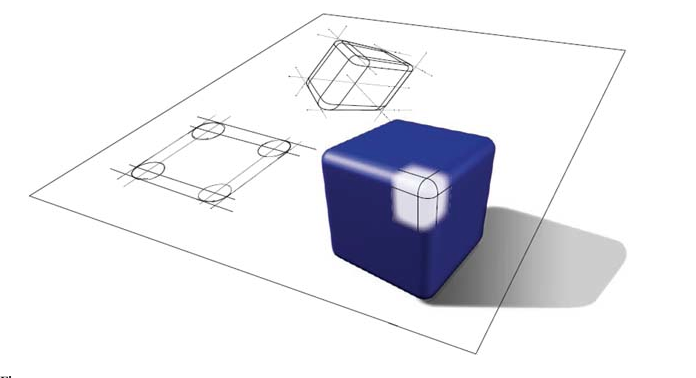
To convey your idea you often need a series of different drawing types. The image below shows the object in perspective (left), a top orthographic view (top right) and a section cut (bottom right). Note that annotating drawings provides additional information.
 Image from Radius Design, Chicago in Henry, Kevin (2012-08-27). Drawing for Product Designers (Portfolio Skills) (Kindle Location 2886). Laurence King. Kindle Edition.
Psychology and form
Gestalt psychology, which began in Germany in the early part of the twentieth century dealt with the visual and cognitive mechanisms behind pattern recognition. From Gestalt, we get the idea that the whole is greater than its parts.
Gestalt laws include:
- Proximity-we group objects that are close together.
- Similarity-we see relationships between similar objects
- Good continuation- objects that suggest movement are related together
- Closure-Objects that suggest a shape are viewed as closed
- Pragnanz-reality is organized or reduced to the simplest form possible
- Figure and ground-images break down into either figures or aspects of the landscape they are part of.
Illustration of Boolean operations
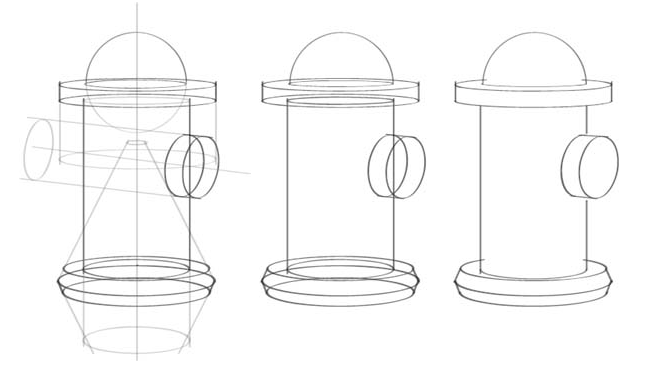 Henry, Kevin (2012-08-27). Drawing for Product Designers (Portfolio Skills) (Kindle Locations 109-115). Laurence King. Kindle Edition.
Deconstructing Geometry
You can learn a great deal about 3D space through deconstructing geometry. Polyhedra have vertices and edges. Unfolding the various faces provides an opportunity to consider planes, folding lines, and distortion as the faces tilt away. If you can learn how to visualize a polygon as a flat unfolded pattern you will be able to create 3D objects.
Resources for Nets
-
www.senteacher.org is a website that generates printable nets for the following polyhedra: cube, cuboid, cylinder, cone, regular pyramid, octahedron, rhombic prism, tetrahedron, icosahedron, hexagonal prism, hexagonal pyramid, pentagonal prism and pyramid.
- Korthalsaltes.com is a website where you can find paper models for constructing polyhedra.
- plus.maths.org explores the unfolding of polyhedra
- www.mathsisfun.com provides animations of many polyhedra solids and nets
- khanacademy's Nets of Polyhedra
- gwydir.demon.co.uk provides simple solid polyhedra and their nets
- illuminations.nctm.org Polyhedra and nets that can be manipulated and animated.
- edgalaxy
This exercise is from Henry, Kevin (2012-08-27).
Drawing for Product Designers (Portfolio Skills) (Kindle Locations 1323-1326). Laurence King. Kindle Edition.
- Take the unfolded pattern for a cube print it out on heavy card stock, and fold along the dotted lines to create a simple cube (polyhedron). You will use this physical model as a sketching aid.

-
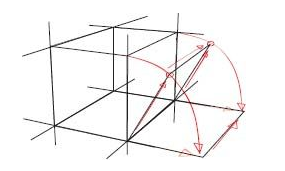
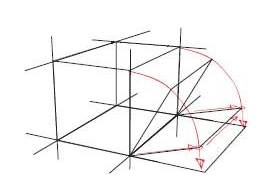
Quickly sketch a cube making sure to “sketch through” so that all occluded (hidden) edges are visible. Determine which face to unfold first and sketch a quick set of arcs (1/ 4 circle) to determine approximately where the face would land when unfolded to the ground plane.

-
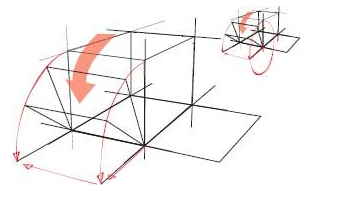
Sketch in several steps of the unfolding process for practice. Think of it as lifting weights for your sketching muscles. Use the quarter circles as references for where the plane would fall. If the arcs are sketched in perspective, they will help position everything accurately.
-
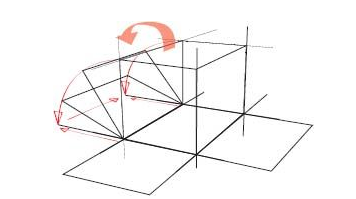
Continue sketching additional steps of the unfolding process by referencing the arcs and “chasing” the lines from vertex to vertex to form the closed flat plane. This method builds muscle memory by reducing the process to a mechanical and repeatable procedure.
-
The biggest challenge in this process is sketching the arcs with reasonable accuracy. Think of them as partial ellipses sketched around a center point and axis which is the bottom edge of the cube (see small detail above). If necessary, sketch in the full ellipse lightly.
-
Pay close attention to the receding lines of the cube while sketching the unfolding panels or planes. In this sketch, there is no horizon line or vanishing point— everything is approximated.
-
At this stage nearly every plane has been unfolded if you count the base plane, which is already sitting on the ground plane. But a cube has six planes or faces, which means there is a top to the box that needs to be added. For this you need to take a different approach.
-
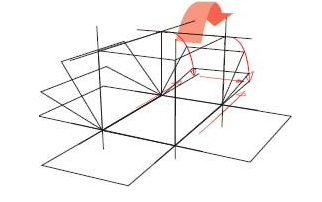
Referencing the front plane, project or extend lines forward in space to create a new plane or face. The problem is knowing where to end the plane. A simple procedure for proportionately extending planes in space involves sketching a centerline and projecting a new line that originates in the uppermost corner and passes through that centerline.
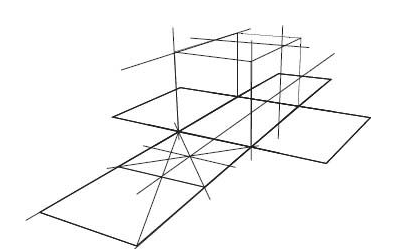
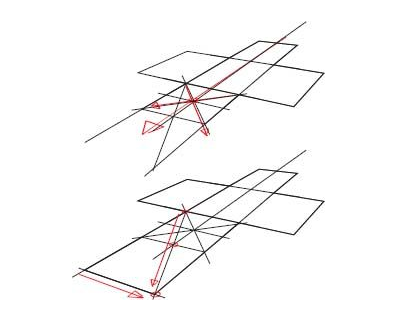
- Here is the process in a few steps :
- First the centerline is sketched through the existing flattened pattern (note that the diagonals help to accurately find the center).
- Next a line is projected from the uppermost corner that passes through the centerline and intersects with the projected line to determine the length of the plane.
- Finally the line is connected.
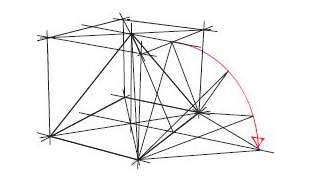
- Any polyhedron can be placed inside a cube to help with the referencing required to sketch the unfolding process. Here a pyramidal form is loosely sketched . The centers are determined by diagonals and lines are projected across the face. The side view of the form is projected on the side of the cube and projected down.
