

Flashlight: Parts that Fit Together
Just because you have a 3D printer doesn’t mean that you have to
use it to print all the parts of a design.
- If you can find a part that does not need to be printed, don’t print it!
- Look for material substitutes for dowels, slabs, and tubes.
- Use 3D printing for what it does best: allows you to design parts that cannot be
easily produced using other available means.

In this project you will not print the Flashlight’s tube, but instead
incorporate an inexpensive piece of PVC pipe and the Tinkercad
battery holder into your design.
Recommended age range 10+
Category: Beginner lesson
Tags: 3D CAD, 3D printing, 3D printed, beginners, design, education, constraints, LEDs, circuit
Software: Tinkercad
Lesson Duration: Two to three 45 minute classes (additional time to print)
Estimated filament use (per person): ~1.95m/~15g
Category: Beginner lesson
Tags: 3D CAD, 3D printing, 3D printed, beginners, design, education, constraints, LEDs, circuit
Software: Tinkercad
Lesson Duration: Two to three 45 minute classes (additional time to print)
Estimated filament use (per person): ~1.95m/~15g
Lesson Approach: Design Iteration
Design is an iterative process. One idea is good, but the next idea may be better, and the next idea after that can be even better —
because you are beginning to explore and refine.
There are many ways to fit the parts together, but some strategies are more simple to execute than others. You should make drawings to illustrate your ideas. Drawings are invaluable because they convey information that may not be readily apparent with your descriptions and they can get an idea/conversation started.
For this project, you can follow along with the walkthrough or you can try your hand at designing your own solution and use a Design Iteration approach to develop your design .
Lesson resources include:
- Walkthrough
- Example files
- Resource files
Objectives
- Design and measure with precision
- Demonstrate how to align objects
- Execute boolean operations
- Incorporate a circuit
- Extrude an SVG to create a 3D model
Flashlight: Bill of Materials (BOM)
Per student:
- One LED diffused 10mm (25 pack from Adafruit)
- One CR2032 Lithium Coin Cell Battery (from Adafruit)
- One piece of 1/2″ Schedule 40 PVC, at ~152.4 mm/6 inches long (from Amazon)
Per classroom:
A note about PVC pipe specifications in this lesson
The following measurements were made for the pipe sourced for the design of this activity:
- The diameter of the PVC pipe is 21.45mm, so the hole that fits over the PVC tube is
21.7mm. - The diameter of the Tinkercad Battery Holder is 32.25 mm, so the hole that
comfortably fits over the holder is 32.60mm. - Should you need to use PVC of a difference diameter or schedule size, you will need
to adjust recommended measurements to suit the parts you have sourced.
Light-Emitting Diodes (LEDs)
 |
An LED is a special type of diode which emits light when current flows through it.LEDs are symbolized like this:
|

Light-Emitting Diodes (LEDs)
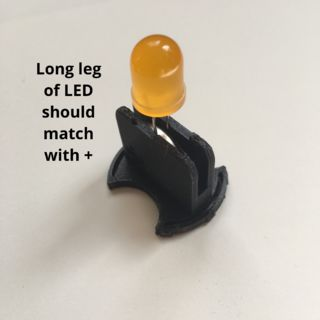
All LEDs are polarized. The positive side (the side connected with the + side of the battery) is the longer leg and is referred to as the anode. The shorter leg, the negative side, is called the cathode. You won’t hurt the LED if you accidentally plug it in backwards. It just won’t work.
The color of an LED is determined by the semiconductor material and not by the package (plastic body). Different colored LEDs require different amounts of voltage to light up. Red, green, and yellow LEDs typically require 2.2V-2.4V. Super-bright white and blue LEDs can require up to 3.4V.The optimum voltage is referred to as forward voltage (VF).
Most LEDs require 20mAh of current flowing from the battery. Most batteries supply more than 20mAh, so you need to use a resistor to limit the flow of current to each LED so it won’t burn out.

Light-Emitting Diodes (LEDs)
| Type | Color | IF | VFTyp | VFMax | Luminous Intensity | Viewing Angle | Wavelength |
|---|---|---|---|---|---|---|---|
| Standard | Red | 30mA | 1.7V | 2.1V | 5mcd@10mA | 60° | 660nm |
| Standard | Yellow | 30mA | 2.1V | 2.5V | 32mcd@20mA | 60° | 565nm |
| Super bright | Red | 30mA | 1.85V | 2.5V | 500mcd@20mA | 60° | 660nm |
- VF Forward Voltage is also referred to as Voltage Drop. It is the minimum amount of voltage needed to light up an LED.
- lV Luminous Intensity is the amount of light emitted from an LED in a particular direction. It is measured in millicandela (mcd). You can consider this property as brightess. The greater the millicandelas the brighter the LED.
- IF Forward Current is the amount of current the LED uses.
- Viewing Angle is the spatial distribution or spread of light. It is expressed in degrees that measure the width of the light beam. LEDs with a small viewing angle produce a more focused beam, and LEDs with larger viewing angles produce a softer more dispersed beam.
Design and measure with precision
To make sure two parts will fit, the inner diameter of one part must be bigger than the outer diameter of the other part.
A difference in diameter of 0.8mm to 1mm will generally allow for movement. For press fit parts, you can start with .2mm-.4mm and then test fit.
Remember: Parts which have the same inner diameter and the outer diameter will not fit!
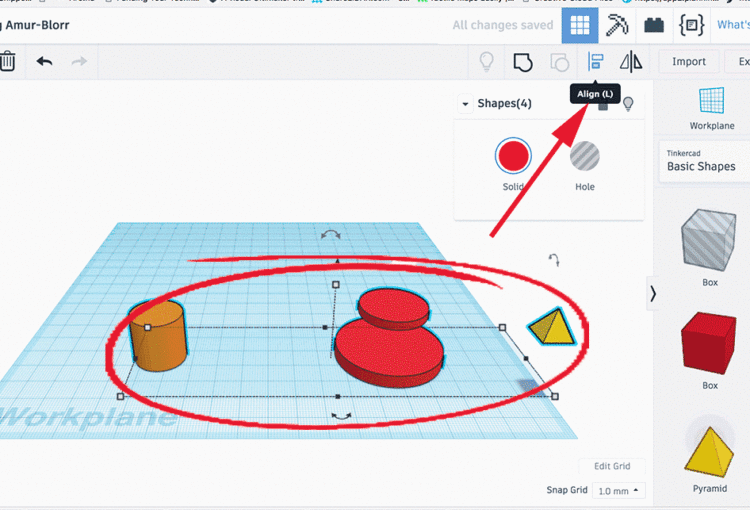
Demonstrate how to align objects
Aligning objects is necessary when you want to create multiple parts that work together.
In Tinkercad you can select multiple objects and then click on the Align Command. To select one item to stay in place, roll your cursor over the object until you see the aligning nodes. Then click on the object. Click on the nodes to select how you would like to align your objects.
In Fusion you can create sketches on the faces of objects and then use the project command to transfer the sketches from one object to another sketch.
Understand & execute boolean operations
Boolean operations are a structured way to combine solid shapes. The principle comes from set theory, where essentially the points in each shape are combined using logic operators like And, Or, and Not. In the world of 3D modeling, these terms are usually some variation of Union, Intersection and Difference or Subtraction.
Boolean operations allow you to form more complex shapes by combining simpler shapes. Boolean operators are widely used in B-Rep-based CAD solid modelers like Fusion 360 or SolidWorks.
 .
.
Boolean Operations
In Fusion 360 you will find all the Boolean Operations (Join, Cut, and Intersect) under the Modify→Combine Command.
Some examples of where to find the boolean operations in other software packages:
- Blender—Modifiers: Boolean(Union, Difference, Intersect)
- OpenSCAD—union(), difference(),intersection()
- Solidworks—Combine Menu
- Tinkercad—Group
SVGs and Tinkercad
Find an svg image on the internet or create one of your own.
- Search Google for a black and white SVG file (Use Advanced Search and search for Black and white SVG files ). Or just save this SVG.

Image by Elegant Themes
- In Tinkercad, click on the Import button.
- Navigate to your SVG file.
- Adjust the size. The width should be between 20-25mm.
Project Preparation
- Order and cut PVC piping. Each student should have a 6-7 inch piece of PVC.
- Purchase LEDs and Coin Cell Batteries. Each student will need an LED and a coin cell battery.
- Consider pre-printing the coin cell battery holders as students will not be modifying this STL.
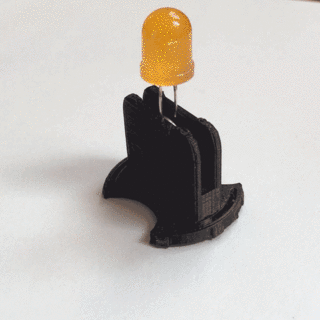
- Align the positive side of the battery with the plus sign on the 3D-printed holder:
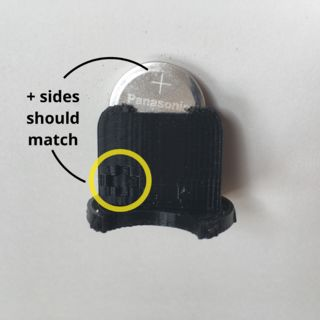
- Insert the LED from the top making sure that the longer leg lines up with the + sign on the holder.
Photos by Tinkercad