Serial - MIDI converter
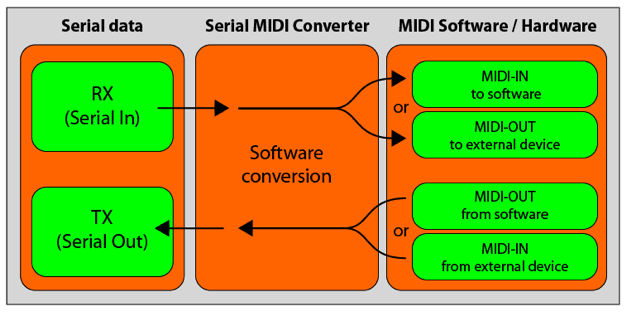
SM is software that connects your computer’s serial port with MIDI software and hardware.
Normally, to use an Arduino or other micro-controller with your MIDI software you had to build a MIDI circuit with a MIDI controller.
With SM and a USB enabled Arduino with USB, you can play music with software such as Apple’s GarageBand or Ableton’s Live.
SM takes incoming serial data and sends it to the desired MIDI port. It also takes MIDI data coming from the chosen MIDI port and forwards it to the serial port.
MIDI
The acronym MIDI stands for Musical Instrument Digital Interface.A Musical Instrument — a machine that makes sounds which humans have decided to call music. Digital
— information that is encoded using the binary numbering system.
Interface — a machine which facilitates communication between two or more systems.
In practical terms, MIDI is a standard way for all sorts of modern musical equipment to talk to each other. This equipment commonly consists of things like keyboards, computer sequencers, synthesisers, and samplers, but it also includes mixers, tape recorders, effects generators, guitars, drum kits, wind instruments etc.
The MIDI Standard was designed in the early 80's by a partnership between Roland and Sequential Circuits, two of the largest synthesiser manufactures of the time. This came about because of pressure from keyboard players, who wanted a universal interface standard for all their synthesisers to comply to. Dissatisfied with how different synthesiser corporations used their own proprietary communications standards which were incompatible with those of other corporations.
After the publication of the MIDI standard in 1984, other musical equipment manufactures quickly began to implement this standard in the designs of their products and MIDI became a accepted world wide.
MIDI information is transferred by sending a digital signal down a wire from one system to another. This digital data takes the form of binary numbers, physically transferred by sending zero volts for zero or off and plus five volts for one or on.
MIDI uses a form of serial to communicate at a data rate of 31250 bps with each byte made of 8 bits plus a stop and start bit. MIDI commands are most often three bytes in length but sometimes more or less.
Certain binary numbers convey certain types of information, for example a certain binary number will tell the device that a note on a keyboard has been pressed. This is called a note on event and the binary numbers sent through MIDI will also tell the receiving system which note has be pressed and how quickly it was pressed.
NoteOn Ch Note Velocity
Ch: 0-15. The channel that should play the note.
Note: 0-127. The piano keyboard note to play. 60 is middle C.
Velocity: 0-127. How hard the the piano keyboard note was struct.
NoteOff Ch Note Velocity
Ch: 0-15. The channel that should terminate the note.
Note: 0-127. The piano keyboard note to terminate.
Velocity: 0-127. How quickly the piano keyboard note was lifted.
The first byte is called the Status byte and contains both the type of MIDI command and the channel number. The high nibble of this byte tells the MIDI device what it is doing, such as Note Off, Note ON, Control change etc... The low nibble is the channel, it is used to differentiate between devices that are on the same MIDI bus and varies from 0 to 15.
The second byte is the Pitch byte and is simply the note being played, stopped, altered etc... This byte is in the range of zero to 127.
The third byte (when used with Note-On or Note-Off) is the velocity, which is a form of volume for the note being played. Imagine that you hit a drum softly, then the velocity would be a low number, but if you really whaled on it then the velocity would be higher. This byte is also in the range of zero to 127.

A sequencer is a device for capturing and playing back sequences of MIDI events. It has transmitters, because it typically sends the MIDI messages stored in the sequence to another device, such as a synthesizer or MIDI output port. It also has receivers, because it can capture MIDI messages and store them in a sequence. To its superinterface, MidiDevice, Sequencer adds methods for basic MIDI sequencing operations. A sequencer can load a sequence from a MIDI file, query and set the sequence's tempo, and synchronize other devices to it. An application program can register an object to be notified when the sequencer processes certain kinds of events.
Testing it out
- Download SM and unzip it
- Download and install themidibus library in the documents:processing:libraries folder
- Open Apple's Audio MIDI Setup
- Select Window>Show MIDI Window
-
Double click on the IAC Driver

- Enable Device is Online

- You can close Audio MIDI Setup
- Open Arduino 1.0 or greater.
- Upload the following program:
// ***************************************************************************************************************** // * * // * SpikenzieLabs.com * // * * // * Very Simple Serial to MIDI DEMO * // * * // ***************************************************************************************************************** // // BY: MARK DEMERS // May 2009 // VERSION: 0.1 // // DESCRIPTION: // Demo sketch to play notes from middle C in the 4th octave up to B in the 5th octave and then back down. // // // HOOK-UP: // 1. Plug USB cable from Arduino into your computer. // // // USAGE: // 1. Install and Set-up Serial MIDI Converter from SpikenzieLabs // 2. Open, compile, and upload this sketch into your Arduino. // 3. Run Serial MIDI Converter in the background. // 4. Launch your music software such as Garage Band or Ableton Live, choose a software instrument and listen to the music. // // // LEGAL: // This code is provided as is. No guaranties or warranties are given in any form. It is up to you to determine // this codes suitability for your application. // int note = 0; void setup() { Serial.begin(57600); // Default speed of the Serial to MIDI Converter serial port } void loop() { for(int note=60; note<=83; note++) // Going Up { MIDI_TX(144,note,127); // NOTE ON delay(100); MIDI_TX(128,note,127); // NOTE OFF delay(100); } for(int note=82; note>=61; note--) // Coming Down { MIDI_TX(144,note,127); // NOTE ON delay(250); MIDI_TX(128,note,127); // NOTE OFF delay(250); } } void MIDI_TX(unsigned char MESSAGE, unsigned char PITCH, unsigned char VELOCITY) { Serial.write(MESSAGE); Serial.write(PITCH); Serial.write(VELOCITY); } - Launch SM by navigating to application.macosx>source>Serial_MIDI_Converter_V2D.pde When you open it, you will be prompted to create a folder. Do that. Then rin the sketch
- Choose the serial port that the Arduino is using
This is the serial port that will be used for both serial TX and RX. Your micro-controllers serial port must be set to 57600 bps 8N1. (Even though MIDI is transmitted at 31250 bps, the serial port is set at a faster baud rate to help minimize any lag time.)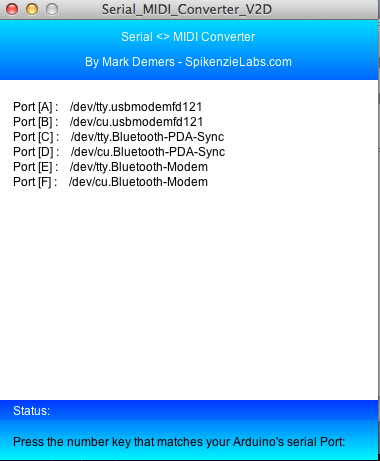
- Select 57600
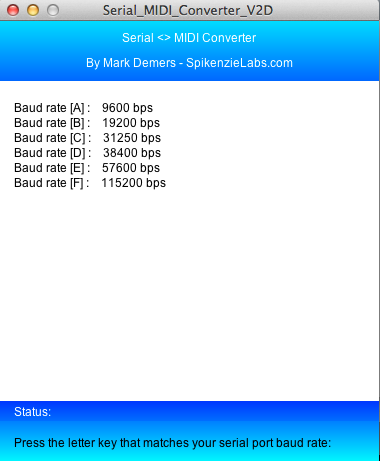
- Choose a MIDI-in port.
This is the source of MIDI data that will be sent out of the serial port. This can be a little confusing, if you are using audio software this will be the MIDI-out of the software ! If you are using an external controller like a keyboard, this will be the MIDI-in port from that device.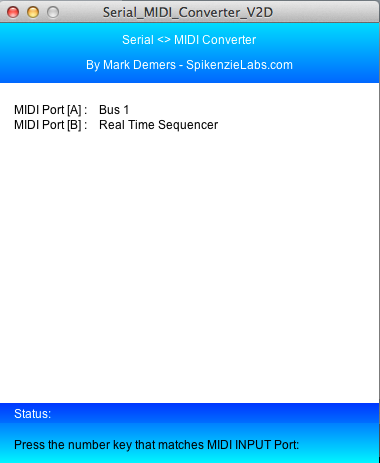
- Choose a MIDI-out port.
When the SM receives serial data it will pass the data out of this MIDI port. You will most often choose the port that your audio software uses as input, but you could also choose another MIDI device.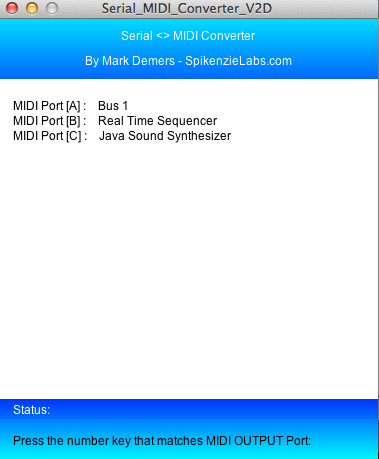
- The SM must be running to direct MIDI to and from serial ports. So, just let it run in the background.

- Open GarageBand
- Select Piano
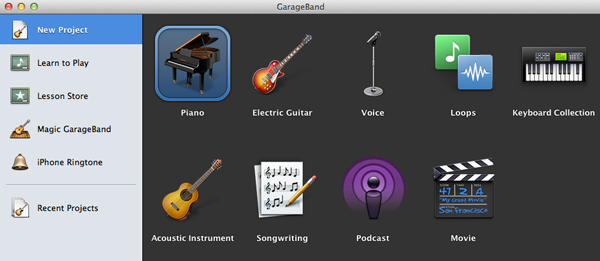
- Navigate to Preferences and open MIDI/Audio.
Select System Setting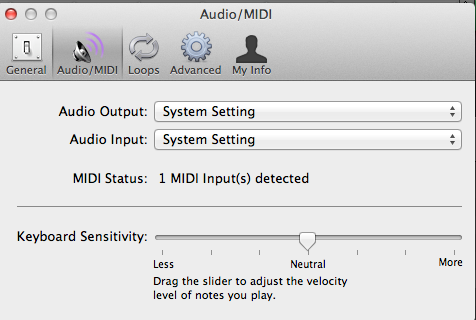
- Edit Piano and select Digital Basic
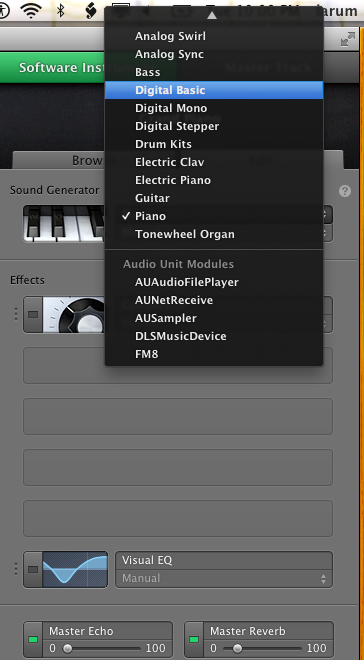
- Close and reopen GarageBand
- Hear the notes!
