Introduction
Trimble SketchUp is a free 3D modeler.
When creating your models for 3D printing your file needs to be one continuous, solid object. The printer must be able to clearly distinguish between the inside and outside of the object it is printing. There cannot be holes or gaps in the model. There are tools that can help identify an close holes and gaps, but the majority of these areas should be found and closed within the original CAD model for best results.
STL Files
In order to print your sketchup models, you'll have to convert your files to stl or obj files.SketchUp Make allows you to export your models as obj files without adding any extensions from the warehouse:


But, if you would like an stl file rather than an obj file:
- visit the extension warehouse:

-
Sign in with your google account:


- Click Accept

-
Search for stl

-
Select the SketchUp STL extension:

-
Click on Install

When you are ready to export:
- Select your model
- Select File>Export STL

- Select the attributes that you would like your file to have and then press OK

Tools
Selection Tool
Use this tool when you want to select part of your project - a line, a wall, a box, etc. If you select a line or wall with this tool then you can hit delete on your keyboard to erase your selection.
This tool is not for moving things around! Use the move/copy tool if you need to move things around.
3D Text
Use this tool to create 3D text. Click on the tool, fill in the options in the box that pops up, and then click on your project where you want to place the text.
Arc
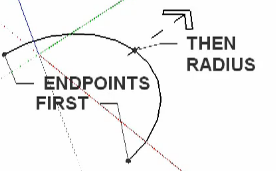
You use this tool to draw arcs (curves). Click where you want to start the arc, then click where you want to end the arc. Move your mouse around to adjust to curve, and when you have it the way you want it, click again to complete the arc.
When pulling out the radius, be aware of the inference directions. It is easy to pull in the wrong direction.
You can type in the exact radius.
If you are pulling the radius out, SketchUp will indicate when you are a perfect half circle.
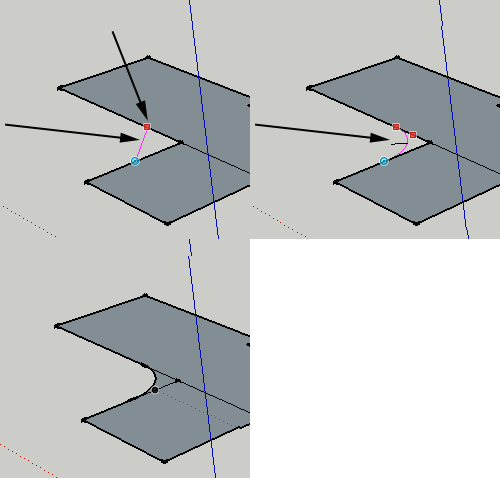
To create an arc that is tangent to two sides, click a point on one side, drag along the other side until the line turns magenta, then drag the radius until that turns magenta

You can also draw arcs in sequence. Start the next arc from the endpoint of the previous arc, as you pull away when the arc is blue it is tangent to the last arc.
Arcs are made up of 12 segments (default). You can change the number of segments by typing a number followed by s while dragging the radius.
Axes
Use this tool to reposition the location of your axes.
Circle
You use the circle tool to draw flat circles. You draw a circle by clicking and dragging outwards. You can specify the radius, by clicking, dragging and typing the the dimension of the radius, like 100mm, and then pressing the Enter key.
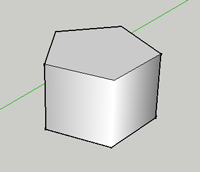
You can use the Circle Tool to draw a polygon. To make the circle a polygon, click and drag, then type the number of sides followed by s (5s) and hit the Enter key. The default number of sides of a circle is 24. When you extrude the shape drawn with the Circle tool, you will get a smooth cylinder:
When drawing another circle, you can reference the center of the first circle by hovering over the edges for a moment and then moving your cursor near the center. SketchUp will snap to the center point.
To get information on your circle or polygon, select the shape then CTRL+click and select Entity Info.
Component Maker
Components are useful for creating reusable models. To create a component:
- Draw your component in the orientation where it will be used.
- Select the Select tool (space).
- Make your selection
- Click on the Icon
- Name the component
Dimension
The dimension tool can be used to measure the length and width of a shape.
Eraser
The eraser tool will remove lines from your project. Click on edges to remove them from your shapes.
Note that removing lines will sometimes remove walls! If you remove a bounding line for a wall, the wall will disappear.
Holding SHIFT and erasing will hide an edge.
To soften edges, hold CTRL or Option and drag over the edge. Softening renders the adjoining surfaces with a smooth gradient.
Follow Me
This tool is useful for making spheres, donuts and other irregular tunnel-shapes. Draw a curve, and then draw the shape you want to follow your curve. With the follow me tool, click and drag your shape along the curve.
Freehand
Use this tool to draw irregular shapes for your project. Also handy when used with the follow me tool.
When using this tool, be careful not to cross over existing edges.
Draw to and from existing edges to properly divide surfaces.
Line
Use this tool to draw a straight line anywhere in your project. Very helpful for dividing things like walls, or putting things into your project like doors.
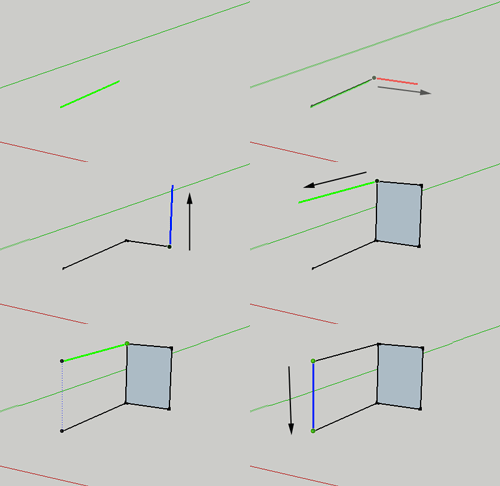
To draw a line, select the tool, click and drag. The line you draw will be colored according to the axis you are drawing on.
To specify a length for your line, begin by clicking and dragging, but then type 100mm or 100m or 100" to get a line 100mm, 100 m or 100 inches long.
To divide the line. Select the line, then CTRL+ click to bring up the context menu. Here is where you can divide your line into segments.
Look Around
Use this tool to "look around" in your project. Clicking and dragging with this tool create the equivalent effect of standing in place and looking up, down, left, right, etc.
Move/Copy
Use this tool to move things around or to copy things.
The Move tool is the auto-fold and array tool as well
Offset
Use this tool to make duplicates of flat surfaces you have already created, just in a different scale (this is very helpful when creating walls).
To use this tool, click and drag on the surface of your shapes to create a similar shape on the surface of your existing object.
Orbit
Use this tool to adjust the view of your project by rotating your position. Click and drag on your project to use this tool.
Paint Bucket
Use this tool to choose colors and to add color/texture to your walls and shapes. Click on this tool to bring up the colors palette. Choose a color, and then click on your objects to add the color or texture to your objects.
Pan
This tool will change your view of your world by moving you to the up/down/left/right, according to the direction you drag. Unlike the orbit tool, the pan tool will not rotate your view. Click and drag across your project to use this tool.
Polygon
Use this tool to draw polygons other than squares and rectangles (such as octagons, triangles, etc).
Position Camera
Use this tool to reposition your camera. Click anywhere on your project, and the camera (your point of view) will move to that position.
Previous View
Use this tool to go back to your previous view. For example, if you accidentally change your view, click this tool to go back to the view you just had.
Protractor
This tool measures angles - use it to plan the creation of angles, or to measure angles you've already created.
Push/Pull
Use this tool to give your shapes volume (ie, once you have a shape like a rectangle, use this tool to pull up on it to make a cube).
You can specify the distance you want to move my clicking, dragging and entering the number (100mm). Double-click on another surface to repeat the distance of the last Push/Pull.
To line up your extrusions, click once to start extruding a surface, then move the cursor to other geometry.This allows you to align to other geometry quickly.
You can Push/Pull a copy of the surface by pressing CTRL (WIN) or OPTION (MAC) and dragging.
Rectangle
Use this tool to draw a flat rectangle.Click once to start, drag.
To draw a rectangle with a specified width and length, start to draw the rect, then type in the dimensions separated by a comma (400mm,200mm).
Rotate
The rotate tool rotates objects, walls, and components. It works best on FLAT surfaces!
To use the rotate tool, click on a (preferably) flat surface to select the object you want to rotate. Move your mouse away from where you just clicked and click again. To start the rotation, move your mouse around. When your object is properly rotated, click to stop the rotation.
The Rotate icon will orient itself to the the surface you hover over. Select the object, choose Rotate tool, click once to anchor the center point of the rotation.
Release the mouse, move cursor away and click to establish a reference point.
Move the cursor again to rotate the object based on the reference points. Click to finish.
Scale
Use this tool to change the size of one of your objects. Click on the object you want to scale, and drag on the corners to change its size. Hold down your shift key to keep it in proportion.
Section Plane
This tool allows you to temporarily remove a plane so that you can view the interior of a model. THis is handy for eliminating unwanted internal geometries. To replace the plane, CTRL+click on the orange selection until it turns blue and then press DELETE.
Tape measure
Use this tool to measure how long something is in sketchup. Click at your starting point, and click again at your ending point. The measurement will show up in the bottom right hand corner of the window.
Text
This tool creates little signs that are attached to your buildings and objects. Use it to display information about your project.
With the tool selected, click on an object and then type the text you want to be displayed.
For annotations, select the text tool, click on the geometry you want to annotate, then move the cursor away and click to place the text.You can edit the contents by double clicking inside the box. You can also modify the annotation by CTRL+clicking on the annotation.
Walk
Using this tool can create the perspective of walking. Click and hold down on your mouse to start using this tool. Keep your mouse held down and move your cursor left and right - it should look like you are turning. Move your mouse up and down to move forwards and backwards.
Zoom Extents
Use this tool to display your entire project. If you are ever zoomed in too far or need to reset your view, click on this tool to reposition your entire project.
Zoom Window
Another type of zooming tool. click and drag a box to zoom in.
Zoom
This tool zooms your view in and out. Click it once to zoom in a little bit, or click and drag over an area you want to zoom in on.
Note that you can also zoom in (and out!) by using the scroll wheel on your mouse of you have one.
SketchUp tutorials
Importing Files
Importing an STL file
- Download the plugin that enables you to import STL files: jf_stl_importer.rb.
- Place the plugin it in the plugins folder in SketchUp.
- If SketchUp is open, close it and reopen the application.
- From the File menu, select Import
- Select STL Importer (*.STL) by Jim Foltz.
Importing a 3DS model file
SketchUp allows you to import 3D Studio (3DS) files. Import a file using the Import menu item in the File menu.- Click File > Import. The Open dialog box is displayed.
- Select the type of file to import from the Files of type (Microsoft Windows) or Format (Mac OS X) drop-down list.
-
(optional) Click on the Options button to modify the import options for the incoming file.
-
Click OK to import the file.
Note: It can take several minutes to import a large file because SketchUp's native geometry is very different from most CAD software and the conversion process is calculation-intensive. -
Click OK in the Import Results dialog box. The model will appear in the drawing area at the origin.
-
(optional) Click on the Zoom Extents tool to locate the imported model if it is not currently displayed in your drawing area.
