Clean Up
So, you've got your 3D model back from the cloud. But, wait, there are some serious problems. There are hole, disconnected parts and there is no way that model is manifold. Don't panic, there is a quick fix. MeshMixer is a free tool that can fix all your woes, and do it quickly.- MeshMixer works on a PC and OSX 10.7, but seems to particularly buggy on Snow Leopard 10.6.
I couldn't install it on a Mac with Snow Leopard, but visit the FAQ page, and maybe you'll have more luck . Download MeshMixer and install it.
- Open the application.
- Click Import to open your stl or obj file.
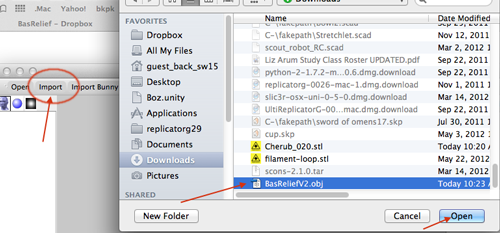
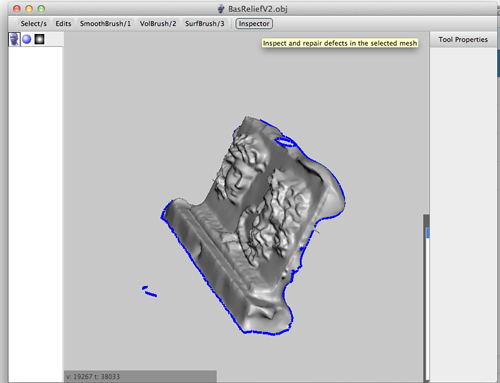
- Click Inspector.You'll see your model with a number of spheres attached to it.
Blue spheres represent holes
Red spheres represent non-manifold areas
Magenta spheres represent disconnected components
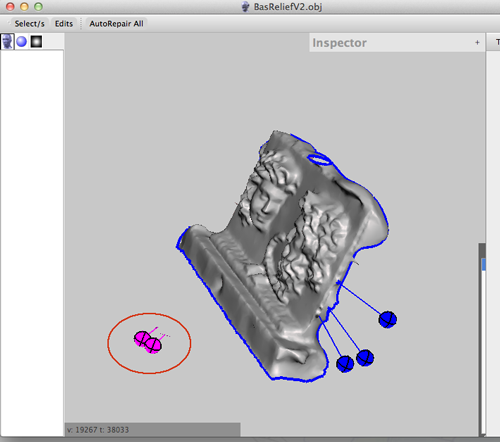
- Left clicking on a sphere will repair the problem.
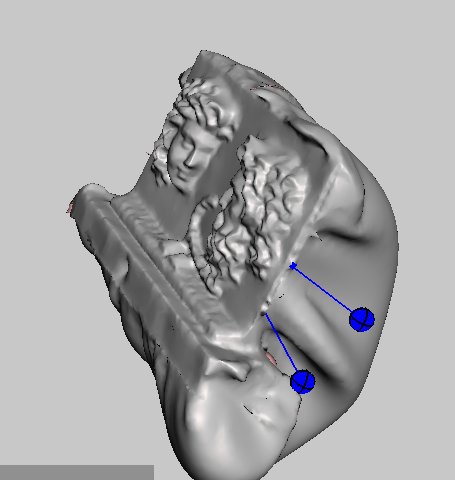
- Right clicking on the sphere will select the area and allow you to edit that part of the mesh.
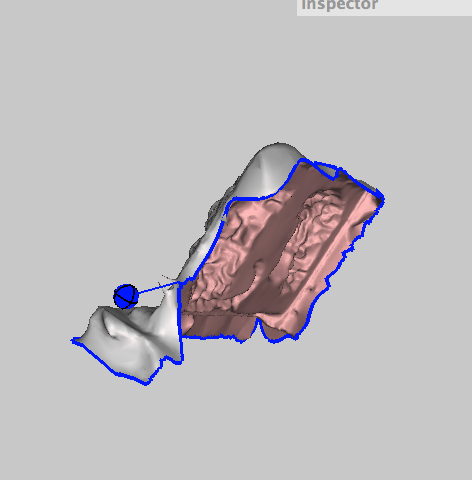
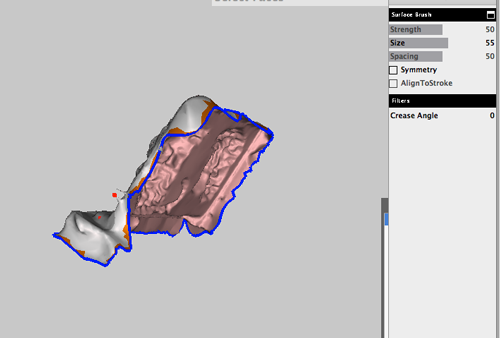
- Now you can Smooth Boundary (press Accept).
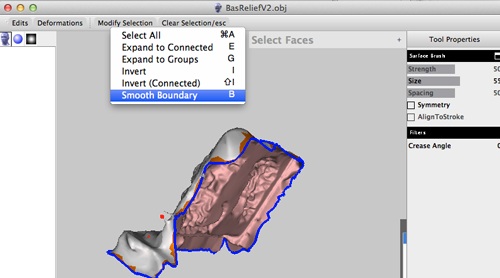
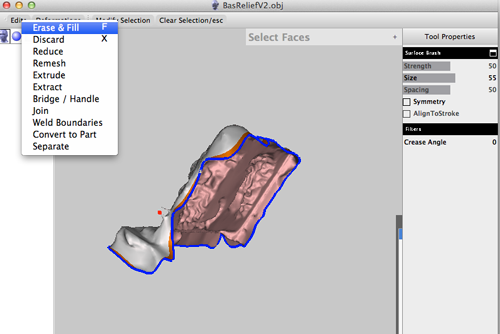
- You can do a brute force fill and use plane cuts to fix:
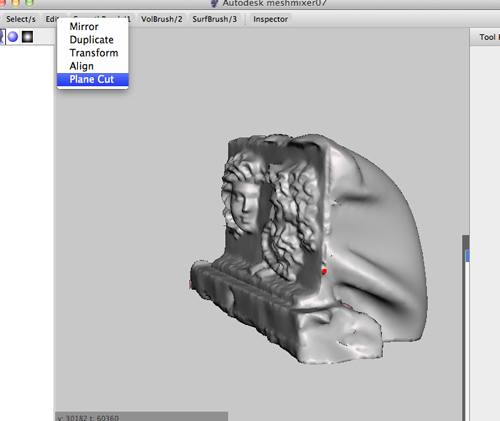
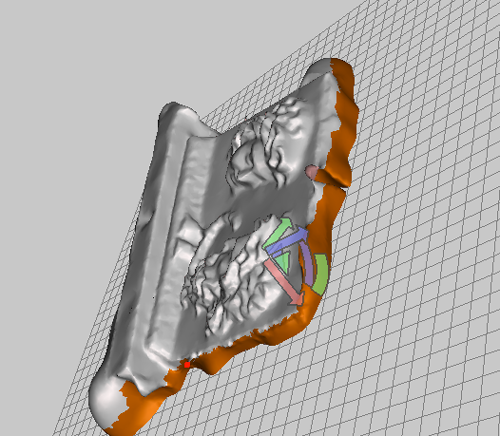
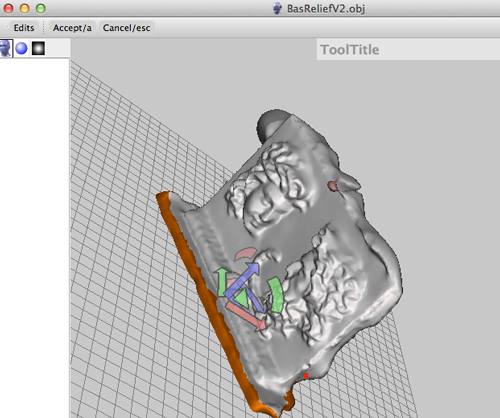
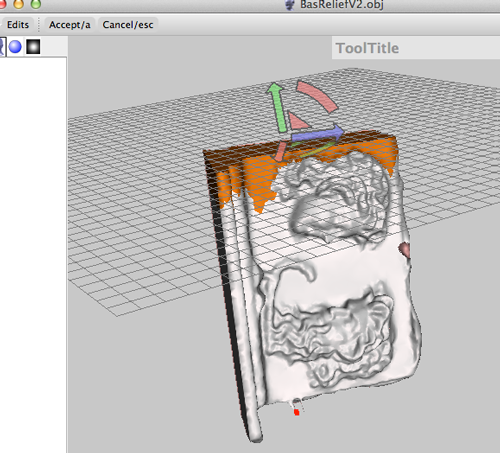
- When you're done, you can export your file as an STL.
Making Holes with Meshmixer
This tutorial created by Todd Blatt, Maker and one of former MakerBot 3D Modeler.
PC Version
- If you don't have Meshmixer installed, download it from meshmixer.com and install it. Oh, and by the way Meshmixer08 became available on October 24th!
- Start with an STL or OBJ file. You can find a variety of different stl files on
 . Once you have your STL or OBJ file, click on Import and navigate to your file:

- Press S to change to select mode.

- Left+Click to paint the area where you'd like the hole to be.

- Press W to turn wireframe mode on. You should see that your hole has jagged edges.

- Press B to select Smooth Boundary which will smooth out the edges

- If you're happy with the way the new faces will look and where the hole will be indicated by the blue line, then press A to accept.
 <
<
- Repeat the process of painting to select where you'd like a hole on the other side of the model:.

- Under the Edit menu, select Bridge / Handle, and then press A to accept:

- There will be a smooth hole punched through the model for you to thread a necklace cord or key chain.

- To be sure your model has a flat base for when you print, select the Plane Cut option from the Edit menu.

- Use the arcs to rotate the cutting plane, holding shift to snap to 90º angles, and drag the arrows to move the plane. (If this is slow, your model has a high resolution, a large number of polygons and vertices.

- Press Ato accept and your file is ready for exporting using Export in the File Menu or Export (Ctrl-E) as a new stl for a necklace!

- Slice and print. Open the model up in ReplicatorG or MakerWare and GO!
Mac Version
- If you don't have Meshmixer installed, download it from meshmixer.com and install it. Oh, and by the way Meshmixer08 became available on October 24th!
- Start with an STL or OBJ file. You can find a variety of different STL or OBJ files on
 .Once you have your STL or OBJ file, click on Import and navigate to your file:

MAC
- Press S to change to select mode.

- Left+Click to paint the area where you'd like the hole to be.

- Press W to turn wireframe mode on. You should see that your hole has jagged edges.

- Press B to select Smooth Boundary which will smooth out the edges


- If you're happy with the way the new faces will look and where the hole will be indicated by the blue line, then press A to accept.

- Repeat the process of painting to select where you'd like a hole on the other side of the model:.

- Under the Edit menu, select Bridge / Handle, and then press A to accept:

- There will be a smooth hole punched through the model for you to thread a necklace cord or key chain.

- To be sure your model has a flat base for when you print, select the Plane Cut option from the Edit menu.

- Use the arcs to rotate the cutting plane, holding shift to snap to 90º angles, and drag the arrows to move the plane. (If this is slow, your model has a high resolution, a large number of polygons and vertices.

- Press Ato accept and your file is ready for exporting using Export in the File Menu or Export (Ctrl-E) as a new stl for a necklace!

- Slice and print. Open the model up in ReplicatorG or MakerWare and GO!
Brushes
Volumetric Bushes
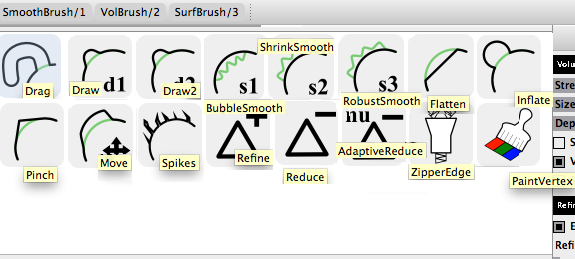
To select The Secondary brush hold down SHIFT and LeftMouse drag.
To reduce the number of triangles in the mesh:
- Select Drag

- Increase the strength of the brush
- Select Reduce and paint over the mesh

Edit Tool
Mirror
- Select how much of the model you want to mirror by adjusting the plane

- Accept the transformation

Duplicate:
- Select Duplicate


- Select Transform and move the duplicate

Transform:
- Select Transform
- Make adjustments (scale, move, rotate)
- Accept transformation (A)
- Repeat steps 2 and 3 until you get the necessary form.
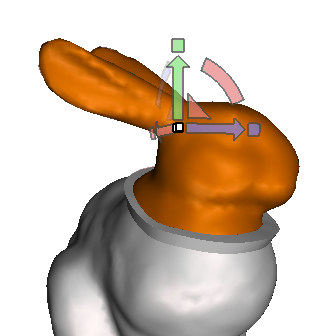
Align allows you to change the alignment.
Plane Cut allows you to cut off and make a mesh solid by adjusting and accepting the transformation.
Functions
Once you've made a selection there are a few things you can do:- Erase and Fill (F). Allows you to select an area around a hole and fill it, or remesh a selected mesh.
- Discard (X). Allows you to make a selection and discard it.
- Reduce. Allows you to select the mesh and reduce the triangles.
- Remesh. Allows you to remesh a selected area.
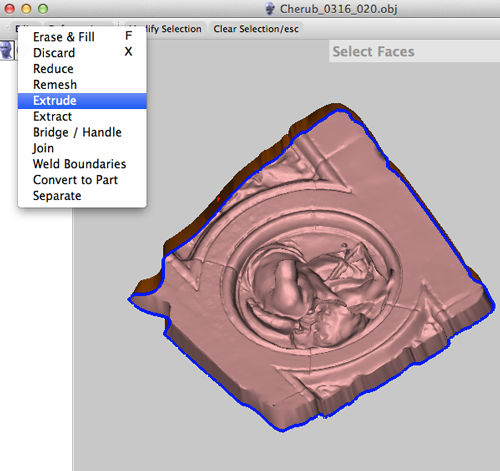
- Extrude. Allows you extrude an area by dragging the offset selector.
- Extract. Allows you to make a separated copy of your selection
- Bridge/Handle. Allows you to create support or connect two areas by making a selection of the areas.


Then reduce the triangles using the the Volumetric Brush:

This tool also allows you to make a hole:


- Join.
- Weld Boundaries. Use this tool after you have used the zipper brush.

Make a selection of the area zippered, then weld the seem together. Follow this step up with the Smooth Brush.

- Convert to part
- Separate. You use this when you want to combine two meshes.
Hotbox
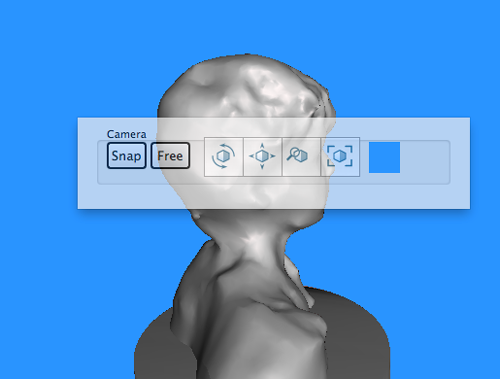
Click on the spacebar to bring up the hotbox. This tool allows you to- manipulate view-axis snapping
- manipulate camera angles
- fit-to-view on object or selection
- Allows you to select a custom background color
MeshMixer
Capping
- Open your obj or stl file:
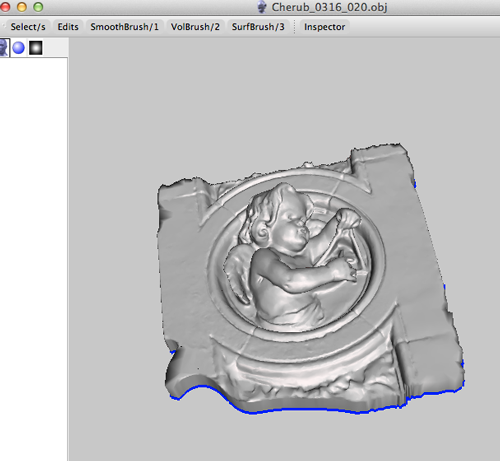
- Click on the Inspector:
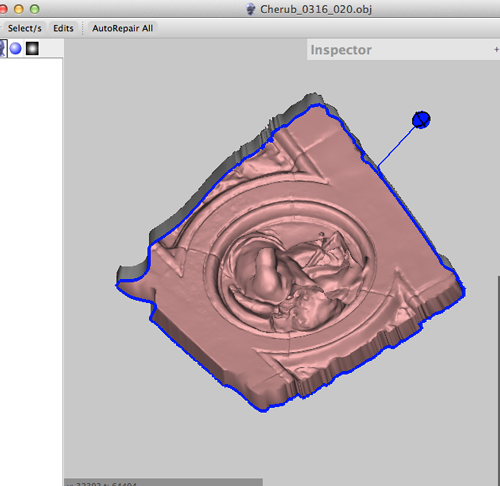
- Right click on the blue sphere to select the area:
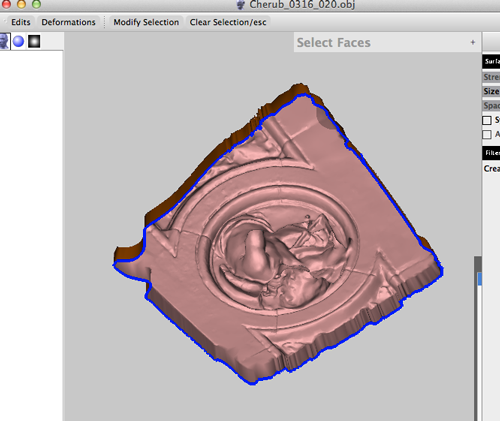
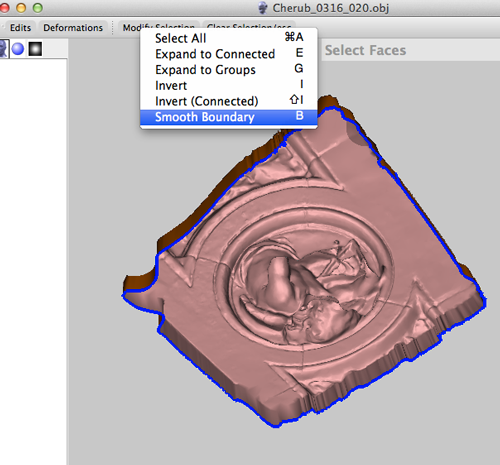
- Select Smooth Boundary (B):
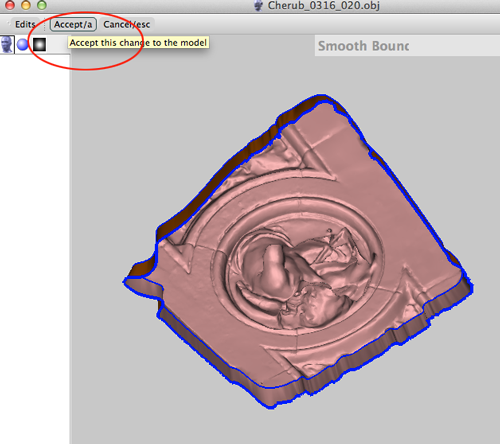
- Click on Accept (A):
- In the Edits menu select Extrude:
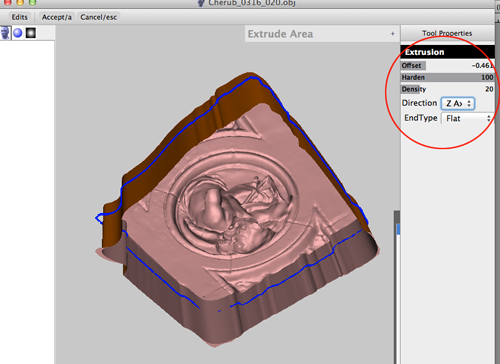
- Choose Flat and a negative offset. Drag to see the extrusion:
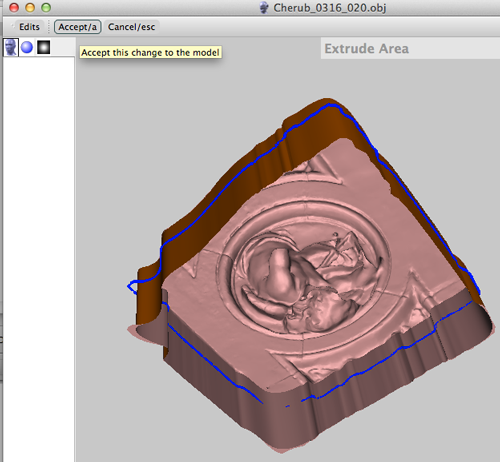
- Click on Accept (A):
- Click on the Inspector:
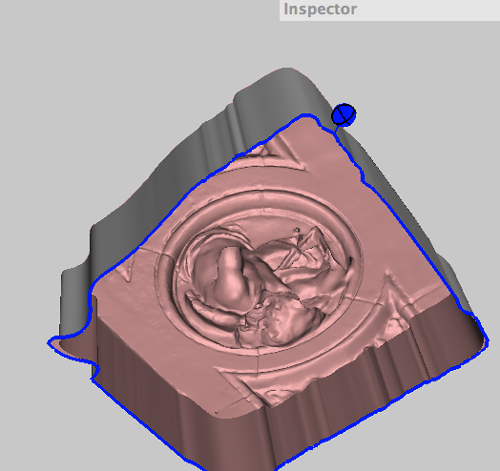
- Right click on the blue sphere and select Smooth Boundary(B):
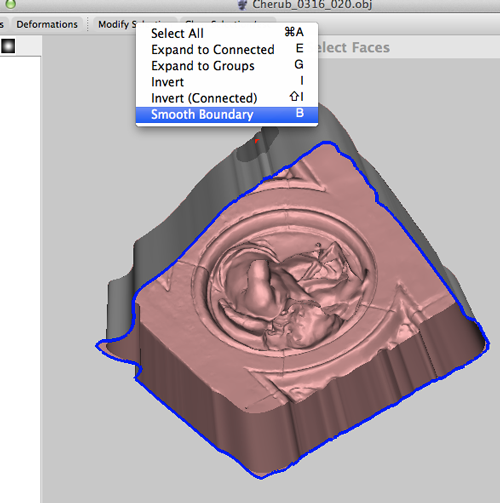
- Click on Accept (A) and select Transform Faces:
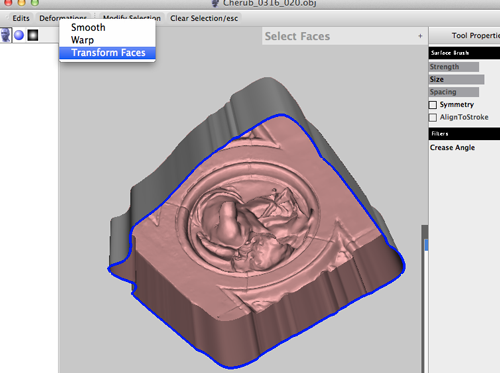
- Scale in by dragging on the white box. Don't scale in too much, though:
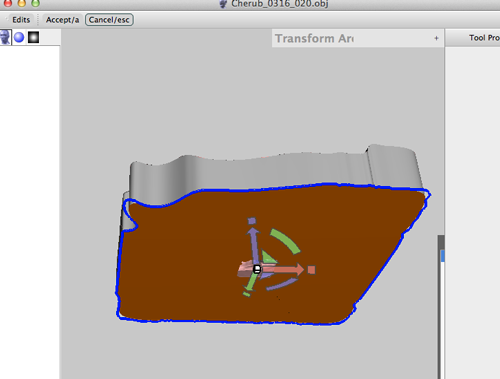
- Switch to Wireframe (W) and select the second Volumetric brush by holding SHIFT and LeftMouse dragging to simplify the mesh.
- Switch out of Wireframe (W) .
- Click Accept (A). Then make a selection and choose Erase and Fill:
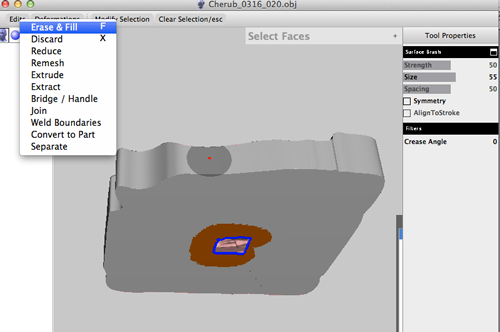
- Here is the model capped:
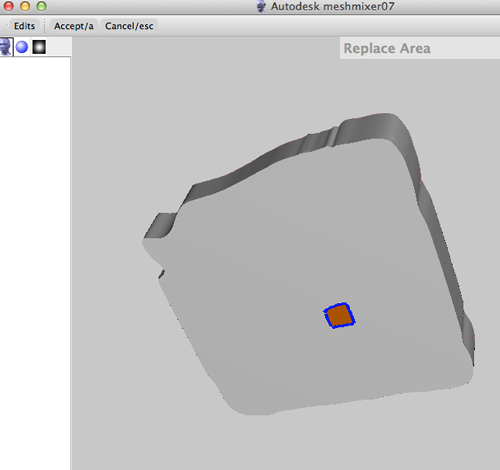
- Export your stl file.
MeshMixer
Mashups
- Import an stl or obj file
- Select a bit of the model
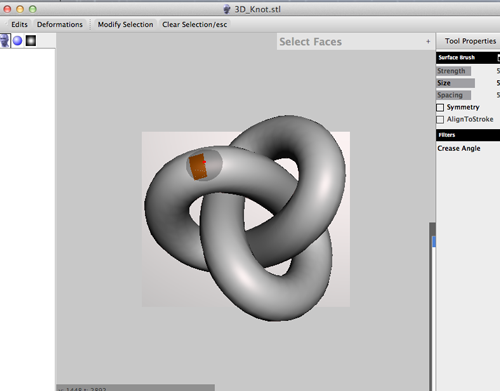
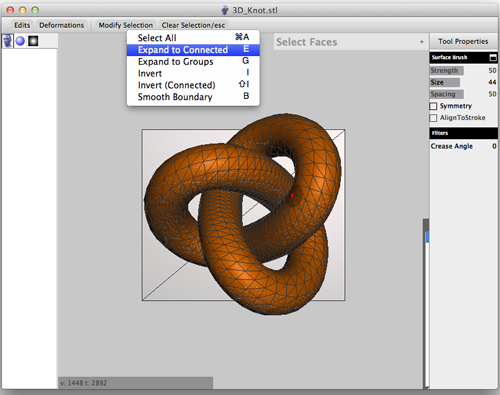
- Expand the selection
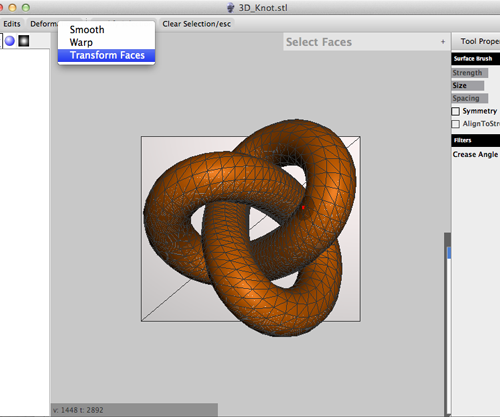
- Click on Transform Faces and move the selection
- Click on Accept (A)
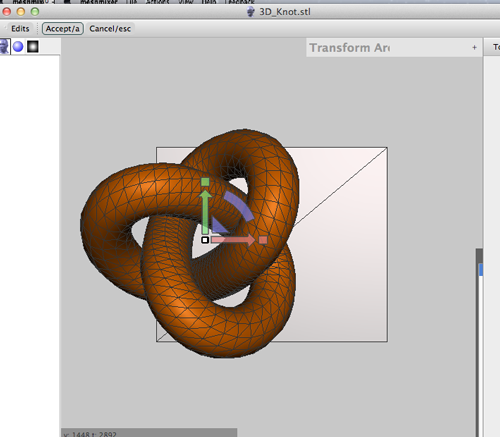
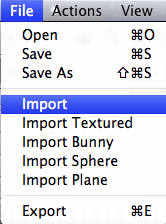
- Click on Import
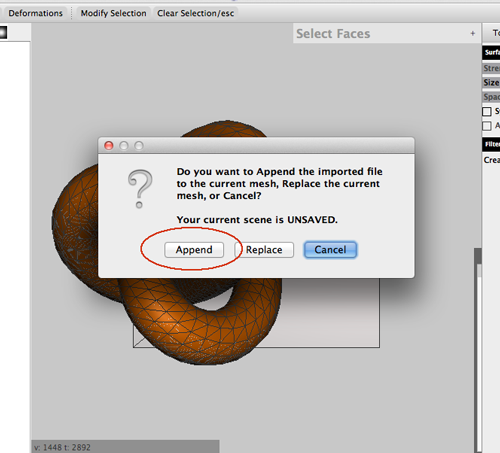
- Select Append
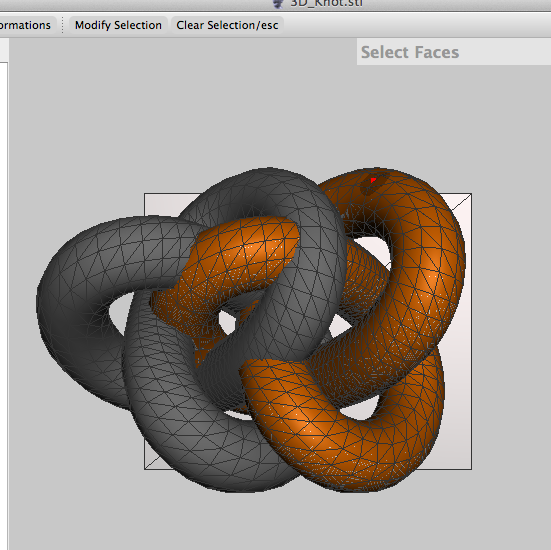
- Press Select (S), click on the second model and expand the selection (E)
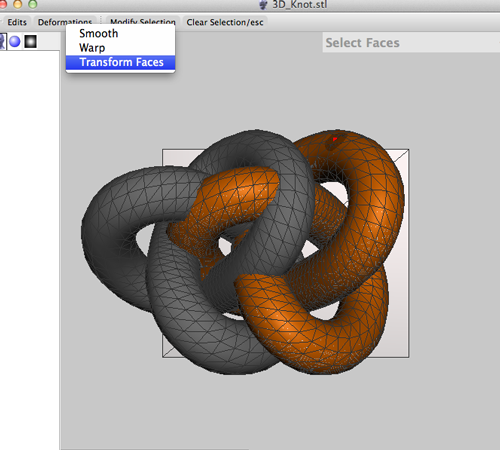
- Select Transform Faces.
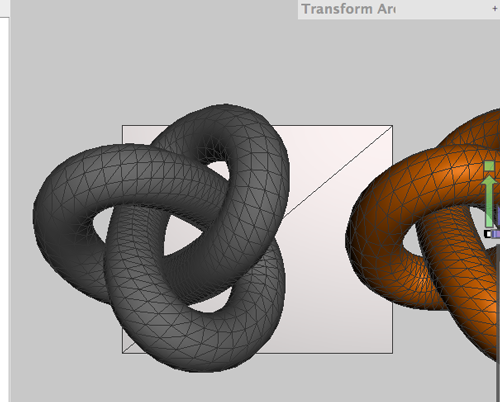
- Move the model to the right
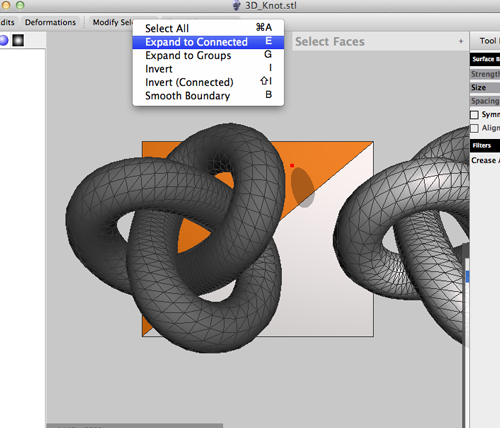
- Select the base and expand the selection.
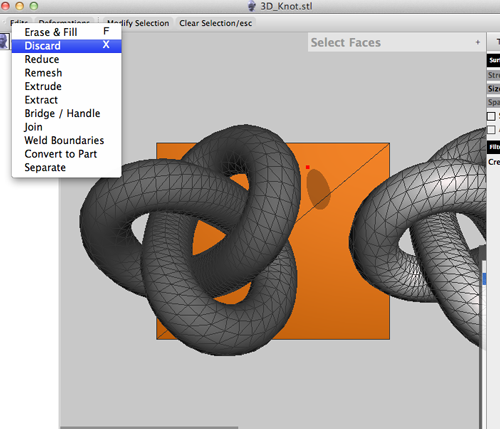
- Click Edit and select Discard (X)
- Select the second model and expand the selection
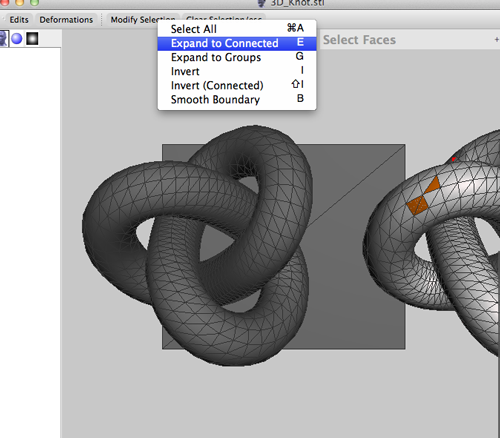
- Select Transform Faces
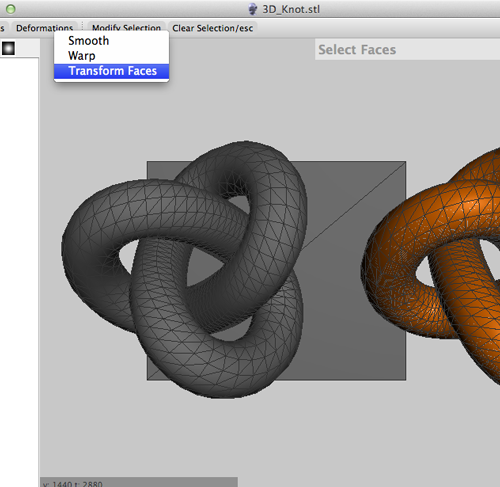
- Move and enlarge (You can scale by clicking and dragging on the white box in the center of the transform tool)
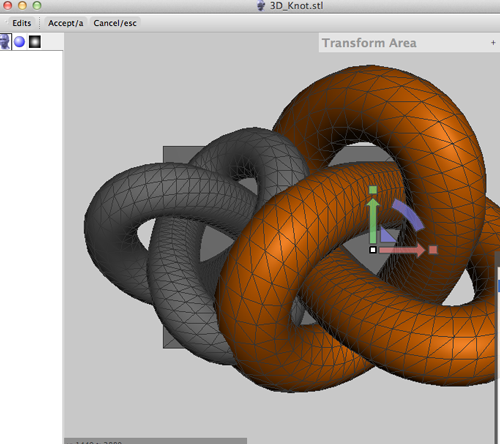
- Select Edit>Separate
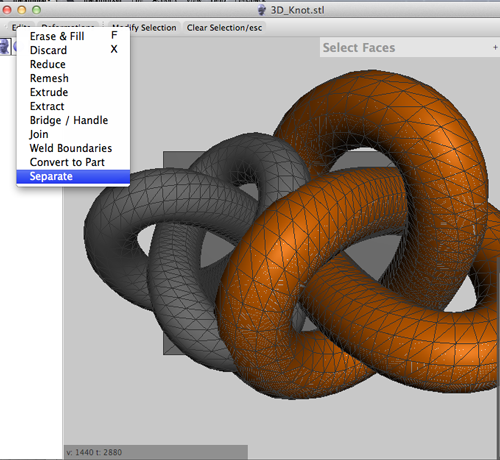
- RIGHT click on the first model to make it active. Make a selection and expand it. Then select Edit>Separate
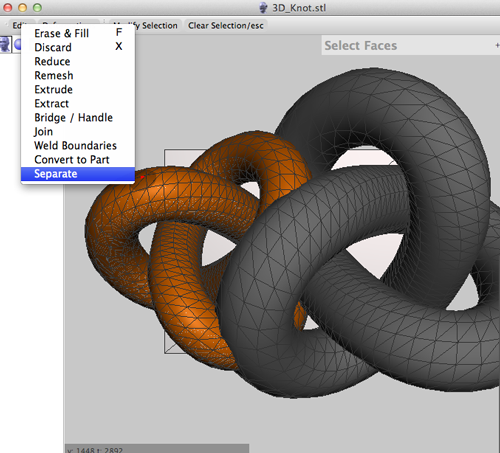
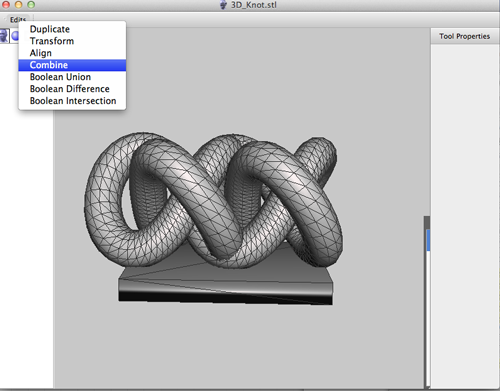
- RIGHT click on both models and select Edit>Combine
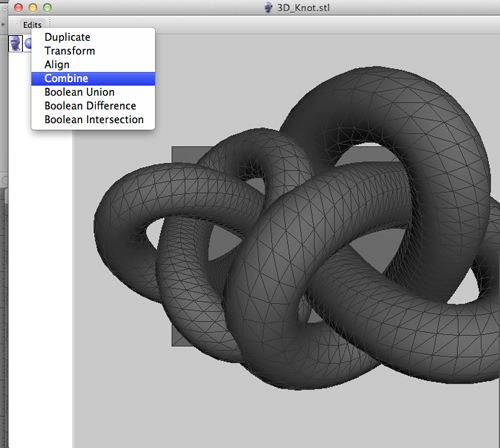
- Repeat the last process to combine the models and the base
Creating a Part
Creating a Part for Mashups
- Import an stl or obj file
- Choose Select and use the Lasso tool to make a selection:


- Smooth the boundary and accept


- Convert selection to part by selecting Edit> Convert to Part:

- Accept


- Import an stl or obj file and drag your part onto it

- Make adjustments:

Workflow
- Capture with 123D Catch.
- Fix model with MeshMixer
- Add details with the program of your choice:
- Maya
- Blender
- mudBox
- Inventor
- 3DSMax
- AutoCad
- ZBrush
- Open in ReplicatorG, skein the model.
- Print!
Hotkeys
Basic Controls
To select the entire boundary, choose Select (S) and double click on the blue line to select it. Press B to Smooth the selection.-
Alt+LeftMouse: tumble camera around object (turntable mode)
-
Alt+MiddleMouse: pan camera
-
Alt+Shift+LeftMouse: pan camera
-
Alt+RightMouse: zoom camera
-
Alt+Ctrl+LeftMouse: zoom camera
-
f: import new mesh (mesh)
-
e: Export current mesh
-
Ctrl+S: Save current .mix file / save as new .mix
-
Ctrl+O: Open existing .mix file
-
Ctrl+Z: Undo
-
Ctrl+Y: Redo
-
Alt+Left: Undo
-
Alt+Right: Redo
-
ESC: cancel current operation (selection, cut/fill, drop)
a: Accept current action
-
s: switch to Selection tool
-
w: toggle Wireframe
-
b: draw Boundary edges (useful for debugging)
-
(: previous view
-
): next view
Selection Tool
-
LeftMouse (+drag): add to selection (click, or drag to paint)
-
Shift+LeftMouse: remove from selection (click, or drag to paint)
-
RightMouse+drag: grow/shrink selection
- mouse wheel: brush size
Volume Brush Tool
- LeftMouse: apply primary brush
-
Shift+LeftMouse: apply secondary brush
-
Ctrl+LeftMouse: invert brush (only certain brushes)
-
mouse wheel: brush size
-
[: decrease brush size
-
]: increase brush size
Smoothing Tool
- left/right arrows: increase/decrease Scale parameter
- up/down arrows: increase/decrease Smooth parameter
- mouse wheel: increase/decrease Smooth parameter
